Dell DR4000 Administrator Guide - Page 90
Hardware Removal or Replacement, Shutting Down/Starting Up a DR4000 System
 |
View all Dell DR4000 manuals
Add to My Manuals
Save this manual to your list of manuals |
Page 90 highlights
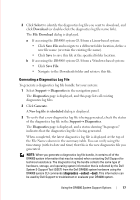
FILE LOCATION: C:\Users\bruce_wylie\Desktop\Dell Docs\~Sidewinder_Docs_DR4000\FRAME_Conversion_DR4000_AdminGuide\~DR4000_AG_F Hardware Removal or Replacement To remove or replace any DR4000 system hardware, follow the best practice shut down/start up procedure. For specific removal and replacement procedures, see the Dell DR4000 System Owner's Manual. Shutting Down/Starting Up a DR4000 System Before attempting to remove or replace any hardware component in the DR4000 system, you must observe the following best practice for shutting down and starting up: 1 Power off the DR4000 system by selecting Shutdown in the System Configuration page. For more information, see "Shutting Down the DR4000 System" on page 39. Another method for shutting down the system is to use the DR4000 system CLI command, system --shutdown. 2 Allow the DR4000 system to fully complete its power-down process (when the power supply status indicator is unlit). 3 Disconnect the DR4000 system power cables from the electrical power outlet. 4 Ensure to wait an additional period of time (up to 10 minutes), and/or verify that all of the green and amber NVRAM LEDs on the rear panel of the system chassis are unlit. NOTE: If you do not allow the NVRAM super capacitor sufficient time to discharge, the NVRAM status will report DATA LOSS when the DR4000 system is subsequently powered up. 5 Unlatch the latch release lock and slide the DR4000 system cover back and away to gain entry to the appliance internal components. To gain entry to the DR4000 system, remove the cover. For more information, see the procedures in the Dell DR4000 System Owner's Manual. 6 Remove and replace the system hardware components as needed. 7 Replace the cover, reconnect the system power cables to the electrical power outlet. DELL CONFIDENTIAL - PRELIMINARY 1/10/12 - FOR PROOF ONLY 82 Using the DR4000 System Support Options
-
 1
1 -
2
-
3
-
4
-
5
-
6
-
7
-
8
-
9
-
10
-
11
-
12
-
13
-
14
-
15
-
16
-
17
-
18
-
19
-
20
-
21
-
22
-
23
-
24
-
25
-
26
-
27
-
28
-
29
-
30
-
31
-
32
-
33
-
34
-
35
-
36
-
37
-
38
-
39
-
40
-
41
-
42
-
43
-
44
-
45
-
46
-
47
-
48
-
49
-
50
-
51
-
52
-
53
-
54
-
55
-
56
-
57
-
58
-
59
-
60
-
61
-
62
-
63
-
64
-
65
-
66
-
67
-
68
-
69
-
70
-
71
-
72
-
73
-
74
-
75
-
76
-
77
-
78
-
79
-
80
-
81
-
82
-
83
-
84
-
 85
85 -
 86
86 -
 87
87 -
 88
88 -
 89
89 -
 90
90 -
 91
91 -
 92
92 -
 93
93 -
 94
94 -
 95
95 -
96
-
97
-
98
-
99
-
100
-
101
-
102
-
103
-
104
-
105
-
106
-
107
-
108
-
109
-
110
-
111
-
112
-
113
-
114
-
115
-
116
-
117
-
118
-
119
-
120
-
121
-
122
-
123
-
124
-
125
-
126
-
127
-
128
-
129
-
130
-
131
-
132
 |
 |
