Dell EqualLogic PS6210XS EqualLogic Host Integration Tools for Microsoft Editi - Page 23
Change the Default Index File Location Using PowerShell cmdlets
 |
View all Dell EqualLogic PS6210XS manuals
Add to My Manuals
Save this manual to your list of manuals |
Page 23 highlights
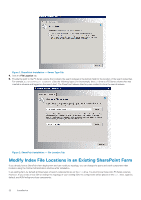
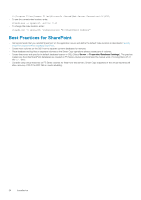
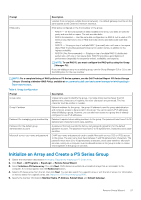
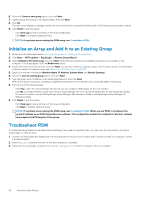
To resolve this problem: • Specify the file location during a new SharePoint installation (see Specify Index File Locations When Installing SharePoint). • Uninstall and then reinstall SharePoint with the new default file location. NOTE: Make sure your farm can handle the temporary loss of a host, such as by setting up a redundant service application. • Change the location of the different search files. See the following sections: • Change the Default Index Location Using PowerShell cmdlets • Change Index Locations Using Central Administration • Change Administration Component Index File Location • Change the SPSearch Index File Location Change the Default Index File Location Using PowerShell cmdlets To change the default index file location using Powershell cmdlets whenever a new host is provisioned for search: 1. Open Office Search. 2. Open the SharePoint PowerShell shortcut. 3. Enter the following cmdlet to see the current index location: Get-SPEnterpriseSearchServiceInstance 4. Enter the following cmdlet to change the default search index location (in this example, to E:\SharePoint Indexes): Get-SPEnterpriseSearchServiceInstance | Set-SPEnterpriseSearchServiceInstance - DefaultIndexLocation "E:\SharePoint Indexes" NOTE: If the default has not been changed during installation, you can repeat this procedure whenever a new host is provisioned for search. Change Index File Locations Using Central Administration 1. In Central Administration, select Application Management → Manage Service Applications → Search Service Application → Search Application Topology. 2. Select Modify from the drop-down menu. 3. Under Index Partition, click Query Component. 4. Select Edit Properties from the drop-down menu. 5. Change the search index file location for each query component. 6. In Crawl Component, select Edit Properties from the drop-down menu. 7. Change the index location for each crawl component. 8. Click OK to apply the topology changes. Change Administration Component Index File Location No direct method is available in Central Administration to change the administration component index file location. Instead, you can temporarily change the Administration Component server to a different server, then immediately change it back to the original server. This process forces the administration component index file location to change. Before you begin, complete the steps in Change the Default Index Location Using PowerShell cmdlets. 1. In Central Administration, click Administration Component → Edit Properties. 2. In the Edit Properties dialog box, change the Administration Component server to a different server. Click OK. NOTE: This step is temporary. 3. In Central Administration, click Administration Component → Edit Properties. 4. In the Edit Properties dialog box, change the Administration Component server to the previous (original) server, then click OK. 5. Click Apply Topology Changes. Change the SPSearch Index File Location If SPSearch is enabled on a host, change the default index location to a PS Series volume using the stsadm.exe utility. • For SharePoint 2010 SP2 or later, the default index location is: Installation 23
-
 1
1 -
2
-
3
-
4
-
5
-
6
-
7
-
8
-
9
-
10
-
11
-
12
-
13
-
14
-
15
-
16
-
17
-
 18
18 -
 19
19 -
 20
20 -
 21
21 -
 22
22 -
 23
23 -
 24
24 -
 25
25 -
 26
26 -
 27
27 -
 28
28 -
29
-
30
-
31
-
32
-
33
-
34
-
35
-
36
-
37
-
38
-
39
-
40
-
41
-
42
-
43
-
44
-
45
-
46
-
47
-
48
-
49
-
50
-
51
-
52
-
53
-
54
-
55
-
56
-
57
-
58
-
59
-
60
-
61
-
62
-
63
-
64
-
65
-
66
-
67
-
68
-
69
 |
 |
