Dell PowerEdge C6105 Hardware Owner's Manual - Page 74
System Setup Options at Boot on Place the heat sink on the processor. See
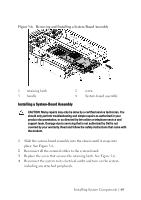
 |
View all Dell PowerEdge C6105 manuals
Add to My Manuals
Save this manual to your list of manuals |
Page 74 highlights
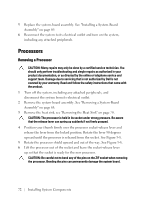
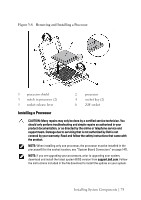
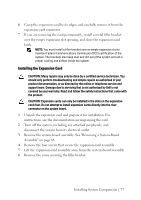
1 Unpack the processor if it has not been used previously. If the processor has already been used, remove any thermal grease from the top of the processor using a lint-free cloth. 2 Align the processor with the socket keys on the ZIF socket. See Figure 3-8. CAUTION: Positioning the processor incorrectly can permanently damage the system board or the processor. Be careful not to bend the pins in the ZIF socket. 3 With the release lever on the processor socket in the open position, align the processor with the socket keys and set the processor lightly in the socket. See Figure 3-8. CAUTION: Do not use force to seat the processor. When the processor is positioned correctly, it engages easily into the socket. 4 Close the processor shield. 5 Rotate the socket release lever down until it snaps into place. 6 Using a clean lint-free cloth, remove the thermal grease from the heat sink. 7 Apply thermal grease evenly to the center of the top of the new processor. CAUTION: Using excess thermal grease can cause grease to contact the processor shield, which can cause contamination of the processor socket. 8 Place the heat sink on the processor. See Figure 3-7. 9 Using a Phillips screwdriver, tighten the heat-sink retention screws. See Figure 3-7. 10 Replace the system-board assembly. See "Installing a System-Board Assembly" on page 69. 11 Reconnect the system to its electrical outlet and turn on the system, including any attached peripherals. 12 Press to enter the System Setup program, and check that the processor information matches the new system configuration. See "System Setup Options at Boot" on page 31. 74 | Installing System Components
-
 1
1 -
2
-
3
-
4
-
5
-
6
-
7
-
8
-
9
-
10
-
11
-
12
-
13
-
14
-
15
-
16
-
17
-
18
-
19
-
20
-
21
-
22
-
23
-
24
-
25
-
26
-
27
-
28
-
29
-
30
-
31
-
32
-
33
-
34
-
35
-
36
-
37
-
38
-
39
-
40
-
41
-
42
-
43
-
44
-
45
-
46
-
47
-
48
-
49
-
50
-
51
-
52
-
53
-
54
-
55
-
56
-
57
-
58
-
59
-
60
-
61
-
62
-
63
-
64
-
65
-
66
-
67
-
68
-
 69
69 -
 70
70 -
 71
71 -
 72
72 -
 73
73 -
 74
74 -
 75
75 -
 76
76 -
 77
77 -
 78
78 -
 79
79 -
80
-
81
-
82
-
83
-
84
-
85
-
86
-
87
-
88
-
89
-
90
-
91
-
92
-
93
-
94
-
95
-
96
-
97
-
98
-
99
-
100
-
101
-
102
-
103
-
104
-
105
-
106
-
107
-
108
-
109
-
110
-
111
-
112
-
113
-
114
-
115
-
116
-
117
-
118
-
119
-
120
-
121
-
122
-
123
-
124
-
125
-
126
-
127
-
128
-
129
-
130
-
131
-
132
-
133
-
134
-
135
-
136
-
137
-
138
-
139
-
140
-
141
-
142
-
143
-
144
-
145
-
146
-
147
-
148
-
149
-
150
-
151
-
152
-
153
-
154
-
155
-
156
-
157
-
158
-
159
-
160
-
161
-
162
-
163
-
164
-
165
-
166
 |
 |