Dell PowerEdge R540 EMC Installation and Service Manual - Page 157
Power interposer board
 |
View all Dell PowerEdge R540 manuals
Add to My Manuals
Save this manual to your list of manuals |
Page 157 highlights
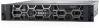
Power interposer board Removing power interposer board Prerequisites 1. Follow the safety guidelines listed in Safety instructions on page 66. 2. Follow the procedure listed in Before working inside your system on page 67. 3. Removing the air shroud on page 75 4. Disconnect all the cables connected from the PIB to the system board. NOTE: Ensure that you note the routing of the cables as you remove them from the system board. 5. Removing a processor and heat sink module on page 103 Steps 1. Using a Phillips #2 screwdriver, remove the screw securing the power interposer board (PIB) to the system. 2. Press the blue release latch on the PIB to release it from the hook on the PSU cage. 3. Lift the board and slide it out at an angle to disengage the guide pins on the board. Figure 120. Removing power interposer board 4. Lift the board away for the system. Next steps 1. Installing power interposer board on page 158 Installing and removing system components 157
-
 1
1 -
2
-
3
-
4
-
5
-
6
-
7
-
8
-
9
-
10
-
11
-
12
-
13
-
14
-
15
-
16
-
17
-
18
-
19
-
20
-
21
-
22
-
23
-
24
-
25
-
26
-
27
-
28
-
29
-
30
-
31
-
32
-
33
-
34
-
35
-
36
-
37
-
38
-
39
-
40
-
41
-
42
-
43
-
44
-
45
-
46
-
47
-
48
-
49
-
50
-
51
-
52
-
53
-
54
-
55
-
56
-
57
-
58
-
59
-
60
-
61
-
62
-
63
-
64
-
65
-
66
-
67
-
68
-
69
-
70
-
71
-
72
-
73
-
74
-
75
-
76
-
77
-
78
-
79
-
80
-
81
-
82
-
83
-
84
-
85
-
86
-
87
-
88
-
89
-
90
-
91
-
92
-
93
-
94
-
95
-
96
-
97
-
98
-
99
-
100
-
101
-
102
-
103
-
104
-
105
-
106
-
107
-
108
-
109
-
110
-
111
-
112
-
113
-
114
-
115
-
116
-
117
-
118
-
119
-
120
-
121
-
122
-
123
-
124
-
125
-
126
-
127
-
128
-
129
-
130
-
131
-
132
-
133
-
134
-
135
-
136
-
137
-
138
-
139
-
140
-
141
-
142
-
143
-
144
-
145
-
146
-
147
-
148
-
149
-
150
-
151
-
 152
152 -
 153
153 -
 154
154 -
 155
155 -
 156
156 -
 157
157 -
 158
158 -
 159
159 -
 160
160 -
 161
161 -
 162
162 -
163
-
164
-
165
-
166
-
167
-
168
-
169
-
170
-
171
-
172
-
173
-
174
-
175
 |
 |
