Epson F6200 User Manual - Page 28
Saving Sets of Media Settings, Ready, Parent topic, Related tasks, Custom Paper Setting
 |
View all Epson F6200 manuals
Add to My Manuals
Save this manual to your list of manuals |
Page 28 highlights
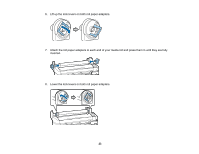
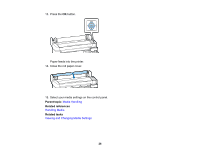
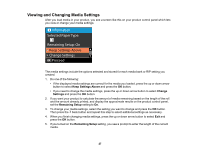
6. Press the up or down arrow button to select a roll length from 15 to 3000 feet (5 and 999.5 m) long and press the OK button. Note: You can select the roll length in 19.7 inch (0.5 m) increments. After a moment you see the message Ready on the product control panel indicating that it is ready to print. Parent topic: Media Handling Related tasks Saving Sets of Media Settings Saving Sets of Media Settings You can store sets of media settings for each type of media you use. This lets you quickly select all the necessary settings whenever you print on that media type. The media settings include the options selected and stored for each media bank or RIP setting you created. Note: Make sure that you loaded the media type for which you are selecting settings. 1. On the product control panel, press the left or right arrow button to select the tab and press the OK button. The Paper menu appears. 2. Press the up or down arrow button to select Custom Paper Setting and press the OK button. The Custom Paper Setting menu appears. 3. Press the up or down arrow button to select a number for the set of media settings (from 1 to 10) and press the OK button. 4. To select a reference media type that is close to the characteristics of the media you are adding, select Select Reference Paper and press the OK button. 5. Press the up or down arrow button to select the reference media type and press the OK button. 6. Press the back button twice to return to the paper settings menu. 7. Press the up or down arrow button to select Setting Name and press the OK button. 8. Press the up or down arrow button to display the letters and symbols you can use to name the media setting. When you see the desired character, press the right arrow button to move to the next 28
-
 1
1 -
2
-
3
-
4
-
5
-
6
-
7
-
8
-
9
-
10
-
11
-
12
-
13
-
14
-
15
-
16
-
17
-
18
-
19
-
20
-
21
-
22
-
 23
23 -
 24
24 -
 25
25 -
 26
26 -
 27
27 -
 28
28 -
 29
29 -
 30
30 -
 31
31 -
 32
32 -
 33
33 -
34
-
35
-
36
-
37
-
38
-
39
-
40
-
41
-
42
-
43
-
44
-
45
-
46
-
47
-
48
-
49
-
50
-
51
-
52
-
53
-
54
-
55
-
56
-
57
-
58
-
59
-
60
-
61
-
62
-
63
-
64
-
65
-
66
-
67
-
68
-
69
-
70
-
71
-
72
-
73
-
74
-
75
-
76
-
77
-
78
-
79
-
80
-
81
-
82
-
83
-
84
-
85
-
86
-
87
-
88
-
89
-
90
-
91
-
92
-
93
-
94
-
95
-
96
-
97
-
98
-
99
-
100
-
101
-
102
-
103
-
104
-
105
-
106
-
107
-
108
-
109
-
110
-
111
-
112
 |
 |