Epson F6200 User Manual - Page 42
Using the Control Panel Menus, Checking for Clogged Print Head Nozzles, Cleaning the Print Head - maintenance kit
 |
View all Epson F6200 manuals
Add to My Manuals
Save this manual to your list of manuals |
Page 42 highlights
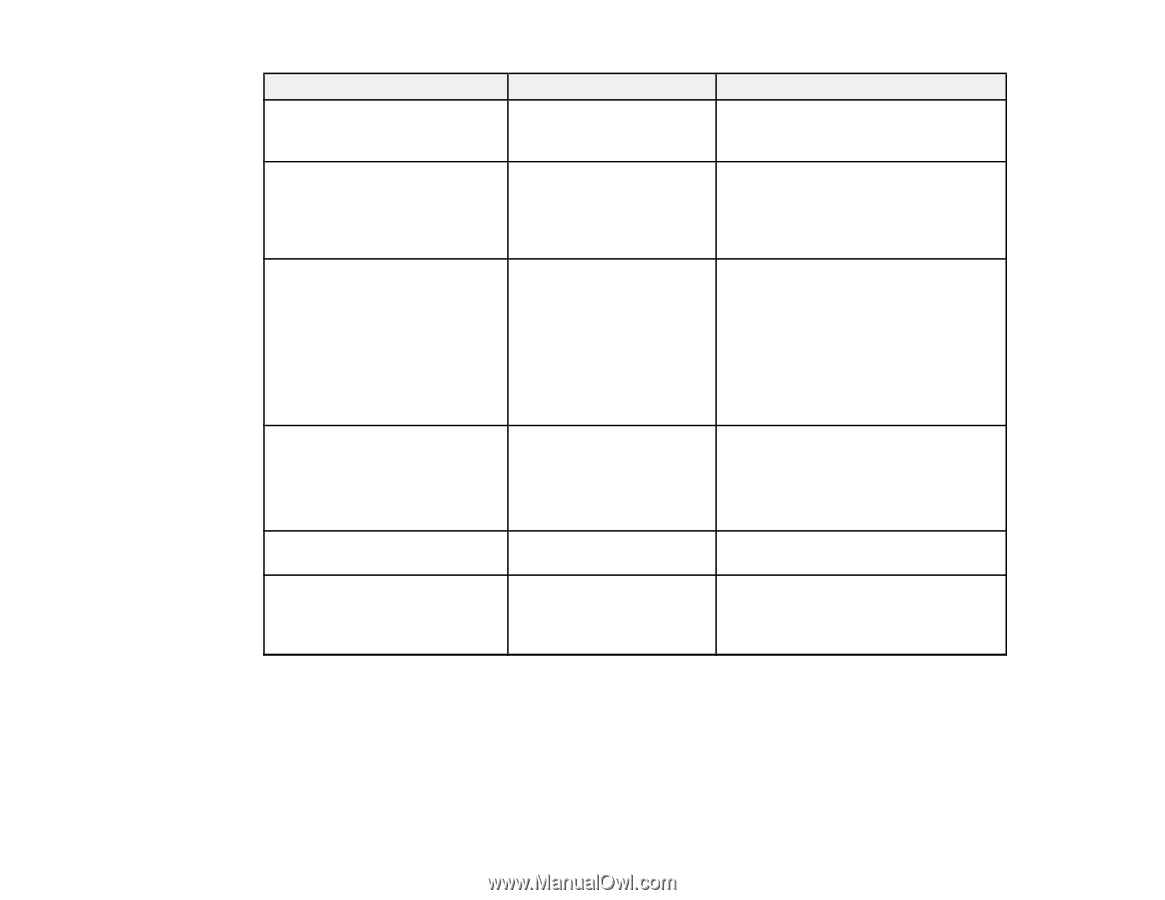
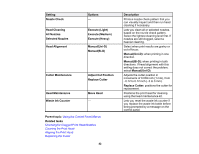
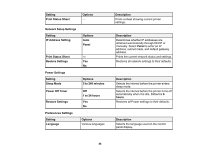
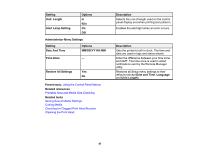
Setting Nozzle Check Head Cleaning All Nozzles Selected Nozzles Head Alignment Options - Execute (Light) Execute (Medium) Execute (Heavy) Manual(Uni-D) Manual(Bi-D) Cutter Maintenance Head Maintenance Waste Ink Counter Adjust Cut Position Replace Cutter Move Head - Parent topic: Using the Control Panel Menus Related tasks Checking for Clogged Print Head Nozzles Cleaning the Print Head Aligning the Print Head Replacing the Cutter 42 Description Prints a nozzle check pattern that you can visually inspect and then run head cleaning if necessary. Lets you clean all or selected nozzles, based on the nozzle check pattern. Select the lightest cleaning level first. If nozzles are still clogged, select a heavier cleaning. Select when print results are grainy or out of focus: Manual(Uni-D): when printing in one direction. Manual(Bi-D): when printing in both directions. If head alignment with this setting does not correct the problem, select Manual(Uni-D). Adjusts the cutter position in increments of 0.039 inch (1 mm), from -0.12 to 0.12 inch (-3 to 3 mm). Replace Cutter: positions the cutter for replacement. Positions the print head for cleaning using the head maintenance kit. Lets you reset the waste ink counter if you replace the waste ink bottle before being prompted by a message on the control panel.
-
 1
1 -
2
-
3
-
4
-
5
-
6
-
7
-
8
-
9
-
10
-
11
-
12
-
13
-
14
-
15
-
16
-
17
-
18
-
19
-
20
-
21
-
22
-
23
-
24
-
25
-
26
-
27
-
28
-
29
-
30
-
31
-
32
-
33
-
34
-
35
-
36
-
 37
37 -
 38
38 -
 39
39 -
 40
40 -
 41
41 -
 42
42 -
 43
43 -
 44
44 -
 45
45 -
 46
46 -
 47
47 -
48
-
49
-
50
-
51
-
52
-
53
-
54
-
55
-
56
-
57
-
58
-
59
-
60
-
61
-
62
-
63
-
64
-
65
-
66
-
67
-
68
-
69
-
70
-
71
-
72
-
73
-
74
-
75
-
76
-
77
-
78
-
79
-
80
-
81
-
82
-
83
-
84
-
85
-
86
-
87
-
88
-
89
-
90
-
91
-
92
-
93
-
94
-
95
-
96
-
97
-
98
-
99
-
100
-
101
-
102
-
103
-
104
-
105
-
106
-
107
-
108
-
109
-
110
-
111
-
112
 |
 |