GE 60-806-95R-16Z Installation Instructions - Page 37
Reporting Menu, Aux. Panic 0401, Police Panic 0402, Keychain TP Arm 0403, Star Is No Delay 0404,
 |
UPC - 046188090938
View all GE 60-806-95R-16Z manuals
Add to My Manuals
Save this manual to your list of manuals |
Page 37 highlights
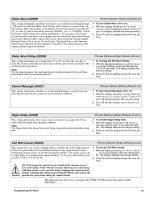
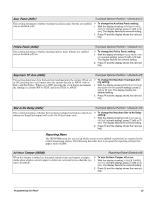
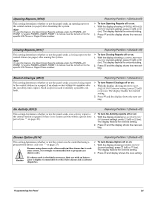
Aux. Panic (0401) Touchpad Options-Partition 1 (Default=on) This setting determines whether touchpad auxiliary panic buttons are enabled (on) or disabled (off). ¾ To change the Auxiliary Panic setting: 1. With the display showing AUXILIARY PANIC OFF/ON (current setting), press 1 (off) or 2 (on). The display flashes the entered setting. 2. Press ƒ and the display shows the new setting. Police Panic (0402) This setting determines whether touchpad police panic buttons are enabled (on) or disabled (off) on. Touchpad Options-Partition 1 (Default=on) ¾ To change the Police Panic setting: 1. With the display showing POLICE PANIC OFF/ ON (current setting), press 1 (off) or 2 (on). The display flashes the entered setting. 2. Press ƒ and the display shows the new setting. Keychain TP Arm (0403) Touchpad Options-Partition 1 (Default=off) This setting determines how the keychain touchpad arms the system. When set to ON, pressing the LOCK button arms the system directly to AWAY with no Entry and Exit Delay. When set to OFF, pressing the LOCK button increments the arming level from OFF to STAY and from STAY to AWAY. ¾ To change the Keychain Touchpad Arming setting: 1. With the display showing KEYCHAIN TOUCHPAD ARM OFF/ON (current setting), press 1 (off) or 2 (on). The display flashes the entered setting. 2. Press ƒ and the display shows the new setting. Star Is No Delay (0404) Touchpad Options-Partition 1 (Default=off) This setting determines whether the keychain touchpad star button controls an onboard or SnapCard output (off) or the No Delay feature (on). ¾ To change the Keychain Star Is No Delay setting: 1. With the display showing STAR IS NO DELAY OFF/ON (current setting), press 1 (off) or 2 (on). The display flashes the entered setting. 2. Press ƒ and the display shows the new setting. Reporting Menu The REPORTING menu lets you set up which system events (global or partition) are reported to the central monitoring station. The following describes how to program the reporting settings that appear under GLOBAL. 24-Hour Tamper (05000) Reporting-Global (Default=off) When this feature is turned on, the panel sounds sirens and reports a tamper ¾ To turn 24-Hour Tamper off or on: alarm when wireless sensor tamper switches are activated (even when the sys- 1. With the display showing 24-HOUR TAMPER tem is disarmed). OFF/ON (current setting), press 1 (off) or 2 (on). The display flashes the entered setting. 2. Press ƒ and the display shows the new setting. Programming the Panel 32
-
 1
1 -
2
-
3
-
4
-
5
-
6
-
7
-
8
-
9
-
10
-
11
-
12
-
13
-
14
-
15
-
16
-
17
-
18
-
19
-
20
-
21
-
22
-
23
-
24
-
25
-
26
-
27
-
28
-
29
-
30
-
31
-
 32
32 -
 33
33 -
 34
34 -
 35
35 -
 36
36 -
 37
37 -
 38
38 -
 39
39 -
 40
40 -
 41
41 -
 42
42 -
43
-
44
-
45
-
46
-
47
-
48
-
49
-
50
-
51
-
52
-
53
-
54
-
55
-
56
-
57
-
58
-
59
-
60
-
61
-
62
-
63
-
64
-
65
-
66
-
67
-
68
-
69
-
70
-
71
-
72
-
73
-
74
-
75
-
76
 |
 |
