GE 60-806-95R-16Z Installation Instructions - Page 44
Learn Sensors 070, Sensor Text 071
 |
UPC - 046188090938
View all GE 60-806-95R-16Z manuals
Add to My Manuals
Save this manual to your list of manuals |
Page 44 highlights
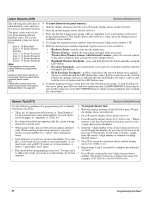
Learn Sensors (070) Sensors (Default=none) The following describes how to ¾ To Learn Sensors into panel memory: learn hardwire zones and wire- 1. With the display showing SENSORS, press ƒ and the display shows LEARN SENSORS. less devices into panel memory. 2. Press ƒ and the display shows SENSOR GROUP 0. The panel comes with six factory programmed onboard hardwire zones. The factory programmed setting are listed 3. Enter the desired 2-digit sensor group + ƒ (see Appendix A for a description of all sensor group characteristics). The display shows TRIP SENSOR nn, where nn is the displayed (next available) sensor number. below: 4. To change the displayed sensor number, enter the desired 2-digit sensor number + ƒ. Zone 1: 10-Entry/Exit 5. With the desired sensor number displayed, trip the sensor or zone as follows: Zone 2: 17-Instant Interior Follower Zone 3: 13-Instant Perimeter Zone 4: 13-Instant Perimeter Zone 5: 13-Instant Perimeter • Hardwire Zones-trip the zone into the alarm state. • Wireless Sensors-follow the instructions included with each sensor. Wireless Door/Window Sensors with External Contacts-place the external contact in the alarm condition, then activate the sensor tamper switch. Zone 6: 13-Instant Perimeter • Handheld Wireless Touchpads-press and hold the BYPASS button until the touchpad Note LED flashes. Clearing panel memory also clears all factory programmed zones. • Keychain Touchpads-press and hold the LOCK and UNLOCK buttons together until the touchpad LED flashes. • ELM Keychain Touchpads-a.) Press and release the UNLOCK button twice quickly, Install an end-of-line resistor on all unused, factory programmed, onboard panel zones OR then press and hold until the LED flashes three times. b.) Press and release the UNLOCK button once quickly, then press and hold until the LED flashes two times. c.) Press and hold the UNLOCK button until the LED flashes once. Delete the unused zone from panel memory (see "Accessory Modules Menu" on page 40). 6. Continue tripping sensors to learn them into the selected sensor group. To stop learning sensors into a group, press , twice and start again from step 1 (LEARN SENSORS) to learn sensors into another group (or use the EDIT SENSORS menu to change group assignment after learning the sensor/zone). Sensor Text (071) Sensors (Default=none) Use the following guidelines for programming text to identify zone/sensor locations. • There are 16 character/word locations or "Item Numbers" for each zone/sensor name. Item numbers for each character/word appear in "Appendix A, Table A4." • If a desired word does not appear in the list, create it using characters (custom text). ¾ To program Sensor Text: 1. With the display showing LEARN SENSORS, press B until the display shows SENSOR TEXT. 2. Press ƒ and the display shows TEXT FOR SN 01. 3. Press ƒ and the display shows SN 01 ITEM 00 000 -. Where ITEM 00 is the first character/word location and 000 is the 3-digit character/word number. • When using words, spaces between them appear automati- 4. Enter the 3-digit number of the desired character/word or cally. When creating words using characters, you must scroll through the numbers by pressing B (forward) or by reserve an item number for a "space" after creating the pressing A (backward). If you make a mistake, simply word. enter the correct 3-digit number or continue scrolling • Each character or word uses up one item number. For exam- through choices. ple, a word from the list counts as one item number. A cre- 5. Press ƒ to accept the displayed choice and the display ated word, such as BOY'S counts as six item numbers, 4 shows SN 01 ITEM 01 000 -. letters, 1 apostrophe, and 1 space. 6. Repeat steps 4 and 5 as needed to complete the zone/sen- • Plan ahead before programming sensor text. You may need sor name. to abbreviate words you create to avoid running out of item 7. Press , after entering the last 3-digit character/word numbers. number. The display shows the complete text name. For example, TEXT FOR SN 01 FRONT ENTRY DOOR. 39 Programming the Panel
-
 1
1 -
2
-
3
-
4
-
5
-
6
-
7
-
8
-
9
-
10
-
11
-
12
-
13
-
14
-
15
-
16
-
17
-
18
-
19
-
20
-
21
-
22
-
23
-
24
-
25
-
26
-
27
-
28
-
29
-
30
-
31
-
32
-
33
-
34
-
35
-
36
-
37
-
38
-
 39
39 -
 40
40 -
 41
41 -
 42
42 -
 43
43 -
 44
44 -
 45
45 -
 46
46 -
 47
47 -
 48
48 -
 49
49 -
50
-
51
-
52
-
53
-
54
-
55
-
56
-
57
-
58
-
59
-
60
-
61
-
62
-
63
-
64
-
65
-
66
-
67
-
68
-
69
-
70
-
71
-
72
-
73
-
74
-
75
-
76
 |
 |