HP 1300 Service Manual - Page 102
Removing the laser/scanner 2 of 2,
 |
UPC - 808736419819
View all HP 1300 manuals
Add to My Manuals
Save this manual to your list of manuals |
Page 102 highlights
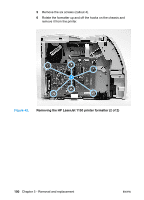
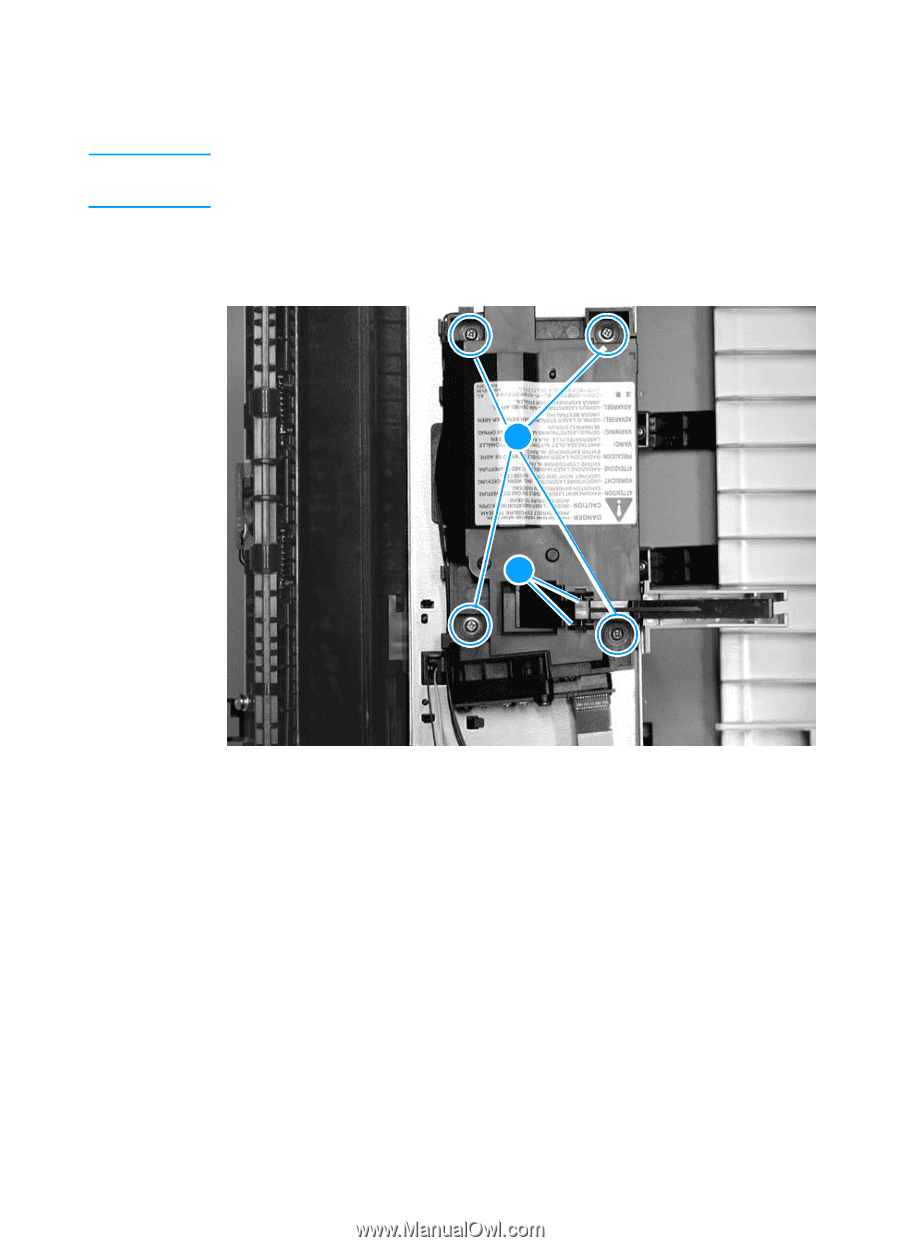
Note 7 Release the two tabs (callout 3), one on each side of the shutter lever, and lift the shutter lever straight up to remove it. Be sure to release both tabs to avoid breaking one of the tabs. Make sure you do not misplace the small spring that is under the shutter lever. 8 Remove four screws (callout 4) and then lift the assembly off of the printer. 4 3 Figure 45. Removing the laser/scanner (2 of 2) To reinstall Insert the spring into the hole on the laser/scanner before you snap the shutter lever back into place. 102 Chapter 5 - Removal and replacement ENWW
-
 1
1 -
2
-
3
-
4
-
5
-
6
-
7
-
8
-
9
-
10
-
11
-
12
-
13
-
14
-
15
-
16
-
17
-
18
-
19
-
20
-
21
-
22
-
23
-
24
-
25
-
26
-
27
-
28
-
29
-
30
-
31
-
32
-
33
-
34
-
35
-
36
-
37
-
38
-
39
-
40
-
41
-
42
-
43
-
44
-
45
-
46
-
47
-
48
-
49
-
50
-
51
-
52
-
53
-
54
-
55
-
56
-
57
-
58
-
59
-
60
-
61
-
62
-
63
-
64
-
65
-
66
-
67
-
68
-
69
-
70
-
71
-
72
-
73
-
74
-
75
-
76
-
77
-
78
-
79
-
80
-
81
-
82
-
83
-
84
-
85
-
86
-
87
-
88
-
89
-
90
-
91
-
92
-
93
-
94
-
95
-
96
-
 97
97 -
 98
98 -
 99
99 -
 100
100 -
 101
101 -
 102
102 -
 103
103 -
 104
104 -
 105
105 -
 106
106 -
 107
107 -
108
-
109
-
110
-
111
-
112
-
113
-
114
-
115
-
116
-
117
-
118
-
119
-
120
-
121
-
122
-
123
-
124
-
125
-
126
-
127
-
128
-
129
-
130
-
131
-
132
-
133
-
134
-
135
-
136
-
137
-
138
-
139
-
140
-
141
-
142
-
143
-
144
-
145
-
146
-
147
-
148
-
149
-
150
-
151
-
152
-
153
-
154
-
155
-
156
-
157
-
158
-
159
-
160
-
161
-
162
-
163
-
164
-
165
-
166
-
167
-
168
-
169
-
170
-
171
-
172
-
173
-
174
-
175
-
176
-
177
-
178
-
179
-
180
-
181
-
182
-
183
-
184
-
185
-
186
-
187
-
188
-
189
-
190
-
191
-
192
-
193
-
194
-
195
-
196
-
197
-
198
-
199
-
200
-
201
-
202
-
203
-
204
-
205
-
206
-
207
-
208
-
209
-
210
-
211
-
212
-
213
-
214
-
215
-
216
-
217
-
218
-
219
-
220
-
221
-
222
 |
 |
102
Chapter 5 - Removal and replacement
ENWW
7
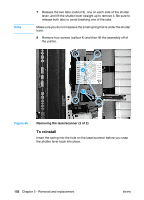
Release the two tabs (callout 3), one on each side of the shutter
lever, and lift the shutter lever straight up to remove it. Be sure to
release both tabs to avoid breaking one of the tabs.
Note
Make sure you do not misplace the small spring that is under the shutter
lever.
8
Remove four screws (callout 4) and then lift the assembly off of
the printer.
Figure 45.
Removing the laser/scanner (2 of 2)
To reinstall
Insert the spring into the hole on the laser/scanner before you snap
the shutter lever back into place.
3
4