HP 1300 Service Manual - Page 43
With one hand, position the new separation pad in the slot of the, base down with one hand
 |
UPC - 808736419819
View all HP 1300 manuals
Add to My Manuals
Save this manual to your list of manuals |
Page 43 highlights
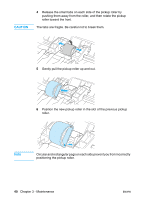
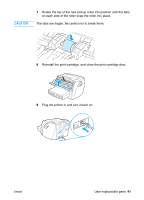
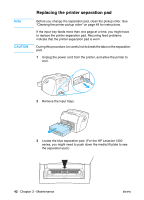
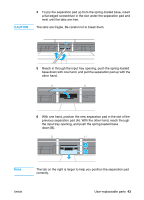
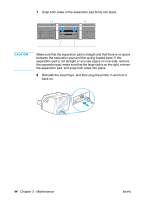
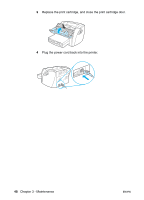
CAUTION 4 To pry the separation pad up from the spring-loaded base, insert a flat-edged screwdriver in the slot under the separation pad and twist until the tabs are free. The tabs are fragile. Be careful not to break them. 5 Reach in through the input tray opening, push the spring-loaded base down with one hand, and pull the separation pad up with the other hand. 6 With one hand, position the new separation pad in the slot of the previous separation pad (A). With the other hand, reach through the input tray opening, and push the spring-loaded base down (B). Note The tab on the right is larger to help you position the separation pad correctly. ENWW User-replaceable parts 43
-
 1
1 -
2
-
3
-
4
-
5
-
6
-
7
-
8
-
9
-
10
-
11
-
12
-
13
-
14
-
15
-
16
-
17
-
18
-
19
-
20
-
21
-
22
-
23
-
24
-
25
-
26
-
27
-
28
-
29
-
30
-
31
-
32
-
33
-
34
-
35
-
36
-
37
-
 38
38 -
 39
39 -
 40
40 -
 41
41 -
 42
42 -
 43
43 -
 44
44 -
 45
45 -
 46
46 -
 47
47 -
 48
48 -
49
-
50
-
51
-
52
-
53
-
54
-
55
-
56
-
57
-
58
-
59
-
60
-
61
-
62
-
63
-
64
-
65
-
66
-
67
-
68
-
69
-
70
-
71
-
72
-
73
-
74
-
75
-
76
-
77
-
78
-
79
-
80
-
81
-
82
-
83
-
84
-
85
-
86
-
87
-
88
-
89
-
90
-
91
-
92
-
93
-
94
-
95
-
96
-
97
-
98
-
99
-
100
-
101
-
102
-
103
-
104
-
105
-
106
-
107
-
108
-
109
-
110
-
111
-
112
-
113
-
114
-
115
-
116
-
117
-
118
-
119
-
120
-
121
-
122
-
123
-
124
-
125
-
126
-
127
-
128
-
129
-
130
-
131
-
132
-
133
-
134
-
135
-
136
-
137
-
138
-
139
-
140
-
141
-
142
-
143
-
144
-
145
-
146
-
147
-
148
-
149
-
150
-
151
-
152
-
153
-
154
-
155
-
156
-
157
-
158
-
159
-
160
-
161
-
162
-
163
-
164
-
165
-
166
-
167
-
168
-
169
-
170
-
171
-
172
-
173
-
174
-
175
-
176
-
177
-
178
-
179
-
180
-
181
-
182
-
183
-
184
-
185
-
186
-
187
-
188
-
189
-
190
-
191
-
192
-
193
-
194
-
195
-
196
-
197
-
198
-
199
-
200
-
201
-
202
-
203
-
204
-
205
-
206
-
207
-
208
-
209
-
210
-
211
-
212
-
213
-
214
-
215
-
216
-
217
-
218
-
219
-
220
-
221
-
222
 |
 |

ENWW
User-replaceable parts
43
4
To pry the separation pad up from the spring-loaded base, insert
a flat-edged screwdriver in the slot under the separation pad and
twist until the tabs are free.
CAUTION
The tabs are fragile. Be careful not to break them.
5
Reach in through the input tray opening, push the spring-loaded
base down with one hand, and pull the separation pad up with the
other hand.
6
With one hand, position the new separation pad in the slot of the
previous separation pad (A). With the other hand, reach through
the input tray opening, and push the spring-loaded base
down (B).
Note
The tab on the right is larger to help you position the separation pad
correctly.