HP 1300 Service Manual - Page 91
Print cartridge door, Removing the print cartridge door 1 of 2
 |
UPC - 808736419819
View all HP 1300 manuals
Add to My Manuals
Save this manual to your list of manuals |
Page 91 highlights
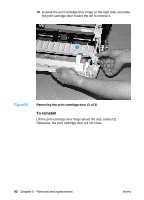
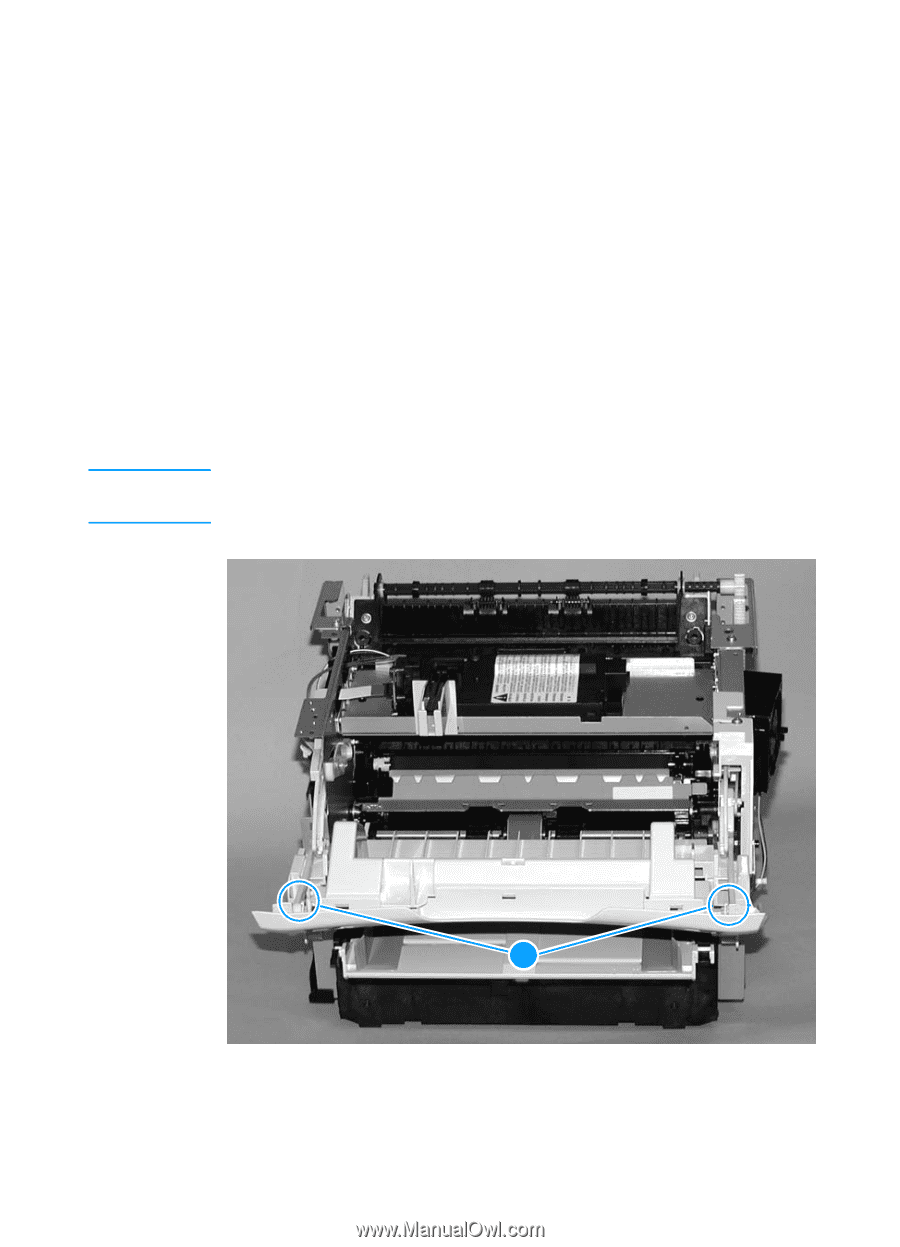
Note Print cartridge door 1 Remove the left side cover (see "Left side cover" on page 81). 2 Remove the back cover (see "Back cover" on page 82). 3 Remove the right side cover (see "Right side cover" on page 84). 4 Remove the top cover (see "Top cover" on page 87). 5 Remove the control panel assembly (see "Control panel assembly" on page 88). 6 Remove the front cover (see "Front cover assembly" on page 89). 7 Open the print cartridge door. 8 At the right side, press the two small tabs (callout 1) on the inside of the connecting link to release it. 9 Repeat on the left side. After the print cartridge door is removed, it is easy to remove the two connecting links. 1 Figure 34. Removing the print cartridge door (1 of 2) ENWW Covers 91
-
 1
1 -
2
-
3
-
4
-
5
-
6
-
7
-
8
-
9
-
10
-
11
-
12
-
13
-
14
-
15
-
16
-
17
-
18
-
19
-
20
-
21
-
22
-
23
-
24
-
25
-
26
-
27
-
28
-
29
-
30
-
31
-
32
-
33
-
34
-
35
-
36
-
37
-
38
-
39
-
40
-
41
-
42
-
43
-
44
-
45
-
46
-
47
-
48
-
49
-
50
-
51
-
52
-
53
-
54
-
55
-
56
-
57
-
58
-
59
-
60
-
61
-
62
-
63
-
64
-
65
-
66
-
67
-
68
-
69
-
70
-
71
-
72
-
73
-
74
-
75
-
76
-
77
-
78
-
79
-
80
-
81
-
82
-
83
-
84
-
85
-
 86
86 -
 87
87 -
 88
88 -
 89
89 -
 90
90 -
 91
91 -
 92
92 -
 93
93 -
 94
94 -
 95
95 -
 96
96 -
97
-
98
-
99
-
100
-
101
-
102
-
103
-
104
-
105
-
106
-
107
-
108
-
109
-
110
-
111
-
112
-
113
-
114
-
115
-
116
-
117
-
118
-
119
-
120
-
121
-
122
-
123
-
124
-
125
-
126
-
127
-
128
-
129
-
130
-
131
-
132
-
133
-
134
-
135
-
136
-
137
-
138
-
139
-
140
-
141
-
142
-
143
-
144
-
145
-
146
-
147
-
148
-
149
-
150
-
151
-
152
-
153
-
154
-
155
-
156
-
157
-
158
-
159
-
160
-
161
-
162
-
163
-
164
-
165
-
166
-
167
-
168
-
169
-
170
-
171
-
172
-
173
-
174
-
175
-
176
-
177
-
178
-
179
-
180
-
181
-
182
-
183
-
184
-
185
-
186
-
187
-
188
-
189
-
190
-
191
-
192
-
193
-
194
-
195
-
196
-
197
-
198
-
199
-
200
-
201
-
202
-
203
-
204
-
205
-
206
-
207
-
208
-
209
-
210
-
211
-
212
-
213
-
214
-
215
-
216
-
217
-
218
-
219
-
220
-
221
-
222
 |
 |
ENWW
Covers
91
Print cartridge door
1
Remove the left side cover (see “Left side cover” on page 81).
2
Remove the back cover (see “Back cover” on page 82).
3
Remove the right side cover (see “Right side cover” on page 84).
4
Remove the top cover (see “Top cover” on page 87).
5
Remove the control panel assembly (see “Control panel
assembly” on page 88).
6
Remove the front cover (see “Front cover assembly” on page 89).
7
Open the print cartridge door.
8
At the right side, press the two small tabs (callout 1) on the inside
of the connecting link to release it.
9
Repeat on the left side.
Note
After the print cartridge door is removed, it is easy to remove the two
connecting links.
Figure 34.
Removing the print cartridge door (1 of 2)
1