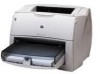
HP 1300 Service Manual - Page 7

HP 1300 - LaserJet B/W Laser Printer Manual

Page 7 highlights

Figures Figure 1. Figure 2. Figure 3. Figure 4. Figure 5. Figure 6. Figure 7. Figure 8. Figure 9. Figure 10. Figure 11. Figure 12. Figure 13. Figure 14. Figure 15. Figure 16. Figure 17. Figure 18. Figure 19. Figure 20. Figure 21. Figure 22. Figure 23. Figure 24. Figure 25. Figure 26. Figure 27. Figure 28. Figure 29. Figure 30. Figure 31. Figure 32. Figure 33. Figure 34. Figure 35. Figure 36. Figure 37. Figure 38. Figure 39. Figure 40. Figure 41. HP LaserJet 1150 printer label (220 volt 19 HP LaserJet 1300 printer label (110 volt 19 HP LaserJet 1300 printer label (220 volt 19 Front and side view 20 Back and side view 21 Dimensions of printer 28 Printer control panel 29 Light status legend 30 Output bin 36 Straight-through output door 36 Basic configuration 54 Printer unit functional block diagram 58 ECU loads 60 Overview of laser/scanner operation 61 High-voltage power supply circuit 63 Image formation block diagram 64 Printer path 68 Solenoid, photosensors, and switches 70 General timing diagram 72 Removing the print cartridge 76 Printer differences (front 79 Printer differences (left side 79 Printer differences (right side 80 Removing the left side cover 81 Removing the back cover (1 of 2 82 Removing the back cover (2 of 2 83 Removing the right side cover (1 of 3 84 Removing the right side cover (2 of 3 85 Removing the right side cover (3 of 3 86 Removing the top cover 87 Removing the control panel 88 Removing the front cover (1 of 2 89 Removing the front cover (2 of 2 90 Removing the print cartridge door (1 of 2 91 Removing the print cartridge door (2 of 2 92 Removing the front guide assembly (1 of 3 93 Removing the front guide assembly (2 of 3 94 Removing the front guide assembly (3 of 3 95 Removing the transfer roller 96 Removing the HP LaserJet 1300 series formatter (1 of 2 97 Removing the HP LaserJet 1300 series formatter (2 of 2 98 ENWW Figures vii

  • 1
  • 2
  • 3
  • 4
  • 5
  • 6
  • 7
  • 8
  • 9
  • 10
  • 11
  • 12
  • 13
  • 14
  • 15
  • 16
  • 17
  • 18
  • 19
  • 20
  • 21
  • 22
  • 23
  • 24
  • 25
  • 26
  • 27
  • 28
  • 29
  • 30
  • 31
  • 32
  • 33
  • 34
  • 35
  • 36
  • 37
  • 38
  • 39
  • 40
  • 41
  • 42
  • 43
  • 44
  • 45
  • 46
  • 47
  • 48
  • 49
  • 50
  • 51
  • 52
  • 53
  • 54
  • 55
  • 56
  • 57
  • 58
  • 59
  • 60
  • 61
  • 62
  • 63
  • 64
  • 65
  • 66
  • 67
  • 68
  • 69
  • 70
  • 71
  • 72
  • 73
  • 74
  • 75
  • 76
  • 77
  • 78
  • 79
  • 80
  • 81
  • 82
  • 83
  • 84
  • 85
  • 86
  • 87
  • 88
  • 89
  • 90
  • 91
  • 92
  • 93
  • 94
  • 95
  • 96
  • 97
  • 98
  • 99
  • 100
  • 101
  • 102
  • 103
  • 104
  • 105
  • 106
  • 107
  • 108
  • 109
  • 110
  • 111
  • 112
  • 113
  • 114
  • 115
  • 116
  • 117
  • 118
  • 119
  • 120
  • 121
  • 122
  • 123
  • 124
  • 125
  • 126
  • 127
  • 128
  • 129
  • 130
  • 131
  • 132
  • 133
  • 134
  • 135
  • 136
  • 137
  • 138
  • 139
  • 140
  • 141
  • 142
  • 143
  • 144
  • 145
  • 146
  • 147
  • 148
  • 149
  • 150
  • 151
  • 152
  • 153
  • 154
  • 155
  • 156
  • 157
  • 158
  • 159
  • 160
  • 161
  • 162
  • 163
  • 164
  • 165
  • 166
  • 167
  • 168
  • 169
  • 170
  • 171
  • 172
  • 173
  • 174
  • 175
  • 176
  • 177
  • 178
  • 179
  • 180
  • 181
  • 182
  • 183
  • 184
  • 185
  • 186
  • 187
  • 188
  • 189
  • 190
  • 191
  • 192
  • 193
  • 194
  • 195
  • 196
  • 197
  • 198
  • 199
  • 200
  • 201
  • 202
  • 203
  • 204
  • 205
  • 206
  • 207
  • 208
  • 209
  • 210
  • 211
  • 212
  • 213
  • 214
  • 215
  • 216
  • 217
  • 218
  • 219
  • 220
  • 221
  • 222

ENWW
Figures
vii
Figures
Figure 1.
HP LaserJet 1150 printer label (220 volt). . . . . . . . . . . . . . . . . . . . . . . 19
Figure 2.
HP LaserJet 1300 printer label (110 volt). . . . . . . . . . . . . . . . . . . . . . . 19
Figure 3.
HP LaserJet 1300 printer label (220 volt). . . . . . . . . . . . . . . . . . . . . . . 19
Figure 4.
Front and side view . . . . . . . . . . . . . . . . . . . . . . . . . . . . . . . . . . . . . . . 20
Figure 5.
Back and side view. . . . . . . . . . . . . . . . . . . . . . . . . . . . . . . . . . . . . . . . 21
Figure 6.
Dimensions of printer . . . . . . . . . . . . . . . . . . . . . . . . . . . . . . . . . . . . . . 28
Figure 7.
Printer control panel . . . . . . . . . . . . . . . . . . . . . . . . . . . . . . . . . . . . . . . 29
Figure 8.
Light status legend . . . . . . . . . . . . . . . . . . . . . . . . . . . . . . . . . . . . . . . . 30
Figure 9.
Output bin. . . . . . . . . . . . . . . . . . . . . . . . . . . . . . . . . . . . . . . . . . . . . . . 36
Figure 10.
Straight-through output door. . . . . . . . . . . . . . . . . . . . . . . . . . . . . . . . . 36
Figure 11.
Basic configuration . . . . . . . . . . . . . . . . . . . . . . . . . . . . . . . . . . . . . . . . 54
Figure 12.
Printer unit functional block diagram . . . . . . . . . . . . . . . . . . . . . . . . . . 58
Figure 13.
ECU loads . . . . . . . . . . . . . . . . . . . . . . . . . . . . . . . . . . . . . . . . . . . . . . 60
Figure 14.
Overview of laser/scanner operation . . . . . . . . . . . . . . . . . . . . . . . . . . 61
Figure 15.
High-voltage power supply circuit. . . . . . . . . . . . . . . . . . . . . . . . . . . . . 63
Figure 16.
Image formation block diagram . . . . . . . . . . . . . . . . . . . . . . . . . . . . . . 64
Figure 17.
Printer path. . . . . . . . . . . . . . . . . . . . . . . . . . . . . . . . . . . . . . . . . . . . . . 68
Figure 18.
Solenoid, photosensors, and switches . . . . . . . . . . . . . . . . . . . . . . . . . 70
Figure 19.
General timing diagram
. . . . . . . . . . . . . . . . . . . . . . . . . . . . . . . . . . . 72
Figure 20.
Removing the print cartridge . . . . . . . . . . . . . . . . . . . . . . . . . . . . . . . . 76
Figure 21.
Printer differences (front) . . . . . . . . . . . . . . . . . . . . . . . . . . . . . . . . . . . 79
Figure 22.
Printer differences (left side). . . . . . . . . . . . . . . . . . . . . . . . . . . . . . . . . 79
Figure 23.
Printer differences (right side) . . . . . . . . . . . . . . . . . . . . . . . . . . . . . . . 80
Figure 24.
Removing the left side cover . . . . . . . . . . . . . . . . . . . . . . . . . . . . . . . . 81
Figure 25.
Removing the back cover (1 of 2). . . . . . . . . . . . . . . . . . . . . . . . . . . . . 82
Figure 26.
Removing the back cover (2 of 2). . . . . . . . . . . . . . . . . . . . . . . . . . . . . 83
Figure 27.
Removing the right side cover (1 of 3) . . . . . . . . . . . . . . . . . . . . . . . . . 84
Figure 28.
Removing the right side cover (2 of 3) . . . . . . . . . . . . . . . . . . . . . . . . . 85
Figure 29.
Removing the right side cover (3 of 3) . . . . . . . . . . . . . . . . . . . . . . . . . 86
Figure 30.
Removing the top cover . . . . . . . . . . . . . . . . . . . . . . . . . . . . . . . . . . . . 87
Figure 31.
Removing the control panel . . . . . . . . . . . . . . . . . . . . . . . . . . . . . . . . . 88
Figure 32.
Removing the front cover (1 of 2). . . . . . . . . . . . . . . . . . . . . . . . . . . . . 89
Figure 33.
Removing the front cover (2 of 2). . . . . . . . . . . . . . . . . . . . . . . . . . . . . 90
Figure 34.
Removing the print cartridge door (1 of 2) . . . . . . . . . . . . . . . . . . . . . . 91
Figure 35.
Removing the print cartridge door (2 of 2) . . . . . . . . . . . . . . . . . . . . . . 92
Figure 36.
Removing the front guide assembly (1 of 3). . . . . . . . . . . . . . . . . . . . . 93
Figure 37.
Removing the front guide assembly (2 of 3). . . . . . . . . . . . . . . . . . . . . 94
Figure 38.
Removing the front guide assembly (3 of 3). . . . . . . . . . . . . . . . . . . . . 95
Figure 39.
Removing the transfer roller . . . . . . . . . . . . . . . . . . . . . . . . . . . . . . . . . 96
Figure 40.
Removing the HP LaserJet 1300 series formatter (1 of 2) . . . . . . . . . . 97
Figure 41.
Removing the HP LaserJet 1300 series formatter (2 of 2) . . . . . . . . . . 98