HP 5500n HP Color LaserJet 5500 series printers - Software Technical Reference - Page 37
Head - E-mail command and response, 2Head - Euro character, Address, Go to, Device, Alerts, Apply
 |
View all HP 5500n manuals
Add to My Manuals
Save this manual to your list of manuals |
Page 37 highlights
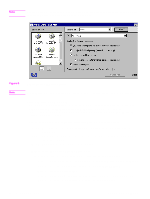
E-mail command and response The HP LaserJet product can send e-mail messages directly. However, you must configure e-mail information to initiate this capability. One use for this feature is to send diagnostic information to solve a printer problem. An e-mail sent to the printer requests configuration information. The printer automatically sends that information back to the service provider. In many cases, the problem can be identified quickly and solved remotely. For more information about e-mail command and response, see the HP Embedded Web Server for HP LaserJet Printers guide. To configure your product to send e-mails, follow these steps: Step 1 Take note of your product's TCP/IP address on the EIO X JetDirect page (this is the second page of the Configuration Page printout. To print a configuration page, see "Determining the current level of firmware".) Step 2 Launch your Web browser. Step 3 In the Address: or Go to: field, type the TCP/IP address assigned to the product (for example, 192.168.0.20) or the host name (for example, http:// myprinter). The HP Web Access home page appears. Step 4 From the top of the HP Web Access screen, click Device. Step 5 On the navigational bar on the left, click Alerts. Step 6 Under Notification Recipients, type your e-mail address (for example, "[email protected]".) Step 7 Click Apply. Step 8 Under Select Events, click Media Path. Step 9 Select the List1 check box next to CLOSE DRAWERS/DOORS/COVERS. Step 10 Click Apply. A screen stating that your selections have been accepted should appear. Click OK. Step 11 In the SMTP Server: field under Outgoing Mail, type the TCP/IP address for the Simple Mail Transfer Protocol (SMTP) server (for example, 192.168.0.201). Step 12 In the Domain Name: field under Outgoing Mail, type the domain name. Step 13 Click Apply. Step 14 Click Security. Step 15 Under Security, select the Outgoing Mail check box. Step 16 Click Apply. Step 17 To test the configuration, open the top cover of the product, then go to your computer and verify that you have received an e-mail message from the product. Euro character The euro is the name for the currency of the European Union (EU). Use of this unit was launched on January 1, 1999. The euro has changed the way business is conducted in Europe and has affected every company and industry in the world. It is vital that companies understand and prepare for the changes the euro brings. Software Technical Reference Technology background information 35
-
 1
1 -
2
-
3
-
4
-
5
-
6
-
7
-
8
-
9
-
10
-
11
-
12
-
13
-
14
-
15
-
16
-
17
-
18
-
19
-
20
-
21
-
22
-
23
-
24
-
25
-
26
-
27
-
28
-
29
-
30
-
31
-
 32
32 -
 33
33 -
 34
34 -
 35
35 -
 36
36 -
 37
37 -
 38
38 -
 39
39 -
 40
40 -
 41
41 -
 42
42 -
43
-
44
-
45
-
46
-
47
-
48
-
49
-
50
-
51
-
52
-
53
-
54
-
55
-
56
-
57
-
58
-
59
-
60
-
61
-
62
-
63
-
64
-
65
-
66
-
67
-
68
-
69
-
70
-
71
-
72
-
73
-
74
-
75
-
76
-
77
-
78
-
79
-
80
-
81
-
82
-
83
-
84
-
85
-
86
-
87
-
88
-
89
-
90
-
91
-
92
-
93
-
94
-
95
-
96
-
97
-
98
-
99
-
100
-
101
-
102
-
103
-
104
-
105
-
106
-
107
-
108
-
109
-
110
-
111
-
112
-
113
-
114
-
115
-
116
-
117
-
118
-
119
-
120
-
121
-
122
-
123
-
124
-
125
-
126
-
127
-
128
-
129
-
130
-
131
-
132
-
133
-
134
-
135
-
136
-
137
-
138
-
139
-
140
-
141
-
142
-
143
-
144
-
145
-
146
-
147
-
148
-
149
-
150
-
151
-
152
-
153
-
154
-
155
-
156
-
157
-
158
-
159
-
160
-
161
-
162
-
163
-
164
-
165
-
166
-
167
-
168
-
169
-
170
-
171
-
172
-
173
-
174
-
175
-
176
-
177
-
178
-
179
-
180
-
181
-
182
-
183
-
184
-
185
-
186
-
187
-
188
-
189
-
190
-
191
-
192
-
193
-
194
-
195
-
196
-
197
-
198
-
199
-
200
 |
 |
