HP 9000 rp4410-4 Installation Guide, Sixth Edition - HP 9000 rp4410/rp4440 - Page 31
Removing and Replacing the Top Cover, Replacing the Top Cover, Step 1.
 |
View all HP 9000 rp4410-4 manuals
Add to My Manuals
Save this manual to your list of manuals |
Page 31 highlights
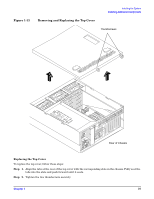
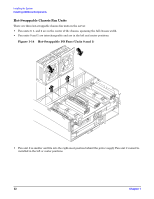
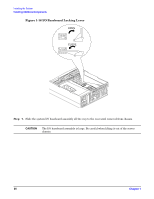
Figure 1-13 Installing the System Installing Additional Components Removing and Replacing the Top Cover Thumbscrews Rear of Chassis Replacing the Top Cover To replace the top cover, follow these steps: Step 1. Align the tabs at the rear of the top cover with the corresponding slots in the chassis. Fully seat the tabs into the slots and push forward until it seats. Step 2. Tighten the two thumbscrews securely. Chapter 1 31
-
 1
1 -
2
-
3
-
4
-
5
-
6
-
7
-
8
-
9
-
10
-
11
-
12
-
13
-
14
-
15
-
16
-
17
-
18
-
19
-
20
-
21
-
22
-
23
-
24
-
25
-
 26
26 -
 27
27 -
 28
28 -
 29
29 -
 30
30 -
 31
31 -
 32
32 -
 33
33 -
 34
34 -
 35
35 -
 36
36 -
37
-
38
-
39
-
40
-
41
-
42
-
43
-
44
-
45
-
46
-
47
-
48
-
49
-
50
-
51
-
52
-
53
-
54
-
55
-
56
-
57
-
58
-
59
-
60
-
61
-
62
-
63
-
64
-
65
-
66
-
67
-
68
-
69
-
70
-
71
-
72
-
73
-
74
-
75
-
76
-
77
-
78
-
79
-
80
-
81
-
82
-
83
-
84
-
85
-
86
-
87
-
88
-
89
-
90
-
91
-
92
-
93
-
94
-
95
-
96
-
97
-
98
-
99
-
100
-
101
-
102
-
103
 |
 |

Installing the System
Installing Additional Components
Chapter 1
31
Figure 1-13
Removing and Replacing the Top Cover
Replacing the Top Cover
To replace the top cover, follow these steps:
Step 1.
Align the tabs at the rear of the top cover with the corresponding slots in the chassis. Fully seat the
tabs into the slots and push forward until it seats.
Step 2.
Tighten the two thumbscrews securely.
Rear of Chassis
Thumbscrews