HP 9000 rp4410-4 Installation Guide, Sixth Edition - HP 9000 rp4410/rp4440 - Page 40
Installing Power Supplies and Disk Drives, CAUTION, WARNING
 |
View all HP 9000 rp4410-4 manuals
Add to My Manuals
Save this manual to your list of manuals |
Page 40 highlights
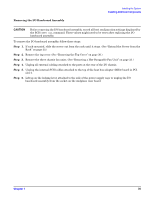
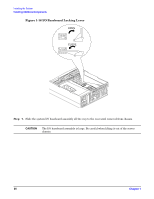
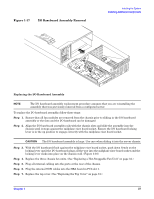
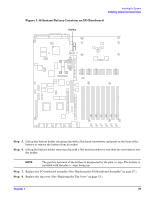
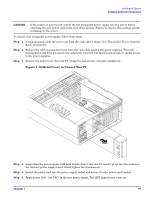
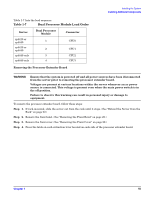
Installing the System Installing Additional Components Step 9. Reset the system time and date using the BCH DATE command. Step 10. Verify that you installed the system battery correctly once you set the time and date. a. Power off the system. b. Unplug the power cord. c. Wait for a minute before turning it back on. d. Run the DATE command again. If the time and date are now correct, you installed the system battery correctly. Step 11. If necessary, reconfigure the Integrity iLO MP (see "Console Setup" on page 75). Installing Power Supplies and Disk Drives This section provides information about installing hot-swappable power supplies and hot-pluggable disk drives. Hot-swappable power supplies are located at the rear of the HP 9000 rp4410 and rp4440 servers, and hot-pluggable disk drives are located behind the front bezels. CAUTION A hot-pluggable device can require interaction with the operating system before the device is safely installed into the server. Verify that the operating system supports installing disk drives while the operating system is running. If the operating system does not support this feature, shut down the operating system before attempting this procedure. Failure to observe this caution results in system failure. For more information on hot-pluggable procedures. See "Hot-Pluggable PCI/PCI-X" on page 57. NOTE A hot-swappable device does not require interaction with the operating system before the device is removed from or installed into the server. The ac power to the server does not need to be off to install a hot-swappable power supply. Installing Hot-Swappable Power Supplies This section provides instructions on how to install power supplies. Power Supply Load Order The supported configuration of an HP 9000 rp4410 or rp4440 server requires a minimum of one power supply. You can install a second, optional hot-swappable power supply, to provide N+1 capability. The left side (viewing from the rear) hot-swappable power supply is identified as P0, and the second hot-swappable power supply is identified as P1. Each hot-swappable power supply requires a separate power cord, installed in the appropriate power cord receptacle and attached to a power cord support bracket. WARNING Be careful when installing a hot-swappable power supply. It is heavier than it appears. CAUTION The empty hot-swappable power supply slot P1 must remain closed with the supplied metal cover in place when a second power supply is not used. The server can be damaged due to overheating if the cover does not remain in place. 40 Chapter 1
-
 1
1 -
2
-
3
-
4
-
5
-
6
-
7
-
8
-
9
-
10
-
11
-
12
-
13
-
14
-
15
-
16
-
17
-
18
-
19
-
20
-
21
-
22
-
23
-
24
-
25
-
26
-
27
-
28
-
29
-
30
-
31
-
32
-
33
-
34
-
 35
35 -
 36
36 -
 37
37 -
 38
38 -
 39
39 -
 40
40 -
 41
41 -
 42
42 -
 43
43 -
 44
44 -
 45
45 -
46
-
47
-
48
-
49
-
50
-
51
-
52
-
53
-
54
-
55
-
56
-
57
-
58
-
59
-
60
-
61
-
62
-
63
-
64
-
65
-
66
-
67
-
68
-
69
-
70
-
71
-
72
-
73
-
74
-
75
-
76
-
77
-
78
-
79
-
80
-
81
-
82
-
83
-
84
-
85
-
86
-
87
-
88
-
89
-
90
-
91
-
92
-
93
-
94
-
95
-
96
-
97
-
98
-
99
-
100
-
101
-
102
-
103
 |
 |
