HP Armada 4200 Armada 4100 and 4200 Families of Personal Computers Maintenance - Page 116
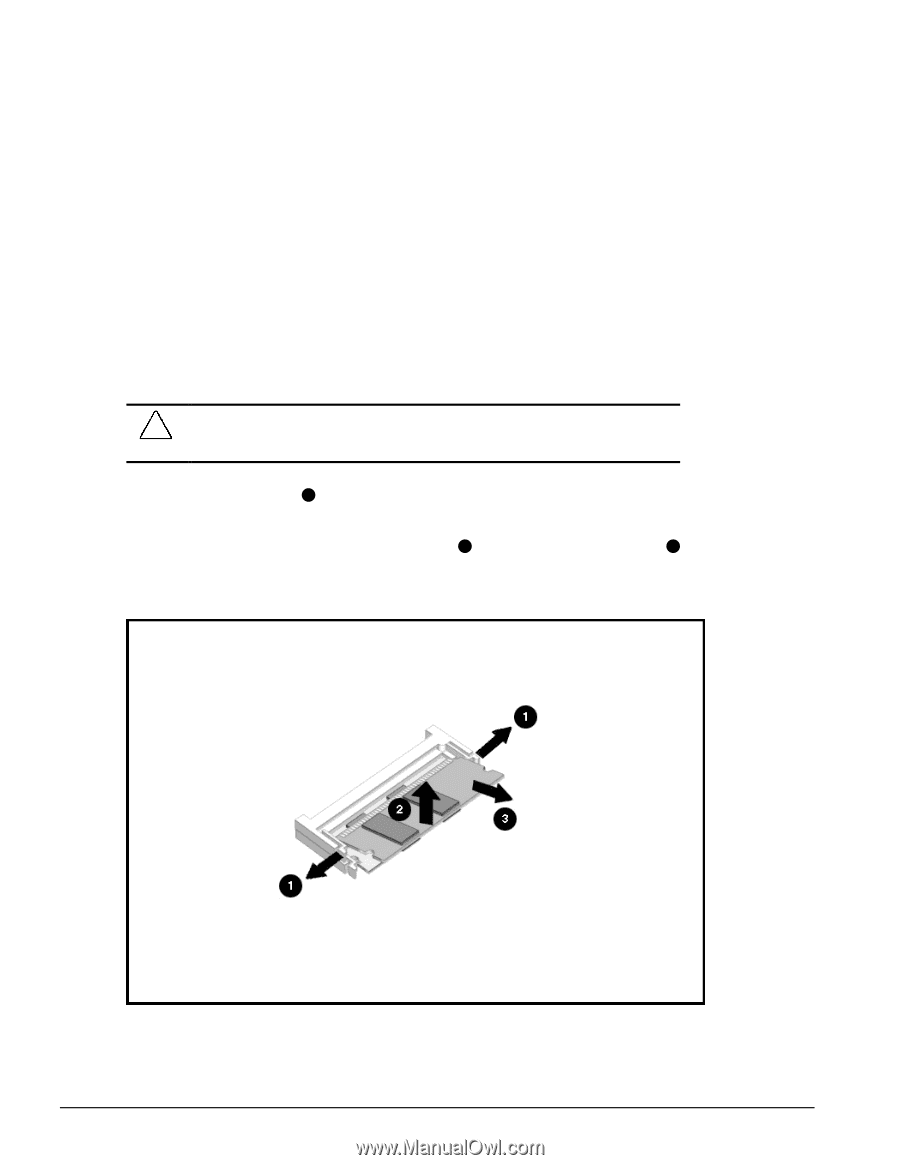
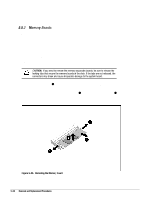
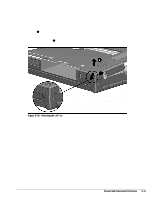
Memory Boards, at each end of the upper memory board. This releases
 |
View all HP Armada 4200 manuals
Add to My Manuals
Save this manual to your list of manuals |
Page 116 highlights
5.5.2 Memory Boards Memory boards that are in the computer must be removed before others are installed. Memory expansion boards come in two matched boards.To remove the memory boards, complete the following steps: 1. Disconnect the AC power and any external devices (Section 5.3.1). 2. Undock the computer from the auxiliary base if necessary (Section 5.3.2). 3. Remove all battery packs (Section 5.3.3). 4. Remove the memory cover (Section 5.5.1). CAUTION: If you need to remove the memory expansion boards, be sure to release the locking tabs that secure the memory boards in the slots. If the tabs are not released, the connectors may break and cause irreparable damage to the system board. 5. Release the locking tab 1 at each end of the upper memory board. This releases the memory board and allows it to rotate upwards to ease removal. 6. Lift the free edge of the memory board slightly 2 and pull it straight out of the 3 slot. Figure 5-25. Removing the Memory Board 5-28 Removal and Replacement Procedures
-
 1
1 -
2
-
3
-
4
-
5
-
6
-
7
-
8
-
9
-
10
-
11
-
12
-
13
-
14
-
15
-
16
-
17
-
18
-
19
-
20
-
21
-
22
-
23
-
24
-
25
-
26
-
27
-
28
-
29
-
30
-
31
-
32
-
33
-
34
-
35
-
36
-
37
-
38
-
39
-
40
-
41
-
42
-
43
-
44
-
45
-
46
-
47
-
48
-
49
-
50
-
51
-
52
-
53
-
54
-
55
-
56
-
57
-
58
-
59
-
60
-
61
-
62
-
63
-
64
-
65
-
66
-
67
-
68
-
69
-
70
-
71
-
72
-
73
-
74
-
75
-
76
-
77
-
78
-
79
-
80
-
81
-
82
-
83
-
84
-
85
-
86
-
87
-
88
-
89
-
90
-
91
-
92
-
93
-
94
-
95
-
96
-
97
-
98
-
99
-
100
-
101
-
102
-
103
-
104
-
105
-
106
-
107
-
108
-
109
-
110
-
 111
111 -
 112
112 -
 113
113 -
 114
114 -
 115
115 -
 116
116 -
 117
117 -
 118
118 -
 119
119 -
 120
120 -
 121
121 -
122
-
123
-
124
-
125
-
126
-
127
-
128
-
129
-
130
-
131
-
132
-
133
-
134
-
135
-
136
-
137
-
138
-
139
-
140
-
141
-
142
-
143
-
144
-
145
-
146
-
147
-
148
-
149
-
150
-
151
-
152
-
153
-
154
-
155
-
156
-
157
-
158
-
159
-
160
-
161
-
162
-
163
-
164
-
165
-
166
-
167
-
168
-
169
-
170
-
171
-
172
-
173
-
174
-
175
-
176
-
177
-
178
-
179
-
180
-
181
-
182
-
183
-
184
-
185
-
186
-
187
-
188
-
189
-
190
 |
 |