HP Armada 4200 Armada 4100 and 4200 Families of Personal Computers Maintenance - Page 126
be installed first whenever a CPU bottom is reattached. Failure to follow
 |
View all HP Armada 4200 manuals
Add to My Manuals
Save this manual to your list of manuals |
Page 126 highlights
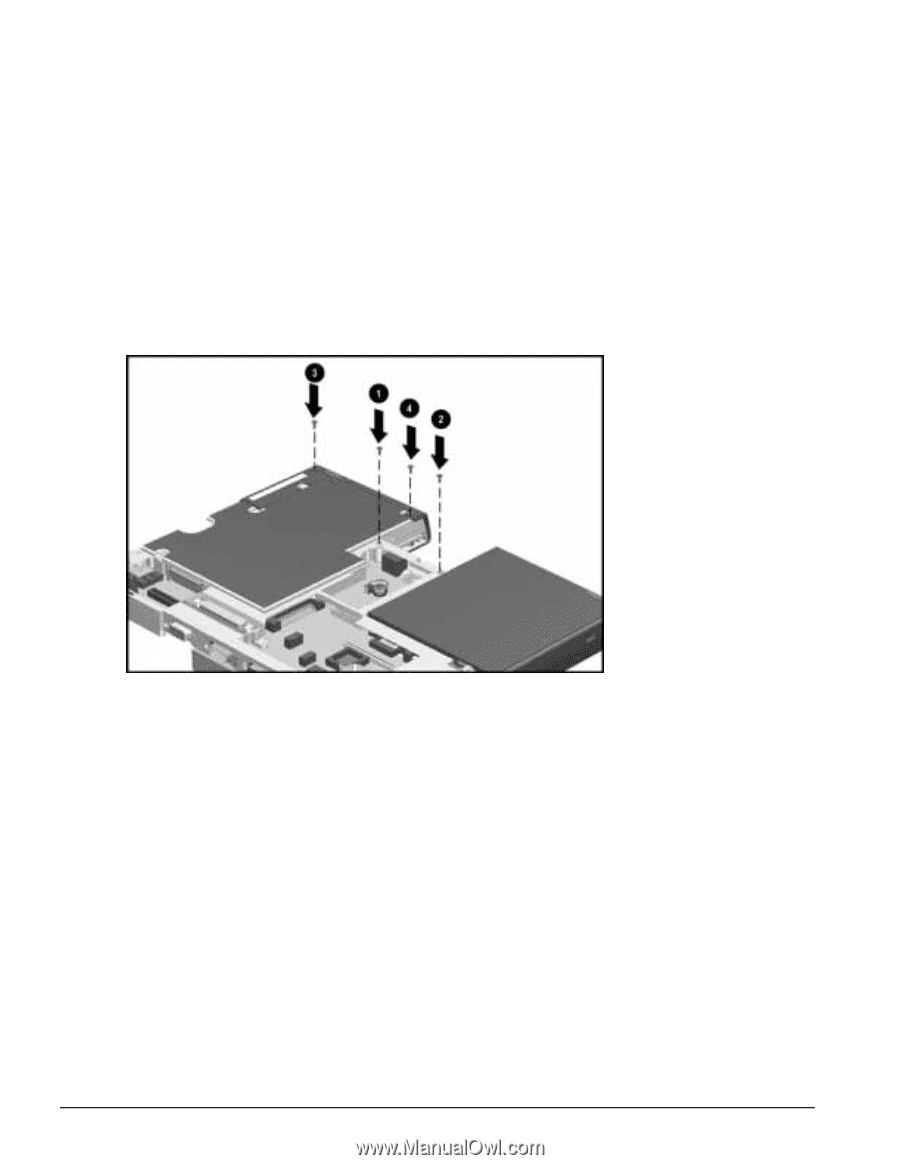
To install the CPU cover, reverse the procedure above and use the following steps to ensure proper keyboard alignment. 1. It is critical for purposes of keyboard alignment that the screw identified below as 1 be installed first whenever a CPU bottom is reattached. Failure to follow this directive will result in sporadic keyboard performance. 2. Screw 2 must be tightened next to firm up the keyboard location. 3. Screws 3 and 4 should follow next. All screws should be snug. Figure 5-35. Reinstalling Screws to the Bottom of the CPU 5-38 Removal and Replacement Procedures
-
 1
1 -
2
-
3
-
4
-
5
-
6
-
7
-
8
-
9
-
10
-
11
-
12
-
13
-
14
-
15
-
16
-
17
-
18
-
19
-
20
-
21
-
22
-
23
-
24
-
25
-
26
-
27
-
28
-
29
-
30
-
31
-
32
-
33
-
34
-
35
-
36
-
37
-
38
-
39
-
40
-
41
-
42
-
43
-
44
-
45
-
46
-
47
-
48
-
49
-
50
-
51
-
52
-
53
-
54
-
55
-
56
-
57
-
58
-
59
-
60
-
61
-
62
-
63
-
64
-
65
-
66
-
67
-
68
-
69
-
70
-
71
-
72
-
73
-
74
-
75
-
76
-
77
-
78
-
79
-
80
-
81
-
82
-
83
-
84
-
85
-
86
-
87
-
88
-
89
-
90
-
91
-
92
-
93
-
94
-
95
-
96
-
97
-
98
-
99
-
100
-
101
-
102
-
103
-
104
-
105
-
106
-
107
-
108
-
109
-
110
-
111
-
112
-
113
-
114
-
115
-
116
-
117
-
118
-
119
-
120
-
 121
121 -
 122
122 -
 123
123 -
 124
124 -
 125
125 -
 126
126 -
 127
127 -
 128
128 -
 129
129 -
 130
130 -
 131
131 -
132
-
133
-
134
-
135
-
136
-
137
-
138
-
139
-
140
-
141
-
142
-
143
-
144
-
145
-
146
-
147
-
148
-
149
-
150
-
151
-
152
-
153
-
154
-
155
-
156
-
157
-
158
-
159
-
160
-
161
-
162
-
163
-
164
-
165
-
166
-
167
-
168
-
169
-
170
-
171
-
172
-
173
-
174
-
175
-
176
-
177
-
178
-
179
-
180
-
181
-
182
-
183
-
184
-
185
-
186
-
187
-
188
-
189
-
190
 |
 |
.
.
.
.
.
.
.
.
.
.
.
.
.
.
.
.
.
.
.
.
.
.
.
.
.
.
.
.
.
.
.
.
.
.
.
.
.
5-38
Removal and Replacement Procedures
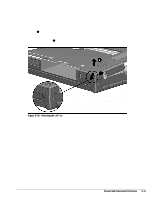
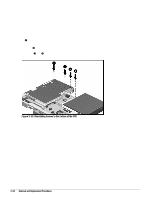
To install the CPU cover, reverse the procedure above and use the following steps to
ensure proper keyboard alignment.
1. It is critical for purposes of keyboard alignment that the screw identified below as
1
be installed first whenever a CPU bottom is reattached. Failure to follow this
directive will result in sporadic keyboard performance.
2. Screw
2
must be tightened next to firm up the keyboard location.
3. Screws
3
and
4
should follow next. All screws should be snug.
Figure 5-35.
Reinstalling Screws to the Bottom of the CPU