HP Armada 4200 Armada 4100 and 4200 Families of Personal Computers Maintenance - Page 30
Preliminary Steps, Use AC Power when running POST, Computer Setup, or Computer - printer
 |
View all HP Armada 4200 manuals
Add to My Manuals
Save this manual to your list of manuals |
Page 30 highlights
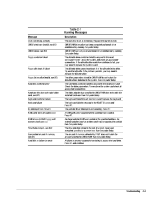
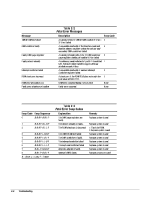
2.1 Preliminary Steps IMPORTANT: Use AC Power when running POST, Computer Setup, or Computer Checkup. A low-battery condition could initiate Suspend or Hibernation and interrupt the test. Before running POST and Computer Checkup, complete the following steps: 1. Obtain established passwords. If you must clear the passwords, go to Section 2.2. 2. Ensure that the hard drive is installed in the computer. 2. Ensure that the battery pack is installed in the computer and the AC power is connected to the computer and plugged into an AC power source. 4. Turn on the computer. 5. If a power-on password has been established, type the password and press Enter. NOTE: The key icon appears on the display when the computer is turned on to indicate that QuickLock/QuickBlank has been initiated. Type the power-on password to exit QuickLock/QuickBlank. If the password is unknown, it must be cleared (see Section 2.2). 6. Run Computer Setup (Section 2.5). 7. Use the Hotkeys to adjust the contrast (Fn+F9) and brightness (Fn+F10) to the center of their ranges and leave the display open. On models with color TFT displays, contrast is not applicable. 8. Turn off the computer and all external devices. 9. Disconnect any external devices that you do not want to test. If you want to use the printer to log error messages, leave it connected to the computer. NOTE: If a problem only occurs when an external device is connected to the computer, the problem could be with the external device or its cable. Isolate the problem by running POST with and without the external device connected. 10. Use Advanced Diagnostics and loopback plugs in the serial and parallel connectors if you plan to test these ports. You may run Advanced Diagnostics from the hard drive or from a diskette. If you are running Diagnostics from the hard drive, complete the following steps: a. Turn on or restart the computer. b. Press F10 when the cursor appears in the upper right corner of the screen. If you do not press F10 in time, restart the computer and try again. The Welcome screen appears. 2-2 Troubleshooting
-
 1
1 -
2
-
3
-
4
-
5
-
6
-
7
-
8
-
9
-
10
-
11
-
12
-
13
-
14
-
15
-
16
-
17
-
18
-
19
-
20
-
21
-
22
-
23
-
24
-
 25
25 -
 26
26 -
 27
27 -
 28
28 -
 29
29 -
 30
30 -
 31
31 -
 32
32 -
 33
33 -
 34
34 -
 35
35 -
36
-
37
-
38
-
39
-
40
-
41
-
42
-
43
-
44
-
45
-
46
-
47
-
48
-
49
-
50
-
51
-
52
-
53
-
54
-
55
-
56
-
57
-
58
-
59
-
60
-
61
-
62
-
63
-
64
-
65
-
66
-
67
-
68
-
69
-
70
-
71
-
72
-
73
-
74
-
75
-
76
-
77
-
78
-
79
-
80
-
81
-
82
-
83
-
84
-
85
-
86
-
87
-
88
-
89
-
90
-
91
-
92
-
93
-
94
-
95
-
96
-
97
-
98
-
99
-
100
-
101
-
102
-
103
-
104
-
105
-
106
-
107
-
108
-
109
-
110
-
111
-
112
-
113
-
114
-
115
-
116
-
117
-
118
-
119
-
120
-
121
-
122
-
123
-
124
-
125
-
126
-
127
-
128
-
129
-
130
-
131
-
132
-
133
-
134
-
135
-
136
-
137
-
138
-
139
-
140
-
141
-
142
-
143
-
144
-
145
-
146
-
147
-
148
-
149
-
150
-
151
-
152
-
153
-
154
-
155
-
156
-
157
-
158
-
159
-
160
-
161
-
162
-
163
-
164
-
165
-
166
-
167
-
168
-
169
-
170
-
171
-
172
-
173
-
174
-
175
-
176
-
177
-
178
-
179
-
180
-
181
-
182
-
183
-
184
-
185
-
186
-
187
-
188
-
189
-
190
 |
 |