HP Color LaserJet Enterprise CP5525 HP Color LaserJet Enterprise CP5520 - User - Page 166
Supported tough paper, Set the duplex alignment, Administration, General Settings, Print Quality
 |
View all HP Color LaserJet Enterprise CP5525 manuals
Add to My Manuals
Save this manual to your list of manuals |
Page 166 highlights
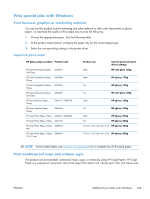
when exposed to heavy usage or weather. This avoids expensive and time-consuming lamination. To maximize the quality of this output, you must do the following: ● Choose the appropriate paper. See the following table. ● At the product control panel, configure the paper tray for the correct paper type. ● Select the corresponding settings in the printer driver. Supported tough paper HP paper name HP LaserJet Tough Paper HP LaserJet Tough Paper Product code Q1298A Q1298B Product size Letter A4 Control panel and print driver settings HP Tough Paper HP Tough Paper Set the duplex alignment For documents that are printed on both sides, such as brochures, set the registration for the tray before printing to ensure that the front and back of the page are aligned. 1. Press the Home button . 2. Press the down arrow to highlight the Administration menu, and then press the OK button. 3. Press the down arrow to highlight the General Settings menu, and then press the OK button. 4. Press the down arrow to highlight the Print Quality menu, and then press the OK button. 5. Press the down arrow to highlight the Image Registration menu, and then press the OK button. 6. Press the down arrow to highlight the Adjust Tray menu for the tray that you want to adjust, and then press the OK button. 7. Press the down arrow to highlight the Print Test Page setting, and then press the OK button. 8. Follow the instructions on the test page to complete the adjustment. 150 Chapter 8 Print tasks ENWW
-
 1
1 -
2
-
3
-
4
-
5
-
6
-
7
-
8
-
9
-
10
-
11
-
12
-
13
-
14
-
15
-
16
-
17
-
18
-
19
-
20
-
21
-
22
-
23
-
24
-
25
-
26
-
27
-
28
-
29
-
30
-
31
-
32
-
33
-
34
-
35
-
36
-
37
-
38
-
39
-
40
-
41
-
42
-
43
-
44
-
45
-
46
-
47
-
48
-
49
-
50
-
51
-
52
-
53
-
54
-
55
-
56
-
57
-
58
-
59
-
60
-
61
-
62
-
63
-
64
-
65
-
66
-
67
-
68
-
69
-
70
-
71
-
72
-
73
-
74
-
75
-
76
-
77
-
78
-
79
-
80
-
81
-
82
-
83
-
84
-
85
-
86
-
87
-
88
-
89
-
90
-
91
-
92
-
93
-
94
-
95
-
96
-
97
-
98
-
99
-
100
-
101
-
102
-
103
-
104
-
105
-
106
-
107
-
108
-
109
-
110
-
111
-
112
-
113
-
114
-
115
-
116
-
117
-
118
-
119
-
120
-
121
-
122
-
123
-
124
-
125
-
126
-
127
-
128
-
129
-
130
-
131
-
132
-
133
-
134
-
135
-
136
-
137
-
138
-
139
-
140
-
141
-
142
-
143
-
144
-
145
-
146
-
147
-
148
-
149
-
150
-
151
-
152
-
153
-
154
-
155
-
156
-
157
-
158
-
159
-
160
-
 161
161 -
 162
162 -
 163
163 -
 164
164 -
 165
165 -
 166
166 -
 167
167 -
 168
168 -
 169
169 -
 170
170 -
 171
171 -
172
-
173
-
174
-
175
-
176
-
177
-
178
-
179
-
180
-
181
-
182
-
183
-
184
-
185
-
186
-
187
-
188
-
189
-
190
-
191
-
192
-
193
-
194
-
195
-
196
-
197
-
198
-
199
-
200
-
201
-
202
-
203
-
204
-
205
-
206
-
207
-
208
-
209
-
210
-
211
-
212
-
213
-
214
-
215
-
216
-
217
-
218
-
219
-
220
-
221
-
222
-
223
-
224
-
225
-
226
-
227
-
228
-
229
-
230
-
231
-
232
-
233
-
234
-
235
-
236
-
237
-
238
-
239
-
240
-
241
-
242
-
243
-
244
-
245
-
246
-
247
-
248
-
249
-
250
-
251
-
252
-
253
-
254
-
255
-
256
-
257
-
258
-
259
-
260
-
261
-
262
 |
 |