HP Color LaserJet Enterprise CP5525 HP Color LaserJet Enterprise CP5520 - User - Page 199
Jam locations, reaching into the inside of the product.
 |
View all HP Color LaserJet Enterprise CP5525 manuals
Add to My Manuals
Save this manual to your list of manuals |
Page 199 highlights
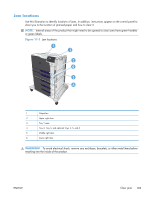
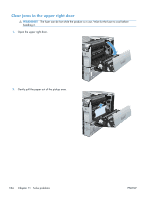
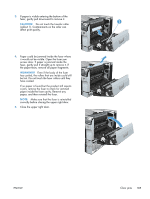
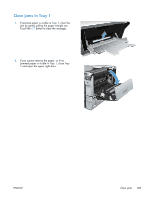
Jam locations Use this illustration to identify locations of jams. In addition, instructions appear on the control panel to direct you to the location of jammed paper and how to clear it. NOTE: Internal areas of the product that might need to be opened to clear jams have green handles or green labels. Figure 11-1 Jam locations 1 2 3 4 5 6 1 Output bin 2 Upper right door 3 Tray 1 area 4 Tray 2, Tray 3, and optional Trays 4, 5, and 6 5 Middle right door 6 Lower right door WARNING! To avoid electrical shock, remove any necklaces, bracelets, or other metal items before reaching into the inside of the product. ENWW Clear jams 183
-
 1
1 -
2
-
3
-
4
-
5
-
6
-
7
-
8
-
9
-
10
-
11
-
12
-
13
-
14
-
15
-
16
-
17
-
18
-
19
-
20
-
21
-
22
-
23
-
24
-
25
-
26
-
27
-
28
-
29
-
30
-
31
-
32
-
33
-
34
-
35
-
36
-
37
-
38
-
39
-
40
-
41
-
42
-
43
-
44
-
45
-
46
-
47
-
48
-
49
-
50
-
51
-
52
-
53
-
54
-
55
-
56
-
57
-
58
-
59
-
60
-
61
-
62
-
63
-
64
-
65
-
66
-
67
-
68
-
69
-
70
-
71
-
72
-
73
-
74
-
75
-
76
-
77
-
78
-
79
-
80
-
81
-
82
-
83
-
84
-
85
-
86
-
87
-
88
-
89
-
90
-
91
-
92
-
93
-
94
-
95
-
96
-
97
-
98
-
99
-
100
-
101
-
102
-
103
-
104
-
105
-
106
-
107
-
108
-
109
-
110
-
111
-
112
-
113
-
114
-
115
-
116
-
117
-
118
-
119
-
120
-
121
-
122
-
123
-
124
-
125
-
126
-
127
-
128
-
129
-
130
-
131
-
132
-
133
-
134
-
135
-
136
-
137
-
138
-
139
-
140
-
141
-
142
-
143
-
144
-
145
-
146
-
147
-
148
-
149
-
150
-
151
-
152
-
153
-
154
-
155
-
156
-
157
-
158
-
159
-
160
-
161
-
162
-
163
-
164
-
165
-
166
-
167
-
168
-
169
-
170
-
171
-
172
-
173
-
174
-
175
-
176
-
177
-
178
-
179
-
180
-
181
-
182
-
183
-
184
-
185
-
186
-
187
-
188
-
189
-
190
-
191
-
192
-
193
-
 194
194 -
 195
195 -
 196
196 -
 197
197 -
 198
198 -
 199
199 -
 200
200 -
 201
201 -
 202
202 -
 203
203 -
 204
204 -
205
-
206
-
207
-
208
-
209
-
210
-
211
-
212
-
213
-
214
-
215
-
216
-
217
-
218
-
219
-
220
-
221
-
222
-
223
-
224
-
225
-
226
-
227
-
228
-
229
-
230
-
231
-
232
-
233
-
234
-
235
-
236
-
237
-
238
-
239
-
240
-
241
-
242
-
243
-
244
-
245
-
246
-
247
-
248
-
249
-
250
-
251
-
252
-
253
-
254
-
255
-
256
-
257
-
258
-
259
-
260
-
261
-
262
 |
 |

Jam locations
Use this illustration to identify locations of jams. In addition, instructions appear on the control panel to
direct you to the location of jammed paper and how to clear it.
NOTE:
Internal areas of the product that might need to be opened to clear jams have green handles
or green labels.
Figure 11-1
Jam locations
2
3
5
1
4
6
1
Output bin
2
Upper right door
3
Tray 1 area
4
Tray 2, Tray 3, and optional Trays 4, 5, and 6
5
Middle right door
6
Lower right door
WARNING!
To avoid electrical shock, remove any necklaces, bracelets, or other metal items before
reaching into the inside of the product.
ENWW
Clear jams
183