HP Color LaserJet Enterprise CP5525 HP Color LaserJet Enterprise CP5520 - User - Page 24
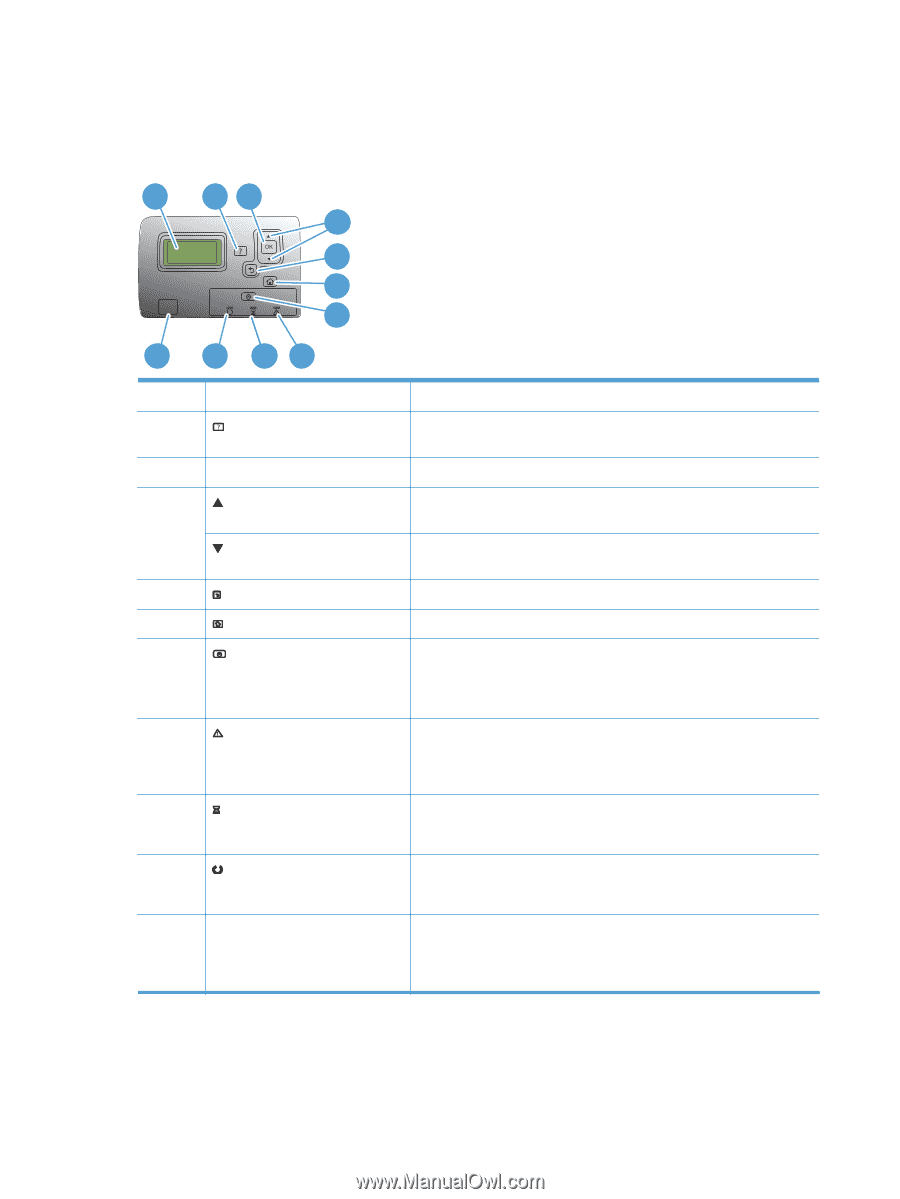
Control panel layout, emitting diode LED status lights.
 |
View all HP Color LaserJet Enterprise CP5525 manuals
Add to My Manuals
Save this manual to your list of manuals |
Page 24 highlights
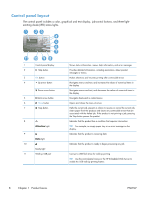
Control panel layout The control panel includes a color, graphical and text display, job-control buttons, and three lightemitting diode (LED) status lights. 1 23 4 5 6 7 11 10 9 8 1 Control panel display 2 Help button 3 OK button 4 Up arrow button Down arrow button 5 Back arrow button 6 Home button 7 Stop button 8 Attention light 9 Data light 10 Ready light 11 Walk-up USB port Shows status information, menus, help information, and error messages Provides detailed information, including animations, about product messages or menus Makes selections and resumes printing after continuable errors Navigates menus and text, and increases the values of numerical items in the display Navigates menus and text, and decreases the values of numerical items in the display Navigates backward in nested menus Opens and closes the menu structure Halts the current job, presents a choice to resume or cancel the current job, clears paper from the product, and clears any continuable errors that are associated with the halted job. If the product is not printing a job, pressing the Stop button pauses the product Indicates that the product has a condition that requires intervention TIP: For example, an empty paper tray or an error message on the display. Indicates that the product is receiving data Indicates that the product is ready to begin processing any job Connect a USB flash drive for walk-up printing TIP: Use the control-panel menus or the HP Embedded Web Server to enable the USB walk-up printing feature. 8 Chapter 1 Product basics ENWW
-
 1
1 -
2
-
3
-
4
-
5
-
6
-
7
-
8
-
9
-
10
-
11
-
12
-
13
-
14
-
15
-
16
-
17
-
18
-
 19
19 -
 20
20 -
 21
21 -
 22
22 -
 23
23 -
 24
24 -
 25
25 -
 26
26 -
 27
27 -
 28
28 -
 29
29 -
30
-
31
-
32
-
33
-
34
-
35
-
36
-
37
-
38
-
39
-
40
-
41
-
42
-
43
-
44
-
45
-
46
-
47
-
48
-
49
-
50
-
51
-
52
-
53
-
54
-
55
-
56
-
57
-
58
-
59
-
60
-
61
-
62
-
63
-
64
-
65
-
66
-
67
-
68
-
69
-
70
-
71
-
72
-
73
-
74
-
75
-
76
-
77
-
78
-
79
-
80
-
81
-
82
-
83
-
84
-
85
-
86
-
87
-
88
-
89
-
90
-
91
-
92
-
93
-
94
-
95
-
96
-
97
-
98
-
99
-
100
-
101
-
102
-
103
-
104
-
105
-
106
-
107
-
108
-
109
-
110
-
111
-
112
-
113
-
114
-
115
-
116
-
117
-
118
-
119
-
120
-
121
-
122
-
123
-
124
-
125
-
126
-
127
-
128
-
129
-
130
-
131
-
132
-
133
-
134
-
135
-
136
-
137
-
138
-
139
-
140
-
141
-
142
-
143
-
144
-
145
-
146
-
147
-
148
-
149
-
150
-
151
-
152
-
153
-
154
-
155
-
156
-
157
-
158
-
159
-
160
-
161
-
162
-
163
-
164
-
165
-
166
-
167
-
168
-
169
-
170
-
171
-
172
-
173
-
174
-
175
-
176
-
177
-
178
-
179
-
180
-
181
-
182
-
183
-
184
-
185
-
186
-
187
-
188
-
189
-
190
-
191
-
192
-
193
-
194
-
195
-
196
-
197
-
198
-
199
-
200
-
201
-
202
-
203
-
204
-
205
-
206
-
207
-
208
-
209
-
210
-
211
-
212
-
213
-
214
-
215
-
216
-
217
-
218
-
219
-
220
-
221
-
222
-
223
-
224
-
225
-
226
-
227
-
228
-
229
-
230
-
231
-
232
-
233
-
234
-
235
-
236
-
237
-
238
-
239
-
240
-
241
-
242
-
243
-
244
-
245
-
246
-
247
-
248
-
249
-
250
-
251
-
252
-
253
-
254
-
255
-
256
-
257
-
258
-
259
-
260
-
261
-
262
 |
 |