HP DesignJet T830 User guide - Page 105
Align the printhead, Print Quality Toolbox
 |
View all HP DesignJet T830 manuals
Add to My Manuals
Save this manual to your list of manuals |
Page 105 highlights
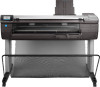
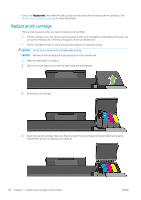
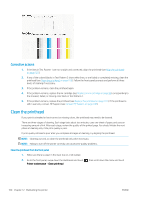
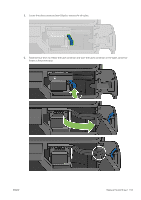
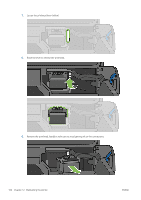
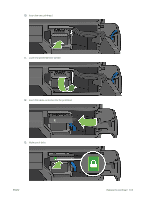
Clean the printhead from the Embedded Web Server 1. Make sure there is paper in the input tray or a roll loaded. 2. In the Tools tab of the Embedded Web Server, select Print Quality Toolbox > Clean Printhead, and follow the instructions on the screen. Clean the printhead from the HP Utility 1. Make sure there is paper in the input tray or a roll loaded. 2. Windows: In the Support tab of the HP Utility, select Printhead Cleaning, and follow the instructions on the screen. 3. Mac OS X: In the first panel of the HP Utility, select Clean Printheads, and follow the instructions on the screen. Align the printhead Precise printhead alignment is essential for accurate colors, smooth color transitions, and sharp edges in graphical elements. Your printer has an automatic printhead alignment process which runs whenever a printhead has been accessed or replaced. You may need to align the printhead after a paper jam or if you are experiencing print-quality problems. 1. Load the paper you wish to use, see Paper handling on page 31. You can use a roll or a cut sheet; plain white paper is recommended. CAUTION: Do not use transparent or semi-transparent paper to align the printhead. 2. Ensure that the window is closed, as a strong light source near the printer during printhead realignment can affect alignment. 3. From the front panel, swipe down the dashboard and touch Printer maintenance > Align printhead. , then scroll down the menu and touch NOTE: Printhead alignment can also be started from the Embedded Web Server (Tools > Print Quality Toolbox > Align Printhead), or from the HP Utility (Windows: Support > Printhead Alignment; Mac OS X: Select Align). 4. If the loaded paper is satisfactory, the printer runs the realignment and prints a realignment pattern. 5. The process takes about five minutes. Wait until the front-panel display shows the process complete before using the printer. If the printer cannot complete the printhead alignment successfully, you may be asked to clean the printhead and try again. Replace the printhead The image that follows is a QR code containing a link to a video to get more information about how to replace a printhead. ENWW Align the printhead 101
-
 1
1 -
2
-
3
-
4
-
5
-
6
-
7
-
8
-
9
-
10
-
11
-
12
-
13
-
14
-
15
-
16
-
17
-
18
-
19
-
20
-
21
-
22
-
23
-
24
-
25
-
26
-
27
-
28
-
29
-
30
-
31
-
32
-
33
-
34
-
35
-
36
-
37
-
38
-
39
-
40
-
41
-
42
-
43
-
44
-
45
-
46
-
47
-
48
-
49
-
50
-
51
-
52
-
53
-
54
-
55
-
56
-
57
-
58
-
59
-
60
-
61
-
62
-
63
-
64
-
65
-
66
-
67
-
68
-
69
-
70
-
71
-
72
-
73
-
74
-
75
-
76
-
77
-
78
-
79
-
80
-
81
-
82
-
83
-
84
-
85
-
86
-
87
-
88
-
89
-
90
-
91
-
92
-
93
-
94
-
95
-
96
-
97
-
98
-
99
-
 100
100 -
 101
101 -
 102
102 -
 103
103 -
 104
104 -
 105
105 -
 106
106 -
 107
107 -
 108
108 -
 109
109 -
 110
110 -
111
-
112
-
113
-
114
-
115
-
116
-
117
-
118
-
119
-
120
-
121
-
122
-
123
-
124
-
125
-
126
-
127
-
128
-
129
-
130
-
131
-
132
-
133
-
134
-
135
-
136
-
137
-
138
-
139
-
140
-
141
-
142
-
143
-
144
-
145
-
146
-
147
-
148
-
149
-
150
-
151
-
152
-
153
-
154
-
155
-
156
-
157
-
158
-
159
-
160
-
161
-
162
-
163
-
164
-
165
-
166
-
167
-
168
-
169
-
170
-
171
-
172
-
173
-
174
-
175
-
176
-
177
-
178
-
179
-
180
-
181
-
182
-
183
-
184
-
185
-
186
-
187
-
188
-
189
-
190
-
191
-
192
-
193
-
194
-
195
-
196
-
197
-
198
-
199
-
200
-
201
-
202
-
203
 |
 |