HP DesignJet T830 User guide - Page 106
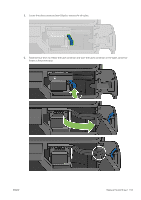
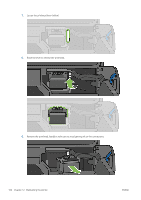
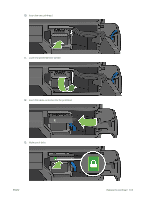
Printer maintenance, Replace Printhead, From the front panel, swipe down the dashboard and touch
 |
View all HP DesignJet T830 manuals
Add to My Manuals
Save this manual to your list of manuals |
Page 106 highlights
TIP: When the printhead has been replaced, the printer will automatically perform a printhead alignment on the loaded paper. If you would like to perform the printhead alignment on a different paper (perhaps from the multi-sheet tray), you could change the paper before starting this procedure. Plain white paper is recommended. TIP: Wear cotton gloves to avoid getting your hands dirty. NOTE: You do not need to use the cartridges provided with the kit. If there is not enough ink, the printer will ask for new cartridges and then you can use the supplies provided. 1. Make sure the printer is turned on. 2. Make sure the printer wheels are locked (the brake lever is pressed down) to prevent the printer from moving. 3. From the front panel, swipe down the dashboard and touch , scroll to Printer maintenance and select the Replace Printhead option. Follow the instructions on the control panel. 4. When requested on the front panel, open the printhead door on the right hand side of the printer. 102 Chapter 12 Maintaining the printer ENWW
-
 1
1 -
2
-
3
-
4
-
5
-
6
-
7
-
8
-
9
-
10
-
11
-
12
-
13
-
14
-
15
-
16
-
17
-
18
-
19
-
20
-
21
-
22
-
23
-
24
-
25
-
26
-
27
-
28
-
29
-
30
-
31
-
32
-
33
-
34
-
35
-
36
-
37
-
38
-
39
-
40
-
41
-
42
-
43
-
44
-
45
-
46
-
47
-
48
-
49
-
50
-
51
-
52
-
53
-
54
-
55
-
56
-
57
-
58
-
59
-
60
-
61
-
62
-
63
-
64
-
65
-
66
-
67
-
68
-
69
-
70
-
71
-
72
-
73
-
74
-
75
-
76
-
77
-
78
-
79
-
80
-
81
-
82
-
83
-
84
-
85
-
86
-
87
-
88
-
89
-
90
-
91
-
92
-
93
-
94
-
95
-
96
-
97
-
98
-
99
-
100
-
 101
101 -
 102
102 -
 103
103 -
 104
104 -
 105
105 -
 106
106 -
 107
107 -
 108
108 -
 109
109 -
 110
110 -
 111
111 -
112
-
113
-
114
-
115
-
116
-
117
-
118
-
119
-
120
-
121
-
122
-
123
-
124
-
125
-
126
-
127
-
128
-
129
-
130
-
131
-
132
-
133
-
134
-
135
-
136
-
137
-
138
-
139
-
140
-
141
-
142
-
143
-
144
-
145
-
146
-
147
-
148
-
149
-
150
-
151
-
152
-
153
-
154
-
155
-
156
-
157
-
158
-
159
-
160
-
161
-
162
-
163
-
164
-
165
-
166
-
167
-
168
-
169
-
170
-
171
-
172
-
173
-
174
-
175
-
176
-
177
-
178
-
179
-
180
-
181
-
182
-
183
-
184
-
185
-
186
-
187
-
188
-
189
-
190
-
191
-
192
-
193
-
194
-
195
-
196
-
197
-
198
-
199
-
200
-
201
-
202
-
203
 |
 |
