HP DesignJet T830 User guide - Page 170
Prepare the printer and the paper to print the diagnostic sheet
 |
View all HP DesignJet T830 manuals
Add to My Manuals
Save this manual to your list of manuals |
Page 170 highlights
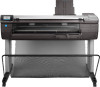
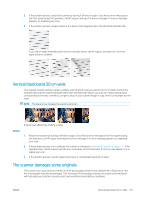
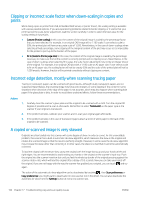
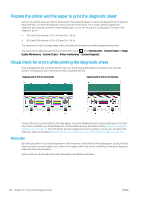
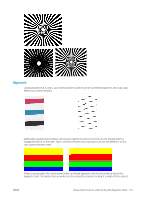
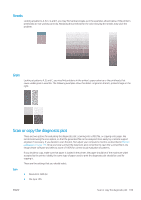
Prepare the printer and the paper to print the diagnostic sheet Turn on your printer and wait until it is functioning. Then select the paper on which the diagnostic plot is going to be printed (you can reuse the diagnostic plot at any time in the future, if it is saved carefully). Ideally, the diagnostic plot should be printed on heavyweight paper; do not use recycled or tracing paper. The size of the diagnostic plot is: ● 914 mm (36 in) printer: 610 × 914 mm (24 × 36 in) ● 610 mm (24 in) printer: 610 × 610 mm (24 × 24 in) You can print on a roll or a single sheet, which should be of the maximum width accepted by the printer. You can print the diagnostic plot from the front panel: touch , then Internal prints > Scanner IQ plot or Image Quality Maintenance > Scanner IQ plot > Printer maintenance > Scanner Diagnostic. Visual check for errors while printing the diagnostic sheet Once the diagnostic plot is printed, the first step is to check that all the patterns included in it are correctly printed. The diagnostic plot, if printed correctly, should look like this: Diagnostic plot for 914 mm (36 in) printer Diagnostic plot for 610 mm (24 in) printer Some of the most common defects that may appear in a printed diagnostic plot are described below. If you find any of these problems, you should follow the recommended recovery procedure. See the Troubleshooting printquality issues on page 136. Once the printer has been diagnosed and it is working correctly, you can reprint the diagnostic sheet as described in Prepare the printer and the paper to print the diagnostic sheet on page 166. Resolution By looking at pattern F you may find problems with the printer's resolution for the loaded paper. Usually, this test does not reveal a printer problem, but a defect in the paper, which may not be suitable for printing the diagnostic sheet with the required quality. Here is what you should see if all is well, followed by two defective examples. 166 Chapter 18 The scanner diagnostic plot ENWW
-
 1
1 -
2
-
3
-
4
-
5
-
6
-
7
-
8
-
9
-
10
-
11
-
12
-
13
-
14
-
15
-
16
-
17
-
18
-
19
-
20
-
21
-
22
-
23
-
24
-
25
-
26
-
27
-
28
-
29
-
30
-
31
-
32
-
33
-
34
-
35
-
36
-
37
-
38
-
39
-
40
-
41
-
42
-
43
-
44
-
45
-
46
-
47
-
48
-
49
-
50
-
51
-
52
-
53
-
54
-
55
-
56
-
57
-
58
-
59
-
60
-
61
-
62
-
63
-
64
-
65
-
66
-
67
-
68
-
69
-
70
-
71
-
72
-
73
-
74
-
75
-
76
-
77
-
78
-
79
-
80
-
81
-
82
-
83
-
84
-
85
-
86
-
87
-
88
-
89
-
90
-
91
-
92
-
93
-
94
-
95
-
96
-
97
-
98
-
99
-
100
-
101
-
102
-
103
-
104
-
105
-
106
-
107
-
108
-
109
-
110
-
111
-
112
-
113
-
114
-
115
-
116
-
117
-
118
-
119
-
120
-
121
-
122
-
123
-
124
-
125
-
126
-
127
-
128
-
129
-
130
-
131
-
132
-
133
-
134
-
135
-
136
-
137
-
138
-
139
-
140
-
141
-
142
-
143
-
144
-
145
-
146
-
147
-
148
-
149
-
150
-
151
-
152
-
153
-
154
-
155
-
156
-
157
-
158
-
159
-
160
-
161
-
162
-
163
-
164
-
 165
165 -
 166
166 -
 167
167 -
 168
168 -
 169
169 -
 170
170 -
 171
171 -
 172
172 -
 173
173 -
 174
174 -
 175
175 -
176
-
177
-
178
-
179
-
180
-
181
-
182
-
183
-
184
-
185
-
186
-
187
-
188
-
189
-
190
-
191
-
192
-
193
-
194
-
195
-
196
-
197
-
198
-
199
-
200
-
201
-
202
-
203
 |
 |