HP DesignJet T830 User guide - Page 59
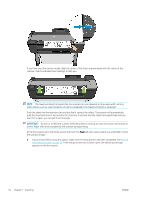
to start the scanning process., to eject the already fed document.
 |
View all HP DesignJet T830 manuals
Add to My Manuals
Save this manual to your list of manuals |
Page 59 highlights
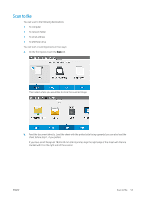
In this case, you must give the email address(es) to which the scanned job will be sent. Scan to email user interface options: - Sender - Send to: ○ Contact ○ Group ○ Addresses Swipe down the dashboard and touch to change scan to email settings. For further information on settings go to Scan to email setup process on page 59. Touch to eject the already fed document. Touch Start Scan to start the scanning process. NOTE: Before starting the process, make sure you have followed the Scan to email setup process. The scan to email setup has to be done from the Embedded Web Server. For more information, go to Scan to email setup process on Scan to email setup process on page 59. NOTE: If the scanned image is larger than the maximum permitted, the printer will ask you if you want to try to send it anyway. If you want to change this option, go to the Embedded Web Server and select Scan to email setup Maximum size of email. ● To a network folder. In this case, you must choose a folder accessible through the network. To create and/or change the folder options, go to the Embedded Web Server, and follow the instructions of the Network folder setup process. ENWW Scan to file 55
-
 1
1 -
2
-
3
-
4
-
5
-
6
-
7
-
8
-
9
-
10
-
11
-
12
-
13
-
14
-
15
-
16
-
17
-
18
-
19
-
20
-
21
-
22
-
23
-
24
-
25
-
26
-
27
-
28
-
29
-
30
-
31
-
32
-
33
-
34
-
35
-
36
-
37
-
38
-
39
-
40
-
41
-
42
-
43
-
44
-
45
-
46
-
47
-
48
-
49
-
50
-
51
-
52
-
53
-
 54
54 -
 55
55 -
 56
56 -
 57
57 -
 58
58 -
 59
59 -
 60
60 -
 61
61 -
 62
62 -
 63
63 -
 64
64 -
65
-
66
-
67
-
68
-
69
-
70
-
71
-
72
-
73
-
74
-
75
-
76
-
77
-
78
-
79
-
80
-
81
-
82
-
83
-
84
-
85
-
86
-
87
-
88
-
89
-
90
-
91
-
92
-
93
-
94
-
95
-
96
-
97
-
98
-
99
-
100
-
101
-
102
-
103
-
104
-
105
-
106
-
107
-
108
-
109
-
110
-
111
-
112
-
113
-
114
-
115
-
116
-
117
-
118
-
119
-
120
-
121
-
122
-
123
-
124
-
125
-
126
-
127
-
128
-
129
-
130
-
131
-
132
-
133
-
134
-
135
-
136
-
137
-
138
-
139
-
140
-
141
-
142
-
143
-
144
-
145
-
146
-
147
-
148
-
149
-
150
-
151
-
152
-
153
-
154
-
155
-
156
-
157
-
158
-
159
-
160
-
161
-
162
-
163
-
164
-
165
-
166
-
167
-
168
-
169
-
170
-
171
-
172
-
173
-
174
-
175
-
176
-
177
-
178
-
179
-
180
-
181
-
182
-
183
-
184
-
185
-
186
-
187
-
188
-
189
-
190
-
191
-
192
-
193
-
194
-
195
-
196
-
197
-
198
-
199
-
200
-
201
-
202
-
203
 |
 |
