HP EliteDesk 800 Maintenance and Service Guide - HP EliteDesk 800 G1 Tower, HP - Page 259
Interpreting POST diagnostic front panel LEDs and audible codes, Activity, Beeps, Possible cause
 |
View all HP EliteDesk 800 manuals
Add to My Manuals
Save this manual to your list of manuals |
Page 259 highlights
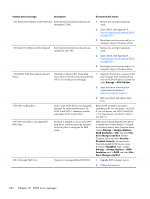
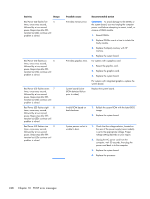
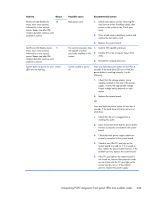
Activity Beeps Red Power LED flashes two 2 times, once every second, followed by a two second pause. Beeps stop after fifth iteration but LEDs continue until problem is solved. Red Power LED flashes three 3 times, once every second, followed by a two second pause. Beeps stop after fifth iteration but LEDs continue until problem is solved. Red Power LED flashes four 4 times, once every second, followed by a two second pause. Beeps stop after fifth iteration but LEDs continue until problem is solved. Possible cause Recommended action Processor thermal protection activated: A fan may be blocked or not turning. OR The heat sink/fan assembly is not properly attached to the processor. 1. Ensure that the computer air vents are not blocked and the processor cooling fan is running. 2. Open hood, press power button, and see if the processor fan spins. If the processor fan is not spinning, make sure the fan's cable is plugged onto the system board header. 3. If fan is plugged in, but is not spinning, then replace heat sink/fan assembly. 4. Contact an authorized reseller or service provider. Processor not installed (not 1. Check to see that the processor is present. an indicator of bad processor). 2. Reseat the processor. Power failure (power supply is overloaded). OR The incorrect external power supply adapter is being used on the USDT. 1. Open the hood and ensure the 4 or 6-wire power supply cable is seated into the connector on the system board. 2. Check if a device is causing the problem by removing ALL attached devices (such as hard, diskette, or optical drives, and expansion cards). Power on the system. If the system enters the POST, then power off and replace one device at a time and repeat this procedure until failure occurs. Replace the device that is causing the failure. Continue adding devices one at a time to ensure all devices are functioning properly. 3. Replace the power supply. 4. Replace the system board. OR The USDT power supply adapter must be at 135W and use the Smart ID technology before the system will power up. Replace the power supply adapter with the HP-supplied USDT power supply adapter. Interpreting POST diagnostic front panel LEDs and audible codes 247
-
 1
1 -
2
-
3
-
4
-
5
-
6
-
7
-
8
-
9
-
10
-
11
-
12
-
13
-
14
-
15
-
16
-
17
-
18
-
19
-
20
-
21
-
22
-
23
-
24
-
25
-
26
-
27
-
28
-
29
-
30
-
31
-
32
-
33
-
34
-
35
-
36
-
37
-
38
-
39
-
40
-
41
-
42
-
43
-
44
-
45
-
46
-
47
-
48
-
49
-
50
-
51
-
52
-
53
-
54
-
55
-
56
-
57
-
58
-
59
-
60
-
61
-
62
-
63
-
64
-
65
-
66
-
67
-
68
-
69
-
70
-
71
-
72
-
73
-
74
-
75
-
76
-
77
-
78
-
79
-
80
-
81
-
82
-
83
-
84
-
85
-
86
-
87
-
88
-
89
-
90
-
91
-
92
-
93
-
94
-
95
-
96
-
97
-
98
-
99
-
100
-
101
-
102
-
103
-
104
-
105
-
106
-
107
-
108
-
109
-
110
-
111
-
112
-
113
-
114
-
115
-
116
-
117
-
118
-
119
-
120
-
121
-
122
-
123
-
124
-
125
-
126
-
127
-
128
-
129
-
130
-
131
-
132
-
133
-
134
-
135
-
136
-
137
-
138
-
139
-
140
-
141
-
142
-
143
-
144
-
145
-
146
-
147
-
148
-
149
-
150
-
151
-
152
-
153
-
154
-
155
-
156
-
157
-
158
-
159
-
160
-
161
-
162
-
163
-
164
-
165
-
166
-
167
-
168
-
169
-
170
-
171
-
172
-
173
-
174
-
175
-
176
-
177
-
178
-
179
-
180
-
181
-
182
-
183
-
184
-
185
-
186
-
187
-
188
-
189
-
190
-
191
-
192
-
193
-
194
-
195
-
196
-
197
-
198
-
199
-
200
-
201
-
202
-
203
-
204
-
205
-
206
-
207
-
208
-
209
-
210
-
211
-
212
-
213
-
214
-
215
-
216
-
217
-
218
-
219
-
220
-
221
-
222
-
223
-
224
-
225
-
226
-
227
-
228
-
229
-
230
-
231
-
232
-
233
-
234
-
235
-
236
-
237
-
238
-
239
-
240
-
241
-
242
-
243
-
244
-
245
-
246
-
247
-
248
-
249
-
250
-
251
-
252
-
253
-
 254
254 -
 255
255 -
 256
256 -
 257
257 -
 258
258 -
 259
259 -
 260
260 -
 261
261 -
 262
262 -
 263
263 -
 264
264 -
265
-
266
-
267
-
268
-
269
-
270
-
271
-
272
-
273
-
274
-
275
-
276
-
277
-
278
-
279
-
280
-
281
-
282
-
283
-
284
-
285
-
286
-
287
-
288
-
289
-
290
-
291
-
292
-
293
-
294
-
295
-
296
 |
 |