HP EliteDesk 800 Maintenance and Service Guide - HP EliteDesk 800 G1 Tower, HP - Page 269
Creating recovery media and backups, Settings, Create a recovery drive, Help and Support
 |
View all HP EliteDesk 800 manuals
Add to My Manuals
Save this manual to your list of manuals |
Page 269 highlights
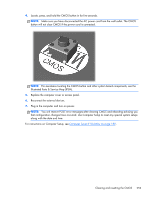
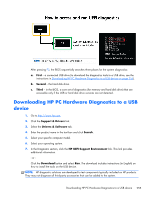
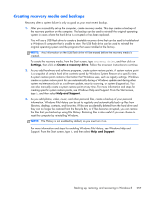
Creating recovery media and backups Recovery after a system failure is only as good as your most recent backup. 1. After you successfully set up the computer, create recovery media. This step creates a backup of the recovery partition on the computer. The backup can be used to reinstall the original operating system in cases where the hard drive is corrupted or has been replaced. You will use a USB flash drive to create a bootable recovery drive that can be used to troubleshoot a Windows 8 computer that is unable to start. The USB flash drive can be used to reinstall the original operating system and the programs that were installed at the factory. NOTE: Any information on the USB flash drive will be erased before the recovery media is created. To create the recovery media, from the Start screen, type recovery drive, and then click on Settings, then click on Create a recovery drive. Follow the on-screen instructions to continue. 2. As you add hardware and software programs, create system restore points. A system restore point is a snapshot of certain hard drive contents saved by Windows System Restore at a specific time. A system restore point contains information that Windows uses, such as registry settings. Windows creates a system restore point for you automatically during a Windows update and during other system maintenance (such as a software update, security scanning, or system diagnostics). You can also manually create a system restore point at any time. For more information and steps for creating specific system restore points, see Windows Help and Support. From the Start screen, type h, and then select Help and Support. 3. As you add photos, video, music, and other personal files, create a backup of your personal information. Windows File History can be set to regularly and automatically back up files from libraries, desktop, contacts, and favorites. If files are accidentally deleted from the hard drive and they can no longer be restored from the Recycle Bin, or if files become corrupted, you can restore the files that you backed up using File History. Restoring files is also useful if you ever choose to reset the computer by reinstalling Windows. NOTE: File History is not enabled by default, so you must turn it on. For more information and steps for enabling Windows File History, see Windows Help and Support. From the Start screen, type h, and then select Help and Support. Backing up, restoring, and recovering in Windows 8 257
-
 1
1 -
2
-
3
-
4
-
5
-
6
-
7
-
8
-
9
-
10
-
11
-
12
-
13
-
14
-
15
-
16
-
17
-
18
-
19
-
20
-
21
-
22
-
23
-
24
-
25
-
26
-
27
-
28
-
29
-
30
-
31
-
32
-
33
-
34
-
35
-
36
-
37
-
38
-
39
-
40
-
41
-
42
-
43
-
44
-
45
-
46
-
47
-
48
-
49
-
50
-
51
-
52
-
53
-
54
-
55
-
56
-
57
-
58
-
59
-
60
-
61
-
62
-
63
-
64
-
65
-
66
-
67
-
68
-
69
-
70
-
71
-
72
-
73
-
74
-
75
-
76
-
77
-
78
-
79
-
80
-
81
-
82
-
83
-
84
-
85
-
86
-
87
-
88
-
89
-
90
-
91
-
92
-
93
-
94
-
95
-
96
-
97
-
98
-
99
-
100
-
101
-
102
-
103
-
104
-
105
-
106
-
107
-
108
-
109
-
110
-
111
-
112
-
113
-
114
-
115
-
116
-
117
-
118
-
119
-
120
-
121
-
122
-
123
-
124
-
125
-
126
-
127
-
128
-
129
-
130
-
131
-
132
-
133
-
134
-
135
-
136
-
137
-
138
-
139
-
140
-
141
-
142
-
143
-
144
-
145
-
146
-
147
-
148
-
149
-
150
-
151
-
152
-
153
-
154
-
155
-
156
-
157
-
158
-
159
-
160
-
161
-
162
-
163
-
164
-
165
-
166
-
167
-
168
-
169
-
170
-
171
-
172
-
173
-
174
-
175
-
176
-
177
-
178
-
179
-
180
-
181
-
182
-
183
-
184
-
185
-
186
-
187
-
188
-
189
-
190
-
191
-
192
-
193
-
194
-
195
-
196
-
197
-
198
-
199
-
200
-
201
-
202
-
203
-
204
-
205
-
206
-
207
-
208
-
209
-
210
-
211
-
212
-
213
-
214
-
215
-
216
-
217
-
218
-
219
-
220
-
221
-
222
-
223
-
224
-
225
-
226
-
227
-
228
-
229
-
230
-
231
-
232
-
233
-
234
-
235
-
236
-
237
-
238
-
239
-
240
-
241
-
242
-
243
-
244
-
245
-
246
-
247
-
248
-
249
-
250
-
251
-
252
-
253
-
254
-
255
-
256
-
257
-
258
-
259
-
260
-
261
-
262
-
263
-
 264
264 -
 265
265 -
 266
266 -
 267
267 -
 268
268 -
 269
269 -
 270
270 -
 271
271 -
 272
272 -
 273
273 -
 274
274 -
275
-
276
-
277
-
278
-
279
-
280
-
281
-
282
-
283
-
284
-
285
-
286
-
287
-
288
-
289
-
290
-
291
-
292
-
293
-
294
-
295
-
296
 |
 |