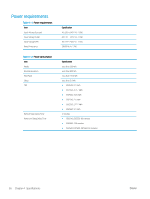
HP LaserJet Managed MFP E82540-E82560 On-Site Installation Guide - Page 37
CAUTION, Staging the side HCI sHCI, Slide the sHCI out of the carton.
 |
View all HP LaserJet Managed MFP E82540-E82560 manuals
Add to My Manuals
Save this manual to your list of manuals |
Page 37 highlights
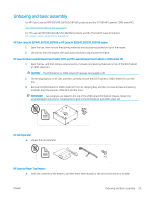
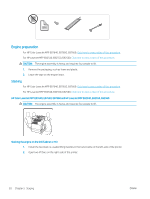
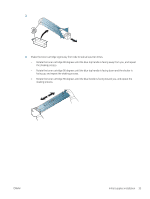
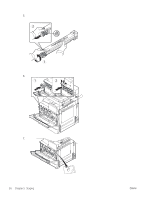
3. Carefully lift the engine assembly from each corner, align the engine to the locator pins and connector on the DCF/2000-sheet HCI, and then carefully lower the engine onto the DCF/2000-sheet HCI. 4. Install two thumbscrews for the 2000-sheet HCI and cabinet. 5. Remove the scanner lock screw. CAUTION: The scanner lock screw must be removed prior to powering on the printer. Staging the side HCI (sHCI) Click here to view a video of this procedure. 1. Cut the top of the container. 2. Open container for the cabinet. 3. Remove the shipping foam that includes rail, alignment bracket, additional hardware, and screws. Set these aside. CAUTION: The sHCI requires two people to lift out of the container. 4. Tilt carton on its side to allow easier removal of the cabinet from carton. 5. Slide the sHCI out of the carton. 6. Remove plastic bag from the sHCI. 7. Rotate the sHCI to its upright position with casters on the bottom. 8. Remove all shipping material and shipping tape from sHCI. 9. Open top of the sHCI and remove the shipping foam and shipping tape. NOTE: To remove shipping foam, lift from the bottom of the foam and lift straight up to remove. ENWW Unboxing and basic assembly 31
-
 1
1 -
2
-
3
-
4
-
5
-
6
-
7
-
8
-
9
-
10
-
11
-
12
-
13
-
14
-
15
-
16
-
17
-
18
-
19
-
20
-
21
-
22
-
23
-
24
-
25
-
26
-
27
-
28
-
29
-
30
-
31
-
 32
32 -
 33
33 -
 34
34 -
 35
35 -
 36
36 -
 37
37 -
 38
38 -
 39
39 -
 40
40 -
 41
41 -
 42
42 -
43
-
44
-
45
-
46
-
47
-
48
-
49
-
50
-
51
-
52
-
53
-
54
-
55
-
56
-
57
-
58
-
59
-
60
-
61
-
62
-
63
-
64
-
65
-
66
-
67
-
68
-
69
-
70
-
71
-
72
-
73
-
74
-
75
-
76
-
77
-
78
-
79
-
80
-
81
-
82
-
83
-
84
-
85
-
86
-
87
-
88
-
89
-
90
-
91
-
92
-
93
-
94
-
95
-
96
-
97
-
98
-
99
-
100
-
101
-
102
-
103
-
104
-
105
-
106
 |
 |
