HP LaserJet Managed MFP E82540-E82560 On-Site Installation Guide - Page 81
Cabinet installation continued, Table 8-1
 |
View all HP LaserJet Managed MFP E82540-E82560 manuals
Add to My Manuals
Save this manual to your list of manuals |
Page 81 highlights
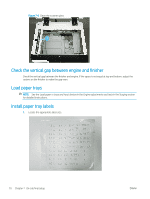
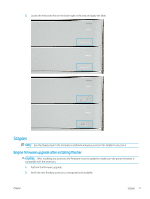
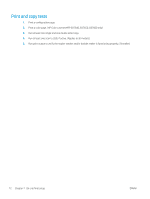
Table 8-1 Cabinet installation (continued) ❑ Open the right door - this removes the interlock blocking the drum unit opening. ❑ Remove the drum from the foam packing. ❑ Cut open the black protective bag and remove the drum unit. ❑ On the orange cover, locate the arrows numbered 1, 2, 3. ❑ Pull up at each location in order to release the cover from the drum unit. ❑ Rotate the drum unit and grasp the gray handle on top. ❑ Locate and grasp the handle on the front of the drum unit. ❑ Align the slots along the top of the drum unit with the rails on the engine. ❑ Carefully insert the drum unit until it is seated, and then use the thumbscrew to secure the drum unit in the engine. ❑ Install the TCU (toner collection unit). TIP: Push firmly on both sides at the same time to lock the TCU into the engine. ❑ Close the front door. ❑ Close the right door. ❑ Perform Late Point Differentiation and Configuration (LPDC). ❑ Apply the "XA3" barcode inside the front door and nameplate on the outside of the front door. ❑ Upgrade firmware with the latest available on hp.com. ❑ Insert the thumb drive with firmware at the connector on the control panel. ❑ Select the following: Support Tools > Maintenance > USB Firmware Upgrade. NOTE: All accessories must be attached when upgrading firmware. NOTE: Accessories added later will NOT be upgraded automatically. ENWW Cabinet stand and dual cassette feeder (DCF) installation 75
-
 1
1 -
2
-
3
-
4
-
5
-
6
-
7
-
8
-
9
-
10
-
11
-
12
-
13
-
14
-
15
-
16
-
17
-
18
-
19
-
20
-
21
-
22
-
23
-
24
-
25
-
26
-
27
-
28
-
29
-
30
-
31
-
32
-
33
-
34
-
35
-
36
-
37
-
38
-
39
-
40
-
41
-
42
-
43
-
44
-
45
-
46
-
47
-
48
-
49
-
50
-
51
-
52
-
53
-
54
-
55
-
56
-
57
-
58
-
59
-
60
-
61
-
62
-
63
-
64
-
65
-
66
-
67
-
68
-
69
-
70
-
71
-
72
-
73
-
74
-
75
-
 76
76 -
 77
77 -
 78
78 -
 79
79 -
 80
80 -
 81
81 -
 82
82 -
 83
83 -
 84
84 -
 85
85 -
 86
86 -
87
-
88
-
89
-
90
-
91
-
92
-
93
-
94
-
95
-
96
-
97
-
98
-
99
-
100
-
101
-
102
-
103
-
104
-
105
-
106
 |
 |
