HP LaserJet Managed MFP E82540-E82560 On-Site Installation Guide - Page 49
Rotate lower lever up to locking position about 90°, Initial power
 |
View all HP LaserJet Managed MFP E82540-E82560 manuals
Add to My Manuals
Save this manual to your list of manuals |
Page 49 highlights
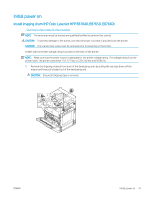
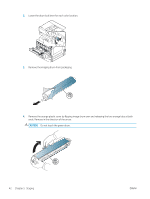
5. Support the imaging drum with one hand on the bottom and one hand holding the handle on the front. Do not use the waste toner connection as a handle. NOTE: Guide on the right top side of image drum that aligns with a guide inside the engine. 2 1 6. Slide into printer using the guide. 7. Rotate lower lever up to locking position (about 90°) ENWW Initial power on 43
-
 1
1 -
2
-
3
-
4
-
5
-
6
-
7
-
8
-
9
-
10
-
11
-
12
-
13
-
14
-
15
-
16
-
17
-
18
-
19
-
20
-
21
-
22
-
23
-
24
-
25
-
26
-
27
-
28
-
29
-
30
-
31
-
32
-
33
-
34
-
35
-
36
-
37
-
38
-
39
-
40
-
41
-
42
-
43
-
 44
44 -
 45
45 -
 46
46 -
 47
47 -
 48
48 -
 49
49 -
 50
50 -
 51
51 -
 52
52 -
 53
53 -
 54
54 -
55
-
56
-
57
-
58
-
59
-
60
-
61
-
62
-
63
-
64
-
65
-
66
-
67
-
68
-
69
-
70
-
71
-
72
-
73
-
74
-
75
-
76
-
77
-
78
-
79
-
80
-
81
-
82
-
83
-
84
-
85
-
86
-
87
-
88
-
89
-
90
-
91
-
92
-
93
-
94
-
95
-
96
-
97
-
98
-
99
-
100
-
101
-
102
-
103
-
104
-
105
-
106
 |
 |

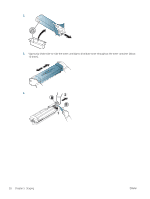
5.
Support the imaging drum with one hand on the bottom and one hand holding the handle on the front. Do
not use the waste toner connection as a handle.
NOTE:
Guide on the right top side of image drum that aligns with a guide inside the engine.
1
2
6.
Slide into printer using the guide.
7.
Rotate lower lever up to locking position (about 90°)
ENWW
Initial power on
43