HP LaserJet Managed MFP E82540-E82560 On-Site Installation Guide - Page 48
ends. Remove in the direction of the arrow., Do not touch the green drum.
 |
View all HP LaserJet Managed MFP E82540-E82560 manuals
Add to My Manuals
Save this manual to your list of manuals |
Page 48 highlights
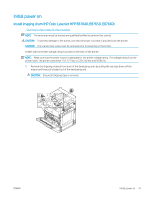
2. Lower the drum lock lever for each color location. 1 2 3. Remove the imaging drum from packaging. 4. Remove the orange plastic cover by flipping image drum over and releasing the two orange tabs at both ends. Remove in the direction of the arrow. CAUTION: Do not touch the green drum. 42 Chapter 5 Staging ENWW
-
 1
1 -
2
-
3
-
4
-
5
-
6
-
7
-
8
-
9
-
10
-
11
-
12
-
13
-
14
-
15
-
16
-
17
-
18
-
19
-
20
-
21
-
22
-
23
-
24
-
25
-
26
-
27
-
28
-
29
-
30
-
31
-
32
-
33
-
34
-
35
-
36
-
37
-
38
-
39
-
40
-
41
-
42
-
 43
43 -
 44
44 -
 45
45 -
 46
46 -
 47
47 -
 48
48 -
 49
49 -
 50
50 -
 51
51 -
 52
52 -
 53
53 -
54
-
55
-
56
-
57
-
58
-
59
-
60
-
61
-
62
-
63
-
64
-
65
-
66
-
67
-
68
-
69
-
70
-
71
-
72
-
73
-
74
-
75
-
76
-
77
-
78
-
79
-
80
-
81
-
82
-
83
-
84
-
85
-
86
-
87
-
88
-
89
-
90
-
91
-
92
-
93
-
94
-
95
-
96
-
97
-
98
-
99
-
100
-
101
-
102
-
103
-
104
-
105
-
106
 |
 |

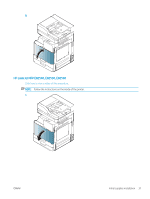
2.
Lower the drum lock lever for each color location.
1
2
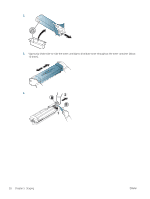
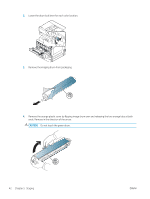
3.
Remove the imaging drum from packaging.
4.
Remove the orange plastic cover by flipping image drum over and releasing the two orange tabs at both
ends. Remove in the direction of the arrow.
CAUTION:
Do not touch the green drum.
42
Chapter 5
Staging
ENWW