HP LaserJet Managed MFP E82540-E82560 On-Site Installation Guide - Page 98
HP LaserJet Stapler/Stacker Finisher refill staple cartridge: Y1G14A., IMPORTANT
 |
View all HP LaserJet Managed MFP E82540-E82560 manuals
Add to My Manuals
Save this manual to your list of manuals |
Page 98 highlights
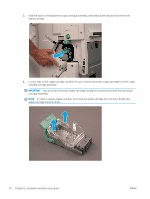
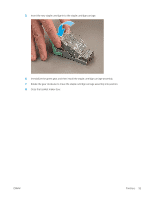
4. Pinch the blue tabs, and then rotate the top of the staple cartridge carriage assembly away from the staple cartridge. IMPORTANT: Do not discard the empty staple cartridge carriage. It must be reused with the new staple cartridge assembly. NOTE: In order to replace staple cartridge, to remove the staple cartridge from the inner finisher the staple cartridge must be empty. 5. Lift two tabs on the staple cartridge, and then lift up to remove the empty staple cartridge from the staple cartridge carriage assembly. 6. Insert the new staple cartridge in to the staple cartridge carriage assembly. 7. Rotate the top of the staple cartridge carriage assembly until it clicks into place. 8. Reinstall the staple cartridge carriage assembly into the booklet maker. 9. Slide the booklet maker assembly into the finisher assembly. 10. Close the booklet maker door. Replace the staple cartridge in the stapler stacker area Click here to view a video for the following procedure. HP LaserJet Stapler/Stacker finisher refill staple cartridge product number: Y1G14A. HP LaserJet Stapler/Stacker Finisher refill staple cartridge: Y1G14A. 1. Open the booklet maker door. 92 Chapter 8 Complete installation procedures ENWW
-
 1
1 -
2
-
3
-
4
-
5
-
6
-
7
-
8
-
9
-
10
-
11
-
12
-
13
-
14
-
15
-
16
-
17
-
18
-
19
-
20
-
21
-
22
-
23
-
24
-
25
-
26
-
27
-
28
-
29
-
30
-
31
-
32
-
33
-
34
-
35
-
36
-
37
-
38
-
39
-
40
-
41
-
42
-
43
-
44
-
45
-
46
-
47
-
48
-
49
-
50
-
51
-
52
-
53
-
54
-
55
-
56
-
57
-
58
-
59
-
60
-
61
-
62
-
63
-
64
-
65
-
66
-
67
-
68
-
69
-
70
-
71
-
72
-
73
-
74
-
75
-
76
-
77
-
78
-
79
-
80
-
81
-
82
-
83
-
84
-
85
-
86
-
87
-
88
-
89
-
90
-
91
-
92
-
 93
93 -
 94
94 -
 95
95 -
 96
96 -
 97
97 -
 98
98 -
 99
99 -
 100
100 -
 101
101 -
 102
102 -
 103
103 -
104
-
105
-
106
 |
 |
