HP LaserJet P2050 Service Manual - Page 236
Jam in Tray 2
 |
View all HP LaserJet P2050 manuals
Add to My Manuals
Save this manual to your list of manuals |
Page 236 highlights
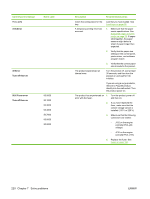
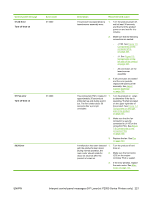
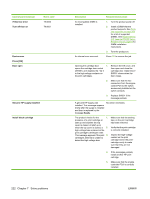
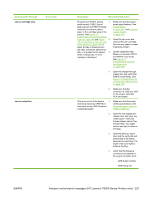
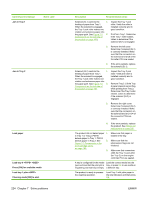
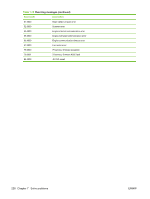
Control-panel message Jam in Tray 1 Event code Jam in Tray 2 Load paper Load tray # Press [OK] for available media Load tray 1 plain Cleaning mode [OK] to start 224 Chapter 7 Solve problems Description Recommended action Solenoid (SL1) controls the 1. feeding of paper from Tray 1. When the solenoid is engaged, the Tray 1 pick roller makes one rotation and advances paper into the paper path. See Figure 7-3 2. Components on the left side of the product on page 196). Inspect the Tray 1 pick roller. Verify the roller is installed correctly and in good condition. Print from Tray 1. Determine if the Tray 1 roller rotates. Listen to determine if the solenoid (SL1) is engaged. 3. Remove the left cover. Determine if solenoid (SL1) is correctly installed. Make sure that the connectors on the solenoid and at J4 of the formatter PCA are seated. 4. If the error persists, replace the solenoid (SL1). Solenoid (SL2) controls the 1. feeding of paper from Tray 1. When the solenoid is engaged, the Tray 1 pick roller makes one rotation and advances paper into the paper path. See Figure 7-3 2. Components on the left side of the product on page 196. Inspect the Tray 2 pick roller. Verify the roller is installed correctly and in good condition. Remove Tray 2. Lift the Tray 2 paper present sensor flag while printing from Tray 2. Determine if the Tray 2 roller rotates. Listen to determine if the solenoid (SL2) is engaged. 3. Remove the right cover. Determine if solenoid (SL2) is correctly installed. Make sure that the connectors on the solenoid and at J1104 of the connector PCA are seated. 4. If the error persists, replace the product. See Whole unit replacement on page 256. The product did not detect paper 1. in Tray 1 or Tray 2. PS916 detects paper in Tray 1. PS914 detects paper in Tray 2. See 2. Figure 7-7 Components in the print cartridge cavity on page 199. 3. Make sure that paper is loaded in the tray. Make sure that the photosensor flags are not hindered. Make sure that connectors J205 (for Tray 1) and J204 (for Tray 2) on the engine controller PCA are seated. A tray is configured for the media Load the correct media into the type and size that the print job is tray, or press OK to use media in requesting, but that tray is empty. a different tray. The product is ready to process the cleaning operation. Load Tray 1 with plain paper in the size indicated, and then press OK. ENWW
-
 1
1 -
2
-
3
-
4
-
5
-
6
-
7
-
8
-
9
-
10
-
11
-
12
-
13
-
14
-
15
-
16
-
17
-
18
-
19
-
20
-
21
-
22
-
23
-
24
-
25
-
26
-
27
-
28
-
29
-
30
-
31
-
32
-
33
-
34
-
35
-
36
-
37
-
38
-
39
-
40
-
41
-
42
-
43
-
44
-
45
-
46
-
47
-
48
-
49
-
50
-
51
-
52
-
53
-
54
-
55
-
56
-
57
-
58
-
59
-
60
-
61
-
62
-
63
-
64
-
65
-
66
-
67
-
68
-
69
-
70
-
71
-
72
-
73
-
74
-
75
-
76
-
77
-
78
-
79
-
80
-
81
-
82
-
83
-
84
-
85
-
86
-
87
-
88
-
89
-
90
-
91
-
92
-
93
-
94
-
95
-
96
-
97
-
98
-
99
-
100
-
101
-
102
-
103
-
104
-
105
-
106
-
107
-
108
-
109
-
110
-
111
-
112
-
113
-
114
-
115
-
116
-
117
-
118
-
119
-
120
-
121
-
122
-
123
-
124
-
125
-
126
-
127
-
128
-
129
-
130
-
131
-
132
-
133
-
134
-
135
-
136
-
137
-
138
-
139
-
140
-
141
-
142
-
143
-
144
-
145
-
146
-
147
-
148
-
149
-
150
-
151
-
152
-
153
-
154
-
155
-
156
-
157
-
158
-
159
-
160
-
161
-
162
-
163
-
164
-
165
-
166
-
167
-
168
-
169
-
170
-
171
-
172
-
173
-
174
-
175
-
176
-
177
-
178
-
179
-
180
-
181
-
182
-
183
-
184
-
185
-
186
-
187
-
188
-
189
-
190
-
191
-
192
-
193
-
194
-
195
-
196
-
197
-
198
-
199
-
200
-
201
-
202
-
203
-
204
-
205
-
206
-
207
-
208
-
209
-
210
-
211
-
212
-
213
-
214
-
215
-
216
-
217
-
218
-
219
-
220
-
221
-
222
-
223
-
224
-
225
-
226
-
227
-
228
-
229
-
230
-
 231
231 -
 232
232 -
 233
233 -
 234
234 -
 235
235 -
 236
236 -
 237
237 -
 238
238 -
 239
239 -
 240
240 -
 241
241 -
242
-
243
-
244
-
245
-
246
-
247
-
248
-
249
-
250
-
251
-
252
-
253
-
254
-
255
-
256
-
257
-
258
-
259
-
260
-
261
-
262
-
263
-
264
-
265
-
266
-
267
-
268
-
269
-
270
-
271
-
272
-
273
-
274
-
275
-
276
-
277
-
278
-
279
-
280
-
281
-
282
-
283
-
284
-
285
-
286
-
287
-
288
-
289
-
290
-
291
-
292
-
293
-
294
-
295
-
296
-
297
-
298
-
299
-
300
-
301
-
302
-
303
-
304
-
305
-
306
-
307
-
308
-
309
-
310
-
311
-
312
-
313
-
314
-
315
-
316
-
317
-
318
-
319
-
320
-
321
-
322
 |
 |