HP ML150 HP ProLiant ML100 Series Server User Guide - Page 29
Expansion board options
 |
UPC - 884420743644
View all HP ML150 manuals
Add to My Manuals
Save this manual to your list of manuals |
Page 29 highlights
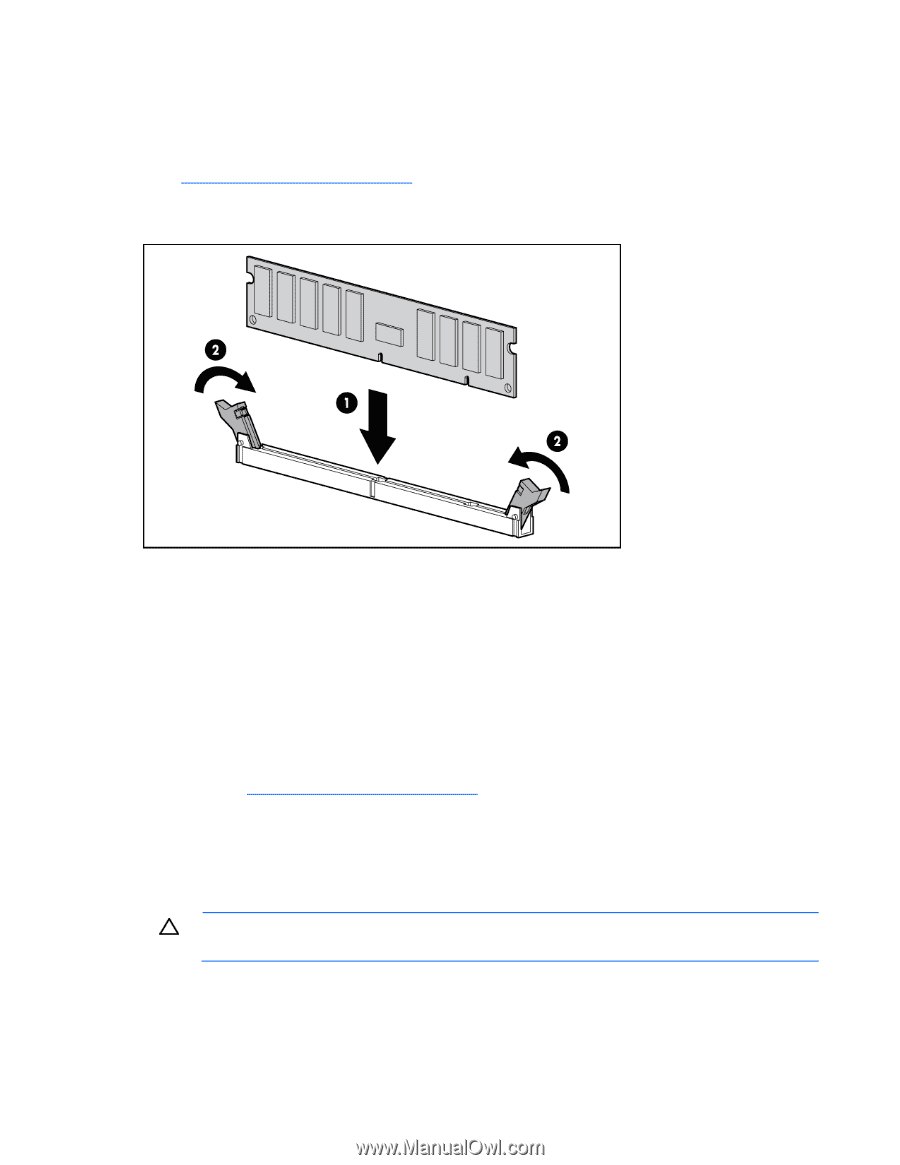
o Extend the server from the rack. 4. Remove the access panel (on page 7). 5. Remove the air baffle. For more information, see the server installation sheet on the HP website (http://www.hp.com/go/bizsupport). 6. Open the DIMM slot latches. 7. Install the DIMM. 8. Install the air baffle. 9. Install the access panel. 10. For ML110 G6 servers, slide the server back into the rack. 11. For ML150 G6 servers, do one of the following: o Close or install the tower bezel, as needed. o Slide the server back into the rack. If you are installing DIMMs in lock-step configuration, configure this mode in RBSU ("ROM-Based Setup Utility" on page 40). For more information about LEDs and troubleshooting failed DIMMs, see the server installation sheet on the HP website (http://www.hp.com/go/bizsupport). Expansion board options For server-specific expansion board installation instructions, refer to the installation sheet that ships with the server. CAUTION: To prevent damage to the server or expansion boards, power down the server and remove all AC power cords before removing or installing the expansion boards. To install the component: 1. Power down the server (on page 7). 2. For ML110 G6 servers, extend the server from the rack. Hardware options installation 29
-
 1
1 -
2
-
3
-
4
-
5
-
6
-
7
-
8
-
9
-
10
-
11
-
12
-
13
-
14
-
15
-
16
-
17
-
18
-
19
-
20
-
21
-
22
-
23
-
 24
24 -
 25
25 -
 26
26 -
 27
27 -
 28
28 -
 29
29 -
 30
30 -
 31
31 -
 32
32 -
 33
33 -
 34
34 -
35
-
36
-
37
-
38
-
39
-
40
-
41
-
42
-
43
-
44
-
45
-
46
-
47
-
48
-
49
-
50
-
51
-
52
-
53
-
54
-
55
-
56
-
57
-
58
-
59
-
60
-
61
-
62
-
63
-
64
-
65
-
66
-
67
-
68
-
69
-
70
-
71
-
72
-
73
-
74
-
75
-
76
-
77
-
78
-
79
-
80
-
81
-
82
-
83
-
84
-
85
-
86
-
87
-
88
-
89
-
90
-
91
-
92
-
93
-
94
-
95
-
96
-
97
-
98
-
99
-
100
-
101
-
102
-
103
-
104
-
105
-
106
-
107
-
108
-
109
-
110
-
111
-
112
 |
 |