HP Officejet J4000 User Guide - Page 103
To set up wireless communication using the installer (Windows)
 |
View all HP Officejet J4000 manuals
Add to My Manuals
Save this manual to your list of manuals |
Page 103 highlights
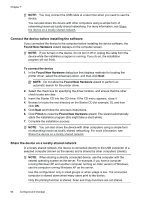
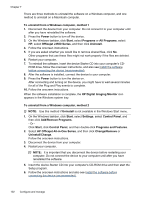
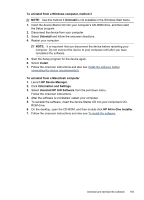
To set up wireless communication using the installer (Windows) For this method, you will need to have a network set up and running. 1. Set up the device hardware (see the Wireless getting started guide). 2. Remove the protective cover from the device's network port. 3. Close any applications that are running on your computer system. 4. Insert the Starter CD into the CD drive. The CD menu runs automatically. If the CD menu does not start automatically, double-click the setup icon on the Starter CD. 5. On the CD menu, click the appropriate installation option and follow the onscreen instructions. 6. On the Connection Type screen, select Wireless, and then click Next. NOTE: If the device cannot be found, you will have the option to temporarily use a network cable to communicate with the device and configure its wireless settings. Complete the following steps to temporarily connect the device to your computer network if you are unable to establish wireless communication. a. Temporarily connect the device to the network with a USB cable. b. Follow the onscreen instructions and disconnect the cable when prompted. 7. On the Select a Network Name (SSID) screen, click Select a detected Wireless Network Name (SSID) to select the wireless network, or click Specify a wireless network to enter a new network name. 8. If you chose to enter a new network name, enter it on the device control panel, and then press Done. NOTE: If the SSID that you entered is not found, you will be asked to provide security information. If the network does not use encryption, setup will attempt to verify the SSID before continuing. 9. If the device cannot connect to the network name, supply the appropriate WEP key or WPA passphrase on the keypad when prompted, and then press Done. NOTE: Be sure to unplug the USB cable when you are done. To set up the device on a wireless network (Mac OS) 1. Set up the device hardware (see the Wireless getting started guide). 2. Ensure an AirPort card is installed on the computer. 3. Close any applications that are running on your computer system. 4. Open the AirPort Setup Assistant from the Utilities folder. Refer to the AirPort documentation for details on setting up on wireless networks. 5. For ad hoc networks, click the AirPort icon on the menu bar and select "hpsetup" under Computer to Computer Networks. For wireless networks, click the AirPort icon, and then click Other to join the network. 6. Insert the Starter CD into the CD drive. The CD menu runs automatically. If the CD menu does not start automatically, double-click the setup icon on the Starter CD. 7. On the CD menu, click Install Software and follow the onscreen instructions. Set up the device for wireless communication (HP Officejet J4680 only) 99
-
 1
1 -
2
-
3
-
4
-
5
-
6
-
7
-
8
-
9
-
10
-
11
-
12
-
13
-
14
-
15
-
16
-
17
-
18
-
19
-
20
-
21
-
22
-
23
-
24
-
25
-
26
-
27
-
28
-
29
-
30
-
31
-
32
-
33
-
34
-
35
-
36
-
37
-
38
-
39
-
40
-
41
-
42
-
43
-
44
-
45
-
46
-
47
-
48
-
49
-
50
-
51
-
52
-
53
-
54
-
55
-
56
-
57
-
58
-
59
-
60
-
61
-
62
-
63
-
64
-
65
-
66
-
67
-
68
-
69
-
70
-
71
-
72
-
73
-
74
-
75
-
76
-
77
-
78
-
79
-
80
-
81
-
82
-
83
-
84
-
85
-
86
-
87
-
88
-
89
-
90
-
91
-
92
-
93
-
94
-
95
-
96
-
97
-
 98
98 -
 99
99 -
 100
100 -
 101
101 -
 102
102 -
 103
103 -
 104
104 -
 105
105 -
 106
106 -
 107
107 -
 108
108 -
109
-
110
-
111
-
112
-
113
-
114
-
115
-
116
-
117
-
118
-
119
-
120
-
121
-
122
-
123
-
124
-
125
-
126
-
127
-
128
-
129
-
130
-
131
-
132
-
133
-
134
-
135
-
136
-
137
-
138
-
139
-
140
-
141
-
142
-
143
-
144
-
145
-
146
-
147
-
148
-
149
-
150
-
151
-
152
-
153
-
154
-
155
-
156
-
157
-
158
-
159
-
160
-
161
-
162
-
163
-
164
-
165
-
166
-
167
-
168
-
169
-
170
-
171
-
172
-
173
-
174
-
175
-
176
-
177
-
178
-
179
-
180
-
181
-
182
-
183
-
184
-
185
-
186
-
187
-
188
-
189
-
190
-
191
-
192
-
193
-
194
-
195
-
196
 |
 |