HP Officejet J4000 User Guide - Page 136
Scan defects are apparent, Black dots or streaks
 |
View all HP Officejet J4000 manuals
Add to My Manuals
Save this manual to your list of manuals |
Page 136 highlights
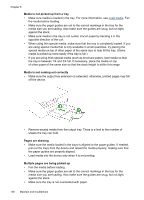
Chapter 8 The scanned image shows blots, lines, vertical white stripes, or other defects ◦ If the scanner glass is dirty, the image produced does not have optimum clarity. See Clean the device for cleaning instructions. ◦ The defects might be on the original and not a result of the scanning process. Graphics look different from the original The graphics settings might not be suitable for the type of scan job that you are performing. Try changing the graphics settings. Take steps to improve the scan quality ◦ Use high-quality originals. ◦ Place the media correctly. If the media is placed incorrectly on the scanner glass, it might skew, which causes unclear images. For more information, see Load originals. ◦ Adjust the software settings according to how you plan to use the scanned page. ◦ Use or make a carrier sheet to protect your originals. ◦ Clean the scanner glass. See Clean the scanner glass for more information. Scan defects are apparent • Blank pages Make sure that the original document is placed correctly. Place the original document face down on the flatbed scanner with the top-left corner of the document located in the lower-right corner of the scanner glass. • Too light or dark ◦ Try adjusting the settings. Be sure to use the correct resolution and color settings. ◦ The original image might be very light or dark or might be printed on colored paper. • Unwanted lines Ink, glue, correction fluid, or an unwanted substance might be on the scanner glass. Try cleaning the scanner glass. See Clean the device for more information. • Black dots or streaks ◦ Ink, glue, correction fluid, or an unwanted substance might be on the scanner glass, the scanner glass might be dirty or scratched, or the lid backing might be dirty. Try cleaning the scanner glass and lid backing. See Clean the device for more information. If cleaning does not correct the problem, the scanner glass or lid backing might need to be replaced. ◦ The defects might be on the original and not a result of the scanning process. • Unclear text Try adjusting the settings. Make sure that the resolution and color settings are correct. • Size is reduced The HP software settings might be set to reduce the scanned image. See the product software Help for more information about changing the settings. 132 Maintain and troubleshoot
-
 1
1 -
2
-
3
-
4
-
5
-
6
-
7
-
8
-
9
-
10
-
11
-
12
-
13
-
14
-
15
-
16
-
17
-
18
-
19
-
20
-
21
-
22
-
23
-
24
-
25
-
26
-
27
-
28
-
29
-
30
-
31
-
32
-
33
-
34
-
35
-
36
-
37
-
38
-
39
-
40
-
41
-
42
-
43
-
44
-
45
-
46
-
47
-
48
-
49
-
50
-
51
-
52
-
53
-
54
-
55
-
56
-
57
-
58
-
59
-
60
-
61
-
62
-
63
-
64
-
65
-
66
-
67
-
68
-
69
-
70
-
71
-
72
-
73
-
74
-
75
-
76
-
77
-
78
-
79
-
80
-
81
-
82
-
83
-
84
-
85
-
86
-
87
-
88
-
89
-
90
-
91
-
92
-
93
-
94
-
95
-
96
-
97
-
98
-
99
-
100
-
101
-
102
-
103
-
104
-
105
-
106
-
107
-
108
-
109
-
110
-
111
-
112
-
113
-
114
-
115
-
116
-
117
-
118
-
119
-
120
-
121
-
122
-
123
-
124
-
125
-
126
-
127
-
128
-
129
-
130
-
 131
131 -
 132
132 -
 133
133 -
 134
134 -
 135
135 -
 136
136 -
 137
137 -
 138
138 -
 139
139 -
 140
140 -
 141
141 -
142
-
143
-
144
-
145
-
146
-
147
-
148
-
149
-
150
-
151
-
152
-
153
-
154
-
155
-
156
-
157
-
158
-
159
-
160
-
161
-
162
-
163
-
164
-
165
-
166
-
167
-
168
-
169
-
170
-
171
-
172
-
173
-
174
-
175
-
176
-
177
-
178
-
179
-
180
-
181
-
182
-
183
-
184
-
185
-
186
-
187
-
188
-
189
-
190
-
191
-
192
-
193
-
194
-
195
-
196
 |
 |