HP Officejet J4000 User Guide - Page 133
Solve scan problems, Scanner did nothing, Check the original, Check the device, READY
 |
View all HP Officejet J4000 manuals
Add to My Manuals
Save this manual to your list of manuals |
Page 133 highlights
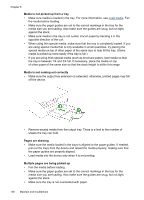
• When using thin special media, make sure that the tray is completely loaded. If you are using special media that is only available in small quantities, try placing the special media on top of other paper of the same size to help fill the tray. (Some media is picked up more easily if the tray is full.) • If you are using thick special media (such as brochure paper), load media so that the tray is between 1/4 and 3/4 full. If necessary, place the media on top of other paper of the same size so that the stack height is within this range. • Use HP media for optimum performance and efficiency. Solve scan problems If the following topics do not help, see Support and warranty for information about HP support. NOTE: If you are starting the scan from a computer, see the software Help for troubleshooting information. • Scanner did nothing • Scan takes too long • Part of the document did not scan or text is missing • Text cannot be edited • Error messages appear • Scanned image quality is poor • Scan defects are apparent Scanner did nothing • Check the original Make sure that the original is placed on the scanner glass correctly. For more information, see Load an original on the scanner glass. • Check the device The device might be coming out of PowerSave mode after a period of inactivity, which delays processing a short while. Wait until the device reaches the READY state. • Check the software Make sure the software is properly installed. Solve scan problems 129
-
 1
1 -
2
-
3
-
4
-
5
-
6
-
7
-
8
-
9
-
10
-
11
-
12
-
13
-
14
-
15
-
16
-
17
-
18
-
19
-
20
-
21
-
22
-
23
-
24
-
25
-
26
-
27
-
28
-
29
-
30
-
31
-
32
-
33
-
34
-
35
-
36
-
37
-
38
-
39
-
40
-
41
-
42
-
43
-
44
-
45
-
46
-
47
-
48
-
49
-
50
-
51
-
52
-
53
-
54
-
55
-
56
-
57
-
58
-
59
-
60
-
61
-
62
-
63
-
64
-
65
-
66
-
67
-
68
-
69
-
70
-
71
-
72
-
73
-
74
-
75
-
76
-
77
-
78
-
79
-
80
-
81
-
82
-
83
-
84
-
85
-
86
-
87
-
88
-
89
-
90
-
91
-
92
-
93
-
94
-
95
-
96
-
97
-
98
-
99
-
100
-
101
-
102
-
103
-
104
-
105
-
106
-
107
-
108
-
109
-
110
-
111
-
112
-
113
-
114
-
115
-
116
-
117
-
118
-
119
-
120
-
121
-
122
-
123
-
124
-
125
-
126
-
127
-
 128
128 -
 129
129 -
 130
130 -
 131
131 -
 132
132 -
 133
133 -
 134
134 -
 135
135 -
 136
136 -
 137
137 -
 138
138 -
139
-
140
-
141
-
142
-
143
-
144
-
145
-
146
-
147
-
148
-
149
-
150
-
151
-
152
-
153
-
154
-
155
-
156
-
157
-
158
-
159
-
160
-
161
-
162
-
163
-
164
-
165
-
166
-
167
-
168
-
169
-
170
-
171
-
172
-
173
-
174
-
175
-
176
-
177
-
178
-
179
-
180
-
181
-
182
-
183
-
184
-
185
-
186
-
187
-
188
-
189
-
190
-
191
-
192
-
193
-
194
-
195
-
196
 |
 |
