HP Officejet J4000 User Guide - Page 16
PC Copy B&W function indicator
 |
View all HP Officejet J4000 manuals
Add to My Manuals
Save this manual to your list of manuals |
Page 16 highlights
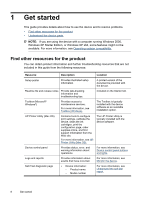
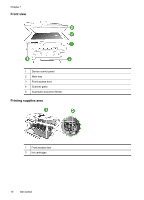
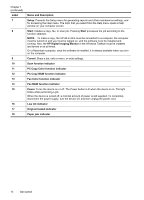
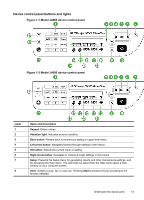
Chapter 1 (continued) Label 7 8 9 10 11 12 13 14 15 16 17 18 Name and Description Setup: Presents the Setup menu for generating reports and other maintenance settings, and for accessing the Help menu. The topic that you select from the Help menu opens a help window on your computer screen. Start: Initiates a copy, fax, or scan job. Pressing Start processes the job according to the function selected. NOTE: To make a copy, the HP All-in-One must be connected to a computer, the computer must be turned on and you must be logged on, and the software must be installed and running. Also, the HP Digital Imaging Monitor in the Windows Taskbar must be installed and turned on at all times. On a Macintosh computer, once the software is installed, it is always available when you turn on the computer. Cancel: Stops a job, exits a menu, or exits settings. Scan function indicator PC Copy Color function indicator PC Copy B&W function indicator Fax Color function indicator Fax B&W function indicator Power: Turns the device on or off. The Power button is lit when the device is on. The light blinks while performing a job. When the device is turned off, a minimal amount of power is still supplied. To completely disconnect the power supply, turn the device off, and then unplug the power cord. Low ink indicator Original loaded indicator Paper jam indicator 12 Get started
-
 1
1 -
2
-
3
-
4
-
5
-
6
-
7
-
8
-
9
-
10
-
 11
11 -
 12
12 -
 13
13 -
 14
14 -
 15
15 -
 16
16 -
 17
17 -
 18
18 -
 19
19 -
 20
20 -
 21
21 -
22
-
23
-
24
-
25
-
26
-
27
-
28
-
29
-
30
-
31
-
32
-
33
-
34
-
35
-
36
-
37
-
38
-
39
-
40
-
41
-
42
-
43
-
44
-
45
-
46
-
47
-
48
-
49
-
50
-
51
-
52
-
53
-
54
-
55
-
56
-
57
-
58
-
59
-
60
-
61
-
62
-
63
-
64
-
65
-
66
-
67
-
68
-
69
-
70
-
71
-
72
-
73
-
74
-
75
-
76
-
77
-
78
-
79
-
80
-
81
-
82
-
83
-
84
-
85
-
86
-
87
-
88
-
89
-
90
-
91
-
92
-
93
-
94
-
95
-
96
-
97
-
98
-
99
-
100
-
101
-
102
-
103
-
104
-
105
-
106
-
107
-
108
-
109
-
110
-
111
-
112
-
113
-
114
-
115
-
116
-
117
-
118
-
119
-
120
-
121
-
122
-
123
-
124
-
125
-
126
-
127
-
128
-
129
-
130
-
131
-
132
-
133
-
134
-
135
-
136
-
137
-
138
-
139
-
140
-
141
-
142
-
143
-
144
-
145
-
146
-
147
-
148
-
149
-
150
-
151
-
152
-
153
-
154
-
155
-
156
-
157
-
158
-
159
-
160
-
161
-
162
-
163
-
164
-
165
-
166
-
167
-
168
-
169
-
170
-
171
-
172
-
173
-
174
-
175
-
176
-
177
-
178
-
179
-
180
-
181
-
182
-
183
-
184
-
185
-
186
-
187
-
188
-
189
-
190
-
191
-
192
-
193
-
194
-
195
-
196
 |
 |
