HP PageWide Managed Color MFP E58650 User Guide - Page 114
FTP Transfer Mode, Update Preview
 |
View all HP PageWide Managed Color MFP E58650 manuals
Add to My Manuals
Save this manual to your list of manuals |
Page 114 highlights
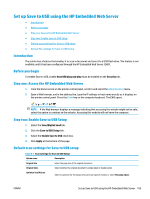
NOTE: If an FTP site is outside the firewall, a proxy server must be specified under the network settings These settings are located in the EWS Networking tab, under the Advanced options. 2. In the FTP Server field, type the FTP server name or IP address. 3. In the Port field, type the port number. NOTE: In most cases, the default port number does not need to be changed. 4. To automatically create a subfolder for scanned documents in the destination folder, select a format for the subfolder name from the Custom Subfolder list. 5. To view the complete folder path for scanned documents, click Update Preview. 6. From the FTP Transfer Mode list, select either Passive or Active. 7. In the Username field, type the user name. 8. In the Password field, type the password. 9. Click Verify Access to confirm the destination can be accessed. 10. Click OK. Option 2: Personal shared folders To save scanned documents to a personal shared folder, complete the following steps: NOTE: This option is used in domain environments where the administrator configures a shared folder for each user. If the Save to a personal shared folder feature is configured, users will be required to sign in at the printer control panel using Windows credentials or LDAP authentication. 100 Chapter 6 Scan ENWW
-
 1
1 -
2
-
3
-
4
-
5
-
6
-
7
-
8
-
9
-
10
-
11
-
12
-
13
-
14
-
15
-
16
-
17
-
18
-
19
-
20
-
21
-
22
-
23
-
24
-
25
-
26
-
27
-
28
-
29
-
30
-
31
-
32
-
33
-
34
-
35
-
36
-
37
-
38
-
39
-
40
-
41
-
42
-
43
-
44
-
45
-
46
-
47
-
48
-
49
-
50
-
51
-
52
-
53
-
54
-
55
-
56
-
57
-
58
-
59
-
60
-
61
-
62
-
63
-
64
-
65
-
66
-
67
-
68
-
69
-
70
-
71
-
72
-
73
-
74
-
75
-
76
-
77
-
78
-
79
-
80
-
81
-
82
-
83
-
84
-
85
-
86
-
87
-
88
-
89
-
90
-
91
-
92
-
93
-
94
-
95
-
96
-
97
-
98
-
99
-
100
-
101
-
102
-
103
-
104
-
105
-
106
-
107
-
108
-
 109
109 -
 110
110 -
 111
111 -
 112
112 -
 113
113 -
 114
114 -
 115
115 -
 116
116 -
 117
117 -
 118
118 -
 119
119 -
120
-
121
-
122
-
123
-
124
-
125
-
126
-
127
-
128
-
129
-
130
-
131
-
132
-
133
-
134
-
135
-
136
-
137
-
138
-
139
-
140
-
141
-
142
-
143
-
144
-
145
-
146
-
147
-
148
-
149
-
150
-
151
-
152
-
153
-
154
-
155
-
156
-
157
-
158
-
159
-
160
-
161
-
162
-
163
-
164
-
165
-
166
-
167
-
168
-
169
-
170
-
171
-
172
-
173
-
174
-
175
-
176
-
177
-
178
-
179
-
180
-
181
-
182
-
183
-
184
-
185
-
186
-
187
-
188
-
189
-
190
-
191
-
192
-
193
-
194
-
195
-
196
-
197
-
198
-
199
-
200
-
201
-
202
-
203
-
204
-
205
-
206
-
207
-
208
-
209
-
210
-
211
-
212
-
213
-
214
-
215
-
216
-
217
-
218
-
219
-
220
-
221
-
222
-
223
-
224
-
225
-
226
-
227
-
228
-
229
-
230
-
231
-
232
-
233
-
234
-
235
-
236
-
237
-
238
-
239
-
240
-
241
-
242
-
243
-
244
-
245
-
246
-
247
-
248
-
249
-
250
 |
 |
