HP PageWide Managed Color MFP E58650 User Guide - Page 163
Link speed and duplex settings, Link Speed
 |
View all HP PageWide Managed Color MFP E58650 manuals
Add to My Manuals
Save this manual to your list of manuals |
Page 163 highlights
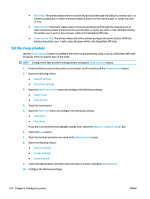
● TCP/IP ● IPV 6 Settings ● Address ● Manual Settings ● Enable 3. Select the On option, and then touch the Save button. 4. To configure the address, touch the Address button and then touch the field to open a keypad. 5. Use the keypad to enter the address, and then touch the OK button. 6. Touch the Save button. Link speed and duplex settings NOTE: This information applies only to Ethernet networks. It does not apply to wireless networks. The link speed and communication mode of the print server must match the network hub. For most situations, leave the printer in automatic mode. Incorrect changes to the link speed and duplex settings might prevent the printer from communicating with other network devices. To make changes, use the printer control panel. NOTE: The printer setting must match the setting for the network device (a network hub, switch, gateway, router, or computer). NOTE: Making changes to these settings causes the printer to turn off and then on. Make changes only when the printer is idle. 1. From the Home screen on the printer control panel, scroll to and touch the Administration button. 2. Open the following menus: ● Network Settings ● Jetdirect Menu ● Link Speed 3. Select one of the following options: ● Auto: The print server automatically configures itself for the highest link speed and communication mode allowed on the network. ● 10T Half: 10 megabytes per second (Mbps), half-duplex operation ● 10T Full: 10 Mbps, full-duplex operation ● 10T Auto: 10 Mbps, automatic-duplex operation ● 100TX Half: 100 Mbps, half-duplex operation ● 100TX Full: 100 Mbps, full-duplex operation ENWW Configure IP network settings 149
-
 1
1 -
2
-
3
-
4
-
5
-
6
-
7
-
8
-
9
-
10
-
11
-
12
-
13
-
14
-
15
-
16
-
17
-
18
-
19
-
20
-
21
-
22
-
23
-
24
-
25
-
26
-
27
-
28
-
29
-
30
-
31
-
32
-
33
-
34
-
35
-
36
-
37
-
38
-
39
-
40
-
41
-
42
-
43
-
44
-
45
-
46
-
47
-
48
-
49
-
50
-
51
-
52
-
53
-
54
-
55
-
56
-
57
-
58
-
59
-
60
-
61
-
62
-
63
-
64
-
65
-
66
-
67
-
68
-
69
-
70
-
71
-
72
-
73
-
74
-
75
-
76
-
77
-
78
-
79
-
80
-
81
-
82
-
83
-
84
-
85
-
86
-
87
-
88
-
89
-
90
-
91
-
92
-
93
-
94
-
95
-
96
-
97
-
98
-
99
-
100
-
101
-
102
-
103
-
104
-
105
-
106
-
107
-
108
-
109
-
110
-
111
-
112
-
113
-
114
-
115
-
116
-
117
-
118
-
119
-
120
-
121
-
122
-
123
-
124
-
125
-
126
-
127
-
128
-
129
-
130
-
131
-
132
-
133
-
134
-
135
-
136
-
137
-
138
-
139
-
140
-
141
-
142
-
143
-
144
-
145
-
146
-
147
-
148
-
149
-
150
-
151
-
152
-
153
-
154
-
155
-
156
-
157
-
 158
158 -
 159
159 -
 160
160 -
 161
161 -
 162
162 -
 163
163 -
 164
164 -
 165
165 -
 166
166 -
 167
167 -
 168
168 -
169
-
170
-
171
-
172
-
173
-
174
-
175
-
176
-
177
-
178
-
179
-
180
-
181
-
182
-
183
-
184
-
185
-
186
-
187
-
188
-
189
-
190
-
191
-
192
-
193
-
194
-
195
-
196
-
197
-
198
-
199
-
200
-
201
-
202
-
203
-
204
-
205
-
206
-
207
-
208
-
209
-
210
-
211
-
212
-
213
-
214
-
215
-
216
-
217
-
218
-
219
-
220
-
221
-
222
-
223
-
224
-
225
-
226
-
227
-
228
-
229
-
230
-
231
-
232
-
233
-
234
-
235
-
236
-
237
-
238
-
239
-
240
-
241
-
242
-
243
-
244
-
245
-
246
-
247
-
248
-
249
-
250
 |
 |
