HP PageWide Managed Color MFP E58650 User Guide - Page 97
Step two: Con the Network Identification settings
 |
View all HP PageWide Managed Color MFP E58650 manuals
Add to My Manuals
Save this manual to your list of manuals |
Page 97 highlights
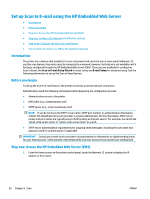
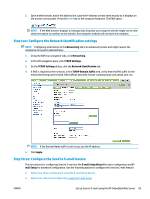
2. Open a Web browser, and in the address line, type the IP address or host name exactly as it displays on the printer control panel. Press the Enter key on the computer keyboard. The EWS opens. NOTE: If the Web browser displays a message indicating that accessing the website might not be safe, select the option to continue to the website. Accessing this website will not harm the computer. Step two: Configure the Network Identification settings NOTE: Configuring email setup on the Networking tab is an advanced process and might require the assistance of a system administrator. 1. Using the EWS top navigation tabs, click Networking. 2. In the left navigation pane, click TCP/IP Settings. 3. On the TCP/IP Settings dialog, click the Network Identification tab. 4. If DNS is required on the network, in the TCP/IP Domain Suffix area, verify that the DNS suffix for the email client being used is listed. DNS suffixes have this format: companyname.com, gmail.com, etc. NOTE: If the Domain Name suffix is not set up, use the IP address. 5. Click Apply. Step three: Configure the Send to E-mail feature The two options for configuring Send to E-mail are the E-mail Setup Wizard for basic configuration and Email Setup for advanced configuration. Use the following options to configure the Send to E-mail feature: ● Option one: Basic configuration using the E-mail Setup Wizard ● Option two: Advanced configuration using the E-mail Setup ENWW Set up Scan to E-mail using the HP Embedded Web Server 83
-
 1
1 -
2
-
3
-
4
-
5
-
6
-
7
-
8
-
9
-
10
-
11
-
12
-
13
-
14
-
15
-
16
-
17
-
18
-
19
-
20
-
21
-
22
-
23
-
24
-
25
-
26
-
27
-
28
-
29
-
30
-
31
-
32
-
33
-
34
-
35
-
36
-
37
-
38
-
39
-
40
-
41
-
42
-
43
-
44
-
45
-
46
-
47
-
48
-
49
-
50
-
51
-
52
-
53
-
54
-
55
-
56
-
57
-
58
-
59
-
60
-
61
-
62
-
63
-
64
-
65
-
66
-
67
-
68
-
69
-
70
-
71
-
72
-
73
-
74
-
75
-
76
-
77
-
78
-
79
-
80
-
81
-
82
-
83
-
84
-
85
-
86
-
87
-
88
-
89
-
90
-
91
-
 92
92 -
 93
93 -
 94
94 -
 95
95 -
 96
96 -
 97
97 -
 98
98 -
 99
99 -
 100
100 -
 101
101 -
 102
102 -
103
-
104
-
105
-
106
-
107
-
108
-
109
-
110
-
111
-
112
-
113
-
114
-
115
-
116
-
117
-
118
-
119
-
120
-
121
-
122
-
123
-
124
-
125
-
126
-
127
-
128
-
129
-
130
-
131
-
132
-
133
-
134
-
135
-
136
-
137
-
138
-
139
-
140
-
141
-
142
-
143
-
144
-
145
-
146
-
147
-
148
-
149
-
150
-
151
-
152
-
153
-
154
-
155
-
156
-
157
-
158
-
159
-
160
-
161
-
162
-
163
-
164
-
165
-
166
-
167
-
168
-
169
-
170
-
171
-
172
-
173
-
174
-
175
-
176
-
177
-
178
-
179
-
180
-
181
-
182
-
183
-
184
-
185
-
186
-
187
-
188
-
189
-
190
-
191
-
192
-
193
-
194
-
195
-
196
-
197
-
198
-
199
-
200
-
201
-
202
-
203
-
204
-
205
-
206
-
207
-
208
-
209
-
210
-
211
-
212
-
213
-
214
-
215
-
216
-
217
-
218
-
219
-
220
-
221
-
222
-
223
-
224
-
225
-
226
-
227
-
228
-
229
-
230
-
231
-
232
-
233
-
234
-
235
-
236
-
237
-
238
-
239
-
240
-
241
-
242
-
243
-
244
-
245
-
246
-
247
-
248
-
249
-
250
 |
 |
