HP PageWide Managed Color MFP E58650 User Guide - Page 134
Scan and send to USB Flash Drive, Introduction, Scan and save the document to a USB flash drive
 |
View all HP PageWide Managed Color MFP E58650 manuals
Add to My Manuals
Save this manual to your list of manuals |
Page 134 highlights
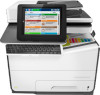
Scan and send to USB Flash Drive Introduction The printer can scan a file and save it on a USB flash drive. Before using this feature, use the HP Embedded Web server to enable and configure it. Scan and save the document to a USB flash drive NOTE: You might be required to sign in to the printer to use this feature. 1. Place the document face-down on the scanner glass, or place it face-up in the document feeder and adjust the paper guides to fit the size of the document. 2. Insert the USB flash drive into the USB port near the printer control panel. 3. From the Home screen on the printer control panel, scroll to and touch the Save to USB button. 4. Save the file on the root of the USB flash drive, save it in an existing folder, or touch the New Folder button to create a new folder on the USB flash drive. 5. Touch the File Name text field to open a keyboard, and then type the name for the file, and then touch the OK button. 6. To configure settings for the document, touch the More Options button. For example: ● Select File Type and Resolution to specify the type of file to create, the resolution, and the output quality. ● If the original document is printed on both sides, select Original Sides, and then select 2 Sided. 7. Touch the preview button to preview the document. In the preview screen, use the buttons at the bottom of the screen to adjust the preview options, and to rearrange, rotate, insert, or remove pages. 8. When the document is ready, touch the Start button to save the file. 120 Chapter 6 Scan ENWW
-
 1
1 -
2
-
3
-
4
-
5
-
6
-
7
-
8
-
9
-
10
-
11
-
12
-
13
-
14
-
15
-
16
-
17
-
18
-
19
-
20
-
21
-
22
-
23
-
24
-
25
-
26
-
27
-
28
-
29
-
30
-
31
-
32
-
33
-
34
-
35
-
36
-
37
-
38
-
39
-
40
-
41
-
42
-
43
-
44
-
45
-
46
-
47
-
48
-
49
-
50
-
51
-
52
-
53
-
54
-
55
-
56
-
57
-
58
-
59
-
60
-
61
-
62
-
63
-
64
-
65
-
66
-
67
-
68
-
69
-
70
-
71
-
72
-
73
-
74
-
75
-
76
-
77
-
78
-
79
-
80
-
81
-
82
-
83
-
84
-
85
-
86
-
87
-
88
-
89
-
90
-
91
-
92
-
93
-
94
-
95
-
96
-
97
-
98
-
99
-
100
-
101
-
102
-
103
-
104
-
105
-
106
-
107
-
108
-
109
-
110
-
111
-
112
-
113
-
114
-
115
-
116
-
117
-
118
-
119
-
120
-
121
-
122
-
123
-
124
-
125
-
126
-
127
-
128
-
 129
129 -
 130
130 -
 131
131 -
 132
132 -
 133
133 -
 134
134 -
 135
135 -
 136
136 -
 137
137 -
 138
138 -
 139
139 -
140
-
141
-
142
-
143
-
144
-
145
-
146
-
147
-
148
-
149
-
150
-
151
-
152
-
153
-
154
-
155
-
156
-
157
-
158
-
159
-
160
-
161
-
162
-
163
-
164
-
165
-
166
-
167
-
168
-
169
-
170
-
171
-
172
-
173
-
174
-
175
-
176
-
177
-
178
-
179
-
180
-
181
-
182
-
183
-
184
-
185
-
186
-
187
-
188
-
189
-
190
-
191
-
192
-
193
-
194
-
195
-
196
-
197
-
198
-
199
-
200
-
201
-
202
-
203
-
204
-
205
-
206
-
207
-
208
-
209
-
210
-
211
-
212
-
213
-
214
-
215
-
216
-
217
-
218
-
219
-
220
-
221
-
222
-
223
-
224
-
225
-
226
-
227
-
228
-
229
-
230
-
231
-
232
-
233
-
234
-
235
-
236
-
237
-
238
-
239
-
240
-
241
-
242
-
243
-
244
-
245
-
246
-
247
-
248
-
249
-
250
 |
 |
