HP Pavilion a400 HP Pavilion Desktop PCs - (English) Users Guide 5990-6416 - Page 142
To install a new optical drive.
 |
View all HP Pavilion a400 manuals
Add to My Manuals
Save this manual to your list of manuals |
Page 142 highlights
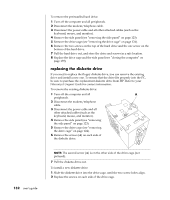
5 Remove the side panel (see "removing the side panel" on page 123). 6 Remove the fan duct (see "removing the fan duct" on page 124). 7 If you are adding a drive to an empty lower bay, remove the bay insert by putting your fingers in the holes (B) and pulling the insert toward you and out of the computer. Skip to the next section, "To install a new optical drive". B 8 Locate the screws (C and D) on the optical drive. C D NOTE: The location of the screws varies, depending on the computer chassis you have. Make sure to identify your chassis on page 97, and refer to the appropriate optical drive drawings. 134 user's guide
-
 1
1 -
2
-
3
-
4
-
5
-
6
-
7
-
8
-
9
-
10
-
11
-
12
-
13
-
14
-
15
-
16
-
17
-
18
-
19
-
20
-
21
-
22
-
23
-
24
-
25
-
26
-
27
-
28
-
29
-
30
-
31
-
32
-
33
-
34
-
35
-
36
-
37
-
38
-
39
-
40
-
41
-
42
-
43
-
44
-
45
-
46
-
47
-
48
-
49
-
50
-
51
-
52
-
53
-
54
-
55
-
56
-
57
-
58
-
59
-
60
-
61
-
62
-
63
-
64
-
65
-
66
-
67
-
68
-
69
-
70
-
71
-
72
-
73
-
74
-
75
-
76
-
77
-
78
-
79
-
80
-
81
-
82
-
83
-
84
-
85
-
86
-
87
-
88
-
89
-
90
-
91
-
92
-
93
-
94
-
95
-
96
-
97
-
98
-
99
-
100
-
101
-
102
-
103
-
104
-
105
-
106
-
107
-
108
-
109
-
110
-
111
-
112
-
113
-
114
-
115
-
116
-
117
-
118
-
119
-
120
-
121
-
122
-
123
-
124
-
125
-
126
-
127
-
128
-
129
-
130
-
131
-
132
-
133
-
134
-
135
-
136
-
 137
137 -
 138
138 -
 139
139 -
 140
140 -
 141
141 -
 142
142 -
 143
143 -
 144
144 -
 145
145 -
 146
146 -
 147
147 -
148
-
149
-
150
-
151
-
152
-
153
-
154
-
155
-
156
 |
 |

134
user’s guide
5
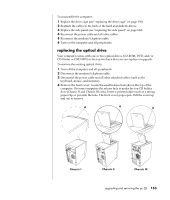
Remove the side panel (see
”removing the side panel” on
page 123).
6
Remove the fan duct (see
”removing the fan duct” on
page 124).
7
If you are adding a drive to an
empty lower bay, remove the bay
insert by putting your fingers in
the holes (
B
) and pulling the insert
toward you and out of the
computer. Skip to the next section,
”To install a new optical drive”.
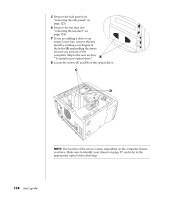
8
Locate the screws (
C
and
D
) on the optical drive.
C
D
NOTE:
The location of the screws varies, depending on the computer chassis
you have. Make sure to identify your chassis on page 97, and refer to the
appropriate optical drive drawings.
B