HP Pavilion a400 HP Pavilion Desktop PCs - (English) Users Guide 5990-6416 - Page 63
using the combo drive, using the diskette floppy drive
 |
View all HP Pavilion a400 manuals
Add to My Manuals
Save this manual to your list of manuals |
Page 63 highlights
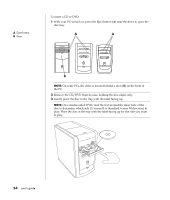
4 Close the disc tray by: • Gently pushing the tray into the PC. Or • Clicking the close/open button on the control panel for the program (such as MusicMatch Jukebox or Windows Media Player) that controls the drive. Or • Pressing the media control open/close button or Eject button on the keyboard (select models only). Or • Pressing the Eject button on the drive, if it is accessible. To remove a CD or DVD: 1 With the PC turned on, open the disc tray by pressing the Eject button. NOTE: You cannot eject the disc tray when the PC is off. 2 Holding on to the disc edges or centre hole only, lift the CD or DVD out of the tray. 3 Place the disc in its case. 4 Close the disc tray by gently pushing the tray into the PC. using the combo drive The combination drive is available on select models only. It combines the functions of two drives into one: either a DVD+RW/+R drive (dvd writer) and a CD-RW drive, or a DVD-ROM drive and a CD-RW drive. using the diskette (floppy) drive The diskette (floppy) drive is available on select model PCs. If your PC does not already have a diskette drive, you cannot add one to the PC chassis as an internal drive. Instead, purchase an external USB diskette drive or other external storage device to suit your needs. If your PC has a diskette (floppy) drive (select models only), you can use a 3.5" diskette (floppy disk) to store files: 1 Insert the diskette with the round metal disk facing down and the arrow on the top pointing into the drive. 2 Gently push the diskette into the drive until it locks in place. 3 You can copy files from or to the diskette. Refer to the Windows Explorer section of Windows Help for instructions on copying files to and from a diskette. 4 When you are ready to remove the diskette, check that the light on the drive is off. This indicates that the PC is not writing to the diskette. 5 Press the Eject button on the PC to remove the diskette. Remove the diskette from the drive prior to turning off the PC. working with sound, pictures, and video 55
-
 1
1 -
2
-
3
-
4
-
5
-
6
-
7
-
8
-
9
-
10
-
11
-
12
-
13
-
14
-
15
-
16
-
17
-
18
-
19
-
20
-
21
-
22
-
23
-
24
-
25
-
26
-
27
-
28
-
29
-
30
-
31
-
32
-
33
-
34
-
35
-
36
-
37
-
38
-
39
-
40
-
41
-
42
-
43
-
44
-
45
-
46
-
47
-
48
-
49
-
50
-
51
-
52
-
53
-
54
-
55
-
56
-
57
-
 58
58 -
 59
59 -
 60
60 -
 61
61 -
 62
62 -
 63
63 -
 64
64 -
 65
65 -
 66
66 -
 67
67 -
 68
68 -
69
-
70
-
71
-
72
-
73
-
74
-
75
-
76
-
77
-
78
-
79
-
80
-
81
-
82
-
83
-
84
-
85
-
86
-
87
-
88
-
89
-
90
-
91
-
92
-
93
-
94
-
95
-
96
-
97
-
98
-
99
-
100
-
101
-
102
-
103
-
104
-
105
-
106
-
107
-
108
-
109
-
110
-
111
-
112
-
113
-
114
-
115
-
116
-
117
-
118
-
119
-
120
-
121
-
122
-
123
-
124
-
125
-
126
-
127
-
128
-
129
-
130
-
131
-
132
-
133
-
134
-
135
-
136
-
137
-
138
-
139
-
140
-
141
-
142
-
143
-
144
-
145
-
146
-
147
-
148
-
149
-
150
-
151
-
152
-
153
-
154
-
155
-
156
 |
 |
