HP Pavilion a400 HP Pavilion Desktop PCs - (English) Users Guide 5990-6416 - Page 146
Install the new CR2032 battery in the socket, with the positive + side
 |
View all HP Pavilion a400 manuals
Add to My Manuals
Save this manual to your list of manuals |
Page 146 highlights
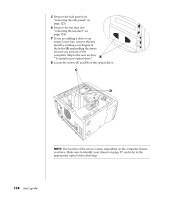
replacing the battery A lithium battery on the motherboard provides backup power for the computer's timekeeping capability. The battery has an estimated life expectancy of seven years. When the battery starts to weaken, the date and time may be incorrect. If the battery fails, replace it with a CR2032 lithium battery (3 volt, 220mAH rating) or an equivalent battery. WARNING: There is danger of explosion if the battery is incorrectly replaced. Replace only with the same, or equivalent, type of battery. Discard used batteries according to the manufacturer's instructions. To replace the battery: 1 Turn off the computer and all peripherals. 2 Disconnect the modem/telephone cable. 3 Disconnect the power cable and all other attached cables (such as the keyboard, mouse, and monitor). 4 Remove the side panel (see "removing the side panel" on page 123). 5 If necessary to reach the battery, remove the drive cage (see "removing the drive cage" on page 124). 6 If necessary to reach the battery, remove the fan duct (see "removing the drive cage" on page 124). 7 If any cards restrict access to the battery: • Remove the add-in card bracket. (See 7-9 of "installing add-in cards" on page 129.) • Remove the cards that are on or near the battery. 8 With a pen or screwdriver, press the metal latch that holds the battery in its socket. The battery will pop out. 9 Install the new CR2032 battery in the socket, with the positive (+) side facing up. To reassemble the computer: 1 Replace any cards that you removed, and then replace the add-in card bracket. 2 Replace the drive cage, fan duct, and side panel (see "closing the computer" on page 139). 3 Reconnect the power cable and all other cables. 4 Reconnect the modem/telephone cable. 5 Turn on the computer and all peripherals. 6 Run the BIOS setup program to reset the date and time. 138 user's guide
-
 1
1 -
2
-
3
-
4
-
5
-
6
-
7
-
8
-
9
-
10
-
11
-
12
-
13
-
14
-
15
-
16
-
17
-
18
-
19
-
20
-
21
-
22
-
23
-
24
-
25
-
26
-
27
-
28
-
29
-
30
-
31
-
32
-
33
-
34
-
35
-
36
-
37
-
38
-
39
-
40
-
41
-
42
-
43
-
44
-
45
-
46
-
47
-
48
-
49
-
50
-
51
-
52
-
53
-
54
-
55
-
56
-
57
-
58
-
59
-
60
-
61
-
62
-
63
-
64
-
65
-
66
-
67
-
68
-
69
-
70
-
71
-
72
-
73
-
74
-
75
-
76
-
77
-
78
-
79
-
80
-
81
-
82
-
83
-
84
-
85
-
86
-
87
-
88
-
89
-
90
-
91
-
92
-
93
-
94
-
95
-
96
-
97
-
98
-
99
-
100
-
101
-
102
-
103
-
104
-
105
-
106
-
107
-
108
-
109
-
110
-
111
-
112
-
113
-
114
-
115
-
116
-
117
-
118
-
119
-
120
-
121
-
122
-
123
-
124
-
125
-
126
-
127
-
128
-
129
-
130
-
131
-
132
-
133
-
134
-
135
-
136
-
137
-
138
-
139
-
140
-
 141
141 -
 142
142 -
 143
143 -
 144
144 -
 145
145 -
 146
146 -
 147
147 -
 148
148 -
 149
149 -
 150
150 -
 151
151 -
152
-
153
-
154
-
155
-
156
 |
 |