HP SW TL881 DLT Mini-Lib/1 Compaq StorageWorks TL881/TL891 Family MiniLibrary - Page 112
Setting a SCSI ID
 |
View all HP SW TL881 DLT Mini-Lib/1 manuals
Add to My Manuals
Save this manual to your list of manuals |
Page 112 highlights
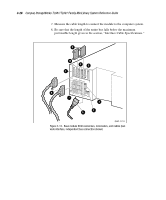
Installation 3-31 6. Press the button repeatedly to scroll down to select Alternate Config screen: Unit Attn. Report: *All: Alternate Config: *Standalone 7. Press the Enter and then button to change the line to Slave. Press the Enter button again and after selection stops flashing. The following screen appears: Change Not Effective Until Reboot ENTER to Continue 8. Press the Enter button. When the Special Configuration submenu reappears, turn the power switch off to cycle power. NOTE: Expansion unit installation re-maps the cartridge slot numbering system as follows: The 16-slots of the Expansion Unit become slot numbers 0-15. Slots 0-9 of the first MiniLibrary Base Module become slots 16-25, etc. Setting a SCSI ID 1. Turn the system on, and wait until the Power-On Self Test (POST) completes and the following Default screen appears on the display. Yours might vary depending on the number of modules in your system, as shown in the second line. READY Modules:0_ _ _ _ _ 0 ________ 9 10 _ _ _ _ _ 15 2. At the Default screen, press the Enter button. The following Main menu screen appears: Load/Unload Show Status Menu Maintenance Menu Configure Menu
-
 1
1 -
2
-
3
-
4
-
5
-
6
-
7
-
8
-
9
-
10
-
11
-
12
-
13
-
14
-
15
-
16
-
17
-
18
-
19
-
20
-
21
-
22
-
23
-
24
-
25
-
26
-
27
-
28
-
29
-
30
-
31
-
32
-
33
-
34
-
35
-
36
-
37
-
38
-
39
-
40
-
41
-
42
-
43
-
44
-
45
-
46
-
47
-
48
-
49
-
50
-
51
-
52
-
53
-
54
-
55
-
56
-
57
-
58
-
59
-
60
-
61
-
62
-
63
-
64
-
65
-
66
-
67
-
68
-
69
-
70
-
71
-
72
-
73
-
74
-
75
-
76
-
77
-
78
-
79
-
80
-
81
-
82
-
83
-
84
-
85
-
86
-
87
-
88
-
89
-
90
-
91
-
92
-
93
-
94
-
95
-
96
-
97
-
98
-
99
-
100
-
101
-
102
-
103
-
104
-
105
-
106
-
 107
107 -
 108
108 -
 109
109 -
 110
110 -
 111
111 -
 112
112 -
 113
113 -
 114
114 -
 115
115 -
 116
116 -
 117
117 -
118
-
119
-
120
-
121
-
122
-
123
-
124
-
125
-
126
-
127
-
128
-
129
-
130
-
131
-
132
-
133
-
134
-
135
-
136
-
137
-
138
-
139
-
140
-
141
-
142
-
143
-
144
-
145
-
146
-
147
-
148
-
149
-
150
-
151
-
152
-
153
-
154
-
155
-
156
-
157
-
158
-
159
-
160
-
161
-
162
-
163
-
164
-
165
-
166
-
167
-
168
-
169
-
170
-
171
-
172
-
173
-
174
-
175
-
176
-
177
-
178
-
179
-
180
-
181
-
182
-
183
-
184
-
185
-
186
-
187
-
188
-
189
-
190
-
191
-
192
-
193
-
194
-
195
-
196
-
197
-
198
-
199
-
200
-
201
-
202
-
203
-
204
-
205
-
206
-
207
-
208
-
209
-
210
-
211
-
212
-
213
 |
 |
