HP SW TL881 DLT Mini-Lib/1 Compaq StorageWorks TL881/TL891 Family MiniLibrary - Page 96
Adding to an Existing PTM, Base Modules.
 |
View all HP SW TL881 DLT Mini-Lib/1 manuals
Add to My Manuals
Save this manual to your list of manuals |
Page 96 highlights
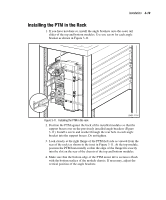
Installation 3-15 17. While continuing to press the belt block against the back of the track, begin to tighten the captive screws. When both screws are partially threaded into the belt block, release the belt and finish tightening the screws. Be sure that the block is fully seated against the bracket on the car. Close and secure the door on the car. 18. Using nylon button rivets, install covers over any exposed PTM sections that are not covered by modules. NOTE: See Appendix E, "Additional Information on Pass-Through Section Covers." Go to the section "Mechanical Installation of the Expansion and MiniLibrary Base Modules." Adding to an Existing PTM Before reading this section, familiarize yourself with the parts and procedures by reading the two preceding sections. To add to an existing PTM, you must first partly disassemble it, then make the necessary changes as described in the preceding sections. Use the following procedure for disassembly. 1. Locate the covers over the drive motor section and the base assembly. Note that the covers are held in place by nylon button rivet fasteners. Using a suitable thin-bladed tool, pry up the cover until the fasteners can be removed. Set the covers aside, and save the fasteners for re-use. 2. Place the PTM on a suitable work surface with the motor at the left and pointed upward. Open the door of the car to gain access to the captive screws (Figure 3-9). Do not remove the door. Loosen the captive screws until they are disengaged from the belt block. 3. Grasp the closed side of the car and pull it toward you so as to compress the springs underneath the car. When the wheels on the closed side are clear of the track, lift the car from the track and set it aside. 4. Locate the tensioner ramp in the base section (Figure 3-5). Compress the spring until the hole in the tensioner ramp is aligned with a hole in the base section. Insert a 0.050 in Allen wrench or a paper clip through the holes. This sets the idler pulley for zero belt tension. 5. Loosen the four screws on the belt block far enough to pull the ends of the belt free of the block (Figure 3-8). Pull the belt free of the motor drive assembly and the base section and set the belt aside.
-
 1
1 -
2
-
3
-
4
-
5
-
6
-
7
-
8
-
9
-
10
-
11
-
12
-
13
-
14
-
15
-
16
-
17
-
18
-
19
-
20
-
21
-
22
-
23
-
24
-
25
-
26
-
27
-
28
-
29
-
30
-
31
-
32
-
33
-
34
-
35
-
36
-
37
-
38
-
39
-
40
-
41
-
42
-
43
-
44
-
45
-
46
-
47
-
48
-
49
-
50
-
51
-
52
-
53
-
54
-
55
-
56
-
57
-
58
-
59
-
60
-
61
-
62
-
63
-
64
-
65
-
66
-
67
-
68
-
69
-
70
-
71
-
72
-
73
-
74
-
75
-
76
-
77
-
78
-
79
-
80
-
81
-
82
-
83
-
84
-
85
-
86
-
87
-
88
-
89
-
90
-
 91
91 -
 92
92 -
 93
93 -
 94
94 -
 95
95 -
 96
96 -
 97
97 -
 98
98 -
 99
99 -
 100
100 -
 101
101 -
102
-
103
-
104
-
105
-
106
-
107
-
108
-
109
-
110
-
111
-
112
-
113
-
114
-
115
-
116
-
117
-
118
-
119
-
120
-
121
-
122
-
123
-
124
-
125
-
126
-
127
-
128
-
129
-
130
-
131
-
132
-
133
-
134
-
135
-
136
-
137
-
138
-
139
-
140
-
141
-
142
-
143
-
144
-
145
-
146
-
147
-
148
-
149
-
150
-
151
-
152
-
153
-
154
-
155
-
156
-
157
-
158
-
159
-
160
-
161
-
162
-
163
-
164
-
165
-
166
-
167
-
168
-
169
-
170
-
171
-
172
-
173
-
174
-
175
-
176
-
177
-
178
-
179
-
180
-
181
-
182
-
183
-
184
-
185
-
186
-
187
-
188
-
189
-
190
-
191
-
192
-
193
-
194
-
195
-
196
-
197
-
198
-
199
-
200
-
201
-
202
-
203
-
204
-
205
-
206
-
207
-
208
-
209
-
210
-
211
-
212
-
213
 |
 |
