HP Surestore E Tape Library Model 6/60 HP SureStore E Tape Library Models 2/20 - Page 174
Removing and Replacing Drive Modules, Drive Replacement Overview, HP Authorized Personnel
 |
View all HP Surestore E Tape Library Model 6/60 manuals
Add to My Manuals
Save this manual to your list of manuals |
Page 174 highlights
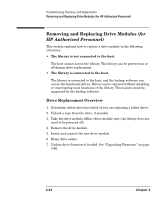
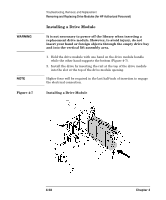
Troubleshooting, Removal, and Replacement Removing and Replacing Drive Modules (for HP Authorized Personnel) Removing and Replacing Drive Modules (for HP Authorized Personnel) This section explains how to replace a drive module in the following situations: • The library is not connected to the host. The host cannot access the library. The library can be powered on or off during drive replacement. • The library is connected to the host. The library is connected to the host, and the backup software can access the functional drives. Drives can be replaced without disabling or interrupting most functions of the library. This feature must be supported by the backup software. Drive Replacement Overview 1. Determine which drive has failed (if you are replacing a failed drive). 2. Unload a tape from the drive, if possible. 3. Take the drive module offline (drive module only; the library does not need to be powered off). 4. Remove the drive module. 5. Insert and connect the new drive module. 6. Bring drive online. 7. Update drive firmware if needed. See "Upgrading Firmware" on page 4-60. 4-54 Chapter 4
-
 1
1 -
2
-
3
-
4
-
5
-
6
-
7
-
8
-
9
-
10
-
11
-
12
-
13
-
14
-
15
-
16
-
17
-
18
-
19
-
20
-
21
-
22
-
23
-
24
-
25
-
26
-
27
-
28
-
29
-
30
-
31
-
32
-
33
-
34
-
35
-
36
-
37
-
38
-
39
-
40
-
41
-
42
-
43
-
44
-
45
-
46
-
47
-
48
-
49
-
50
-
51
-
52
-
53
-
54
-
55
-
56
-
57
-
58
-
59
-
60
-
61
-
62
-
63
-
64
-
65
-
66
-
67
-
68
-
69
-
70
-
71
-
72
-
73
-
74
-
75
-
76
-
77
-
78
-
79
-
80
-
81
-
82
-
83
-
84
-
85
-
86
-
87
-
88
-
89
-
90
-
91
-
92
-
93
-
94
-
95
-
96
-
97
-
98
-
99
-
100
-
101
-
102
-
103
-
104
-
105
-
106
-
107
-
108
-
109
-
110
-
111
-
112
-
113
-
114
-
115
-
116
-
117
-
118
-
119
-
120
-
121
-
122
-
123
-
124
-
125
-
126
-
127
-
128
-
129
-
130
-
131
-
132
-
133
-
134
-
135
-
136
-
137
-
138
-
139
-
140
-
141
-
142
-
143
-
144
-
145
-
146
-
147
-
148
-
149
-
150
-
151
-
152
-
153
-
154
-
155
-
156
-
157
-
158
-
159
-
160
-
161
-
162
-
163
-
164
-
165
-
166
-
167
-
168
-
 169
169 -
 170
170 -
 171
171 -
 172
172 -
 173
173 -
 174
174 -
 175
175 -
 176
176 -
 177
177 -
 178
178 -
 179
179 -
180
-
181
-
182
-
183
-
184
-
185
-
186
-
187
-
188
-
189
-
190
-
191
-
192
-
193
-
194
-
195
-
196
-
197
-
198
-
199
-
200
-
201
-
202
-
203
-
204
-
205
-
206
-
207
-
208
-
209
-
210
-
211
-
212
-
213
-
214
-
215
-
216
-
217
-
218
-
219
-
220
-
221
-
222
-
223
-
224
-
225
-
226
-
227
-
228
-
229
-
230
-
231
-
232
-
233
-
234
-
235
-
236
-
237
-
238
-
239
-
240
-
241
-
242
-
243
-
244
-
245
-
246
-
247
-
248
-
249
-
250
-
251
-
252
-
253
-
254
-
255
-
256
 |
 |