HP T610 HP Designjet T610 Series - User's Guide - Page 146
Some objects are missing from the printed image, A PDF file is clipped or objects are missing,
 |
UPC - 883585044344
View all HP T610 manuals
Add to My Manuals
Save this manual to your list of manuals |
Page 146 highlights
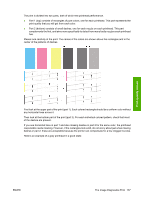
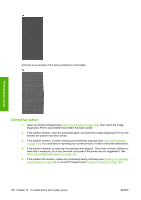
Print-quality issues from these applications, the bottom of the image will be clipped. In this case, the only way to print the whole image is to reduce the resolution so that the whole image requires fewer than 32,768 pixels. The PCL and HP-GL/2 drivers for Windows include an option called 16-bit App. Compatibility, which can be used to reduce the resolution of such images automatically. You can find this option in the Advanced tab, under Document Options > Printer Features. Some objects are missing from the printed image Large quantities of data may be necessary to print a high-quality large-format print job, and in some specific workflows there may be issues that can lead to some objects missing from the output. Here are some recommendations for the use of the PCL or HP-GL/2 drivers for Windows in these cases. ● In the Advanced tab, select Document options, Printer features, and set Send job as bitmap to Enabled (HP-GL/2 driver only). ● In the Advanced tab, select Document options, Printer features, and set 16-bit App. Compatibility to Enabled. ● In the Advanced tab, select Document options, Printer features, and set Max. Application resolution to 300. The above settings are mentioned for troubleshooting purposes and may adversely affect the final output quality or the time necessary to generate the print job. Therefore, they should be restored to their default values if they do not help to solve the problem. If you are working under Mac OS, the above settings are not available. Instead, you could try reducing the resolution of bitmap images in your application software. A PDF file is clipped or objects are missing In older versions of Adobe Acrobat or Adobe Reader, large PDF files could be clipped or lose some objects when printing with the HP-GL/2 driver at high resolution. In order to avoid such problems, upgrade your Adobe Acrobat or Adobe Reader software to the latest version. From version 7 onwards, these problems should be solved. The Image Diagnostics Print The Image Diagnostics Print consists of patterns designed to highlight printhead reliability problems. It helps you to check the performance of the printheads that are currently installed in your printer, and whether any printhead suffers from clogging or other problems. To print the Image Diagnostics Print: 1. Use the same paper type that you were using when you detected a problem. 2. Use the View loaded paper key on the front panel to check that the selected paper type is the same as the paper type loaded into the printer. 3. At the printer's front panel, select the Image Quality Maintenance menu icon diagnostic image. , then Print It takes about two minutes to print the Image Diagnostics Print. 136 Chapter 13 Troubleshooting print-quality issues ENWW
-
 1
1 -
2
-
3
-
4
-
5
-
6
-
7
-
8
-
9
-
10
-
11
-
12
-
13
-
14
-
15
-
16
-
17
-
18
-
19
-
20
-
21
-
22
-
23
-
24
-
25
-
26
-
27
-
28
-
29
-
30
-
31
-
32
-
33
-
34
-
35
-
36
-
37
-
38
-
39
-
40
-
41
-
42
-
43
-
44
-
45
-
46
-
47
-
48
-
49
-
50
-
51
-
52
-
53
-
54
-
55
-
56
-
57
-
58
-
59
-
60
-
61
-
62
-
63
-
64
-
65
-
66
-
67
-
68
-
69
-
70
-
71
-
72
-
73
-
74
-
75
-
76
-
77
-
78
-
79
-
80
-
81
-
82
-
83
-
84
-
85
-
86
-
87
-
88
-
89
-
90
-
91
-
92
-
93
-
94
-
95
-
96
-
97
-
98
-
99
-
100
-
101
-
102
-
103
-
104
-
105
-
106
-
107
-
108
-
109
-
110
-
111
-
112
-
113
-
114
-
115
-
116
-
117
-
118
-
119
-
120
-
121
-
122
-
123
-
124
-
125
-
126
-
127
-
128
-
129
-
130
-
131
-
132
-
133
-
134
-
135
-
136
-
137
-
138
-
139
-
140
-
 141
141 -
 142
142 -
 143
143 -
 144
144 -
 145
145 -
 146
146 -
 147
147 -
 148
148 -
 149
149 -
 150
150 -
 151
151 -
152
-
153
-
154
-
155
-
156
-
157
-
158
-
159
-
160
-
161
-
162
-
163
-
164
-
165
-
166
-
167
-
168
-
169
-
170
-
171
-
172
-
173
-
174
-
175
-
176
-
177
-
178
-
179
-
180
-
181
 |
 |