HP T610 HP Designjet T610 Series - User's Guide - Page 59
Custom paper sizes, Select margins options, Print with shortcuts - image
 |
UPC - 883585044344
View all HP T610 manuals
Add to My Manuals
Save this manual to your list of manuals |
Page 59 highlights
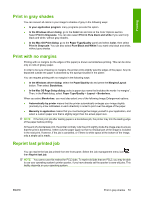
Printing Custom paper sizes To choose a non-standard paper size not shown in the list of paper sizes: ● Under Windows, there are two different ways: ◦ In the driver dialog, select Custom from the paper size list in the Paper/Quality tab, then specify the paper dimensions, then click Save to save your new paper size. To see your new custom size in the list of custom sizes, you need to exit the printer properties, then reenter them (and use the More button if necessary). ◦ From the Start menu, select Printers and Faxes, then from the File menu select Server Properties. In the Forms tab, check the Create a new form box, specify the name and dimensions of the new form, then click Save Form. ● Under Mac OS X 10.4: select Paper Size > Manage Custom Sizes in the Page Setup dialog. ● Under Mac OS X 10.2 or 10.3: select Settings > Custom Paper Size from the Page Setup dialog. Select margins options By default, the printer leaves a 5 mm margin between the edges of your image and the edges of the paper (increased to 17 mm at the foot of cut-sheet paper). However, you can change this behavior in several ways. ● In the Windows driver dialog: select the Paper/Quality tab and then the Margins/Layout button. ● In the Mac OS Print dialog: select the Paper Type/Quality panel and then Layout. You will then see at least some of the following options. NOTE: Under Mac OS, the available margins options depend on the paper size selected in the Page Setup dialog. For instance, for borderless printing you must select a paper size name that includes the words "no margins". ● Standard. Your image will be printed on a page of the size you have selected, with a narrow margin between the edges of the image and the edges of the paper. The image should be small enough to fit between the margins. ● Oversize. Your image will be printed on a page slightly larger than the size you have selected. If you cut off the margins, you will be left with a page of the size you selected, with no margins remaining between your image and the edges of the paper. ● Clip Contents By Margins. Your image will be printed on a page of the size you have selected, with a narrow margin between the edges of the image and the edges of the paper. In this case, if the image is the same size as the page, the printer assumes that the extreme edges of the image are either white or unimportant, and do not need to be printed. This may be useful when your image already contains a border. ● Borderless. Your image will be printed on a page of the size you have selected, with no margins. The image is slightly enlarged to ensure that no margin is left between the edges of the image and the edges of the paper. If you select Automatically by Printer, this enlargement is done automatically. If you select Manually in Application, you must select a custom page size slightly larger than the page on which you intend to print. See also Print with no margins on page 53. Print with shortcuts The printer driver provides many options that can be set to different values when printing a particular job. A printing shortcut stores the values of all these options that are appropriate for a particular kind of ENWW Select margins options 49
-
 1
1 -
2
-
3
-
4
-
5
-
6
-
7
-
8
-
9
-
10
-
11
-
12
-
13
-
14
-
15
-
16
-
17
-
18
-
19
-
20
-
21
-
22
-
23
-
24
-
25
-
26
-
27
-
28
-
29
-
30
-
31
-
32
-
33
-
34
-
35
-
36
-
37
-
38
-
39
-
40
-
41
-
42
-
43
-
44
-
45
-
46
-
47
-
48
-
49
-
50
-
51
-
52
-
53
-
 54
54 -
 55
55 -
 56
56 -
 57
57 -
 58
58 -
 59
59 -
 60
60 -
 61
61 -
 62
62 -
 63
63 -
 64
64 -
65
-
66
-
67
-
68
-
69
-
70
-
71
-
72
-
73
-
74
-
75
-
76
-
77
-
78
-
79
-
80
-
81
-
82
-
83
-
84
-
85
-
86
-
87
-
88
-
89
-
90
-
91
-
92
-
93
-
94
-
95
-
96
-
97
-
98
-
99
-
100
-
101
-
102
-
103
-
104
-
105
-
106
-
107
-
108
-
109
-
110
-
111
-
112
-
113
-
114
-
115
-
116
-
117
-
118
-
119
-
120
-
121
-
122
-
123
-
124
-
125
-
126
-
127
-
128
-
129
-
130
-
131
-
132
-
133
-
134
-
135
-
136
-
137
-
138
-
139
-
140
-
141
-
142
-
143
-
144
-
145
-
146
-
147
-
148
-
149
-
150
-
151
-
152
-
153
-
154
-
155
-
156
-
157
-
158
-
159
-
160
-
161
-
162
-
163
-
164
-
165
-
166
-
167
-
168
-
169
-
170
-
171
-
172
-
173
-
174
-
175
-
176
-
177
-
178
-
179
-
180
-
181
 |
 |
